Most of the Windows 10 applications have the access to the Internet for several reasons. But we might not be comfortable with every app accessing the internet as they like. Some may show you popup ads, and some other apps will use the bandwidth unwantedly. Also, you might want to block your kids from using the internet for a specific program.
This guide helps you avoid unwanted internet usage by apps, and how to block a program from accessing the internet in Windows 10.
Content
- Block a Program in Windows Firewall
- Use TinyWall to Block Programs from Accessing the Internet
- Blocking Programs from the Internet Using NetLimiter
Block a Program in Windows Firewall
Windows Firewall controls the internet access on your Windows 10 PC. It defines which programs and services can have inbound or outbound internet accesses. You can create a Firewall rule to cut off internet access for the desired program. See how to block a program in Firewall on Windows 10.
- Type in “Firewall” in the Search box within the Windows 10 Taskbar. Click on the “Windows Defender Firewall with Advanced Security” option.
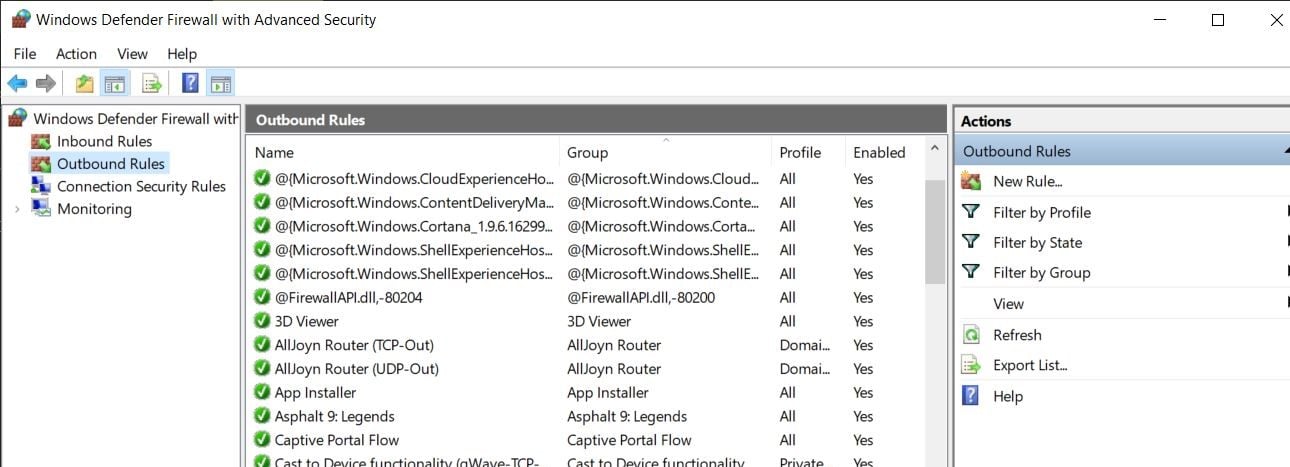
- Select the “Outbound Rules” option in the Navigation Pane located on the far left of the window. You can view the set of existing outbound firewall rules for different programs in the middle pane.
- Within the “Actions” section on the top right corner, click on “New Rule.”
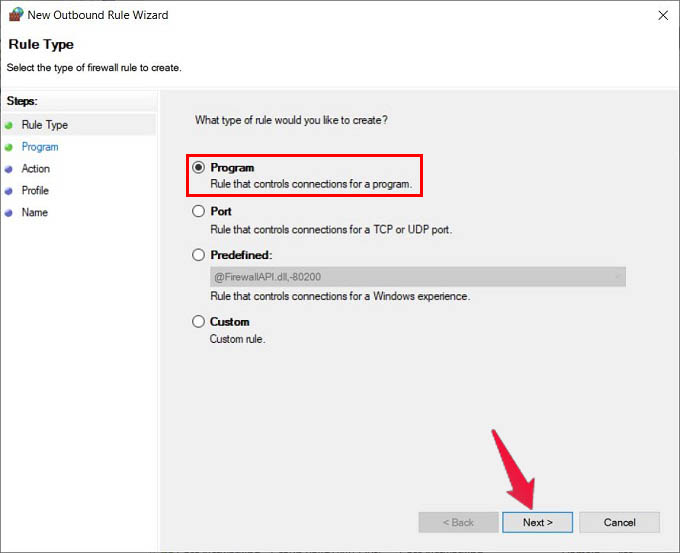
- The “New Outbound Rule Wizard” pops up. Ensure that the “Program” option is selected. Then click on the “Next” button.
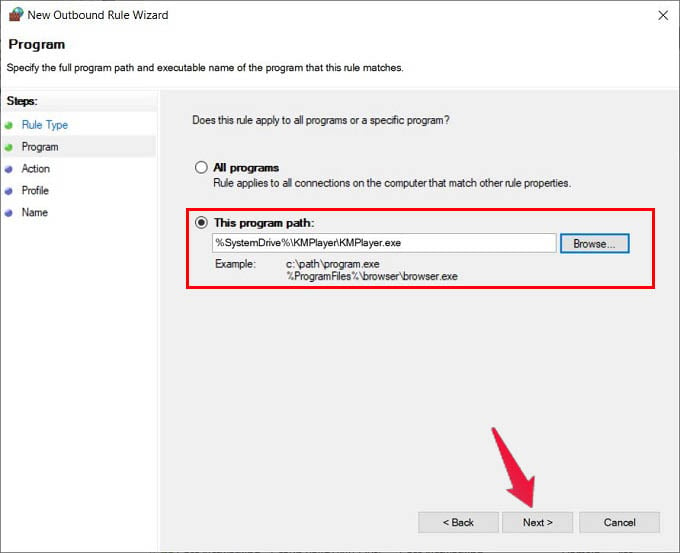
- Now, in the Program screen, select “This Program Path” and Browse the program’s path whose internet connectivity you wish to block.
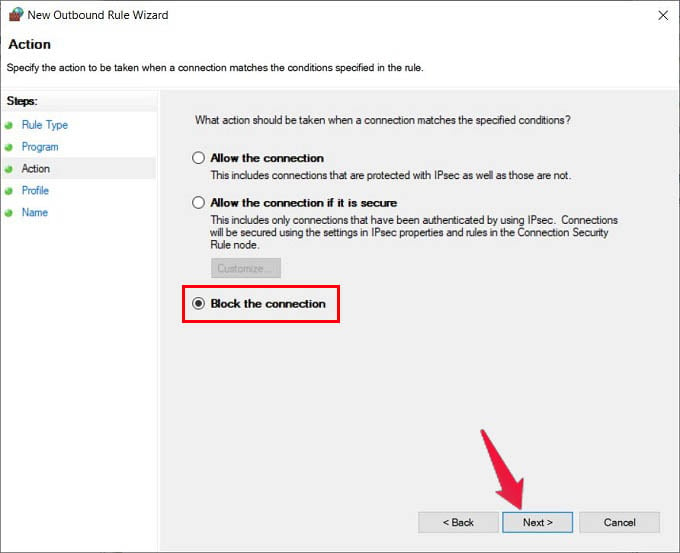
- Then select the “Block the connection” option in the Action screen and click on the “Next” button.
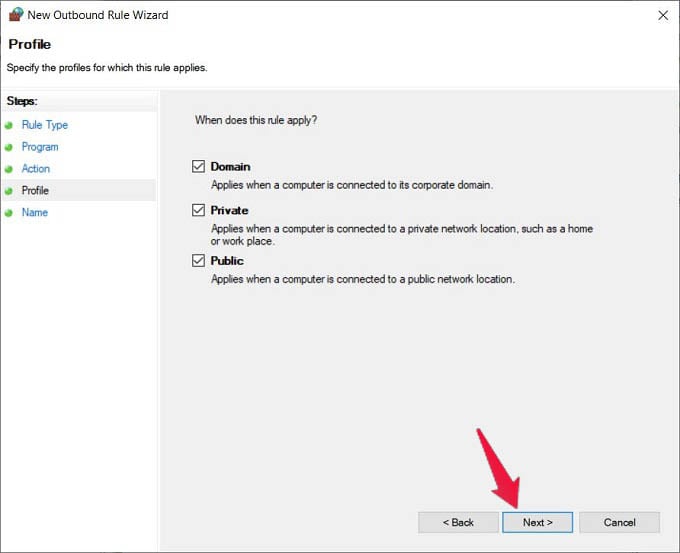
- In the “Profile” screen, you can select where this particular Firewall rule will apply.
- As the final step, give it an appropriate name to quickly identify the rule later on. E.g., suppose you want to block the internet access for KMPlayer Application, you could give the name “KMPlayer block.”
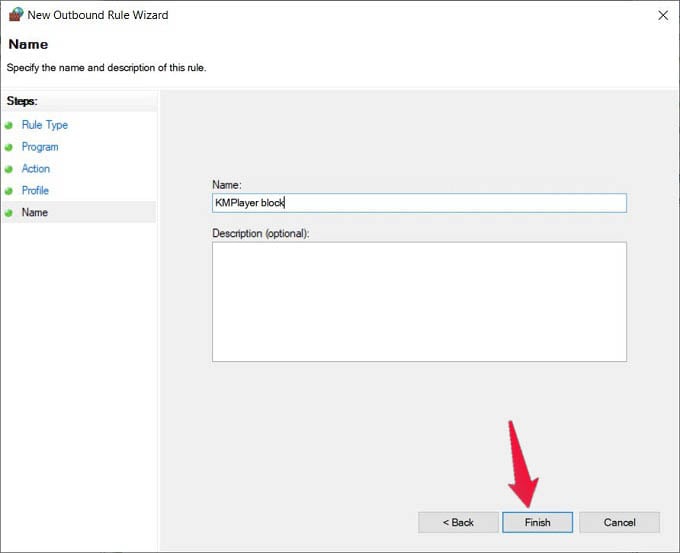
Click on “Finish” and you now blocked a program in the firewall using a rule, blocking the program from accessing the internet. To test if it worked as expected, try running the selected program with the Internet in the connected state.
In case you want to disable the Firewall Rule at a later time, go back to the “Windows Defender Firewall with Advanced Security” page. Then, select the required Outbound rule in the middle pane, right-click, and select “Disable Rule.”
Apart from blocking programs from internet access on Windows using the Windows Firewall tool, there are certain third-party apps that let you do the same.
Related: Windows 10 Defender Security Center Features to Protect PC
Use TinyWall to Block Programs from Accessing the Internet
TinyWall is a lightweight firewall controller software for Windows users. We are using the TinyWall here to block programs from accessing the internet in Windows 10.
- Install “TinyWall” lightweight Firewall application on your PC.
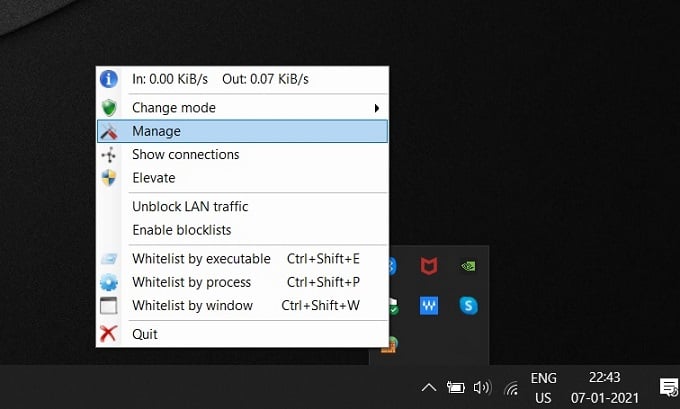
- Once installation completes, TinyWall can be located in the Taskbar icon tray. Click on the icon and select the “Manage” option.
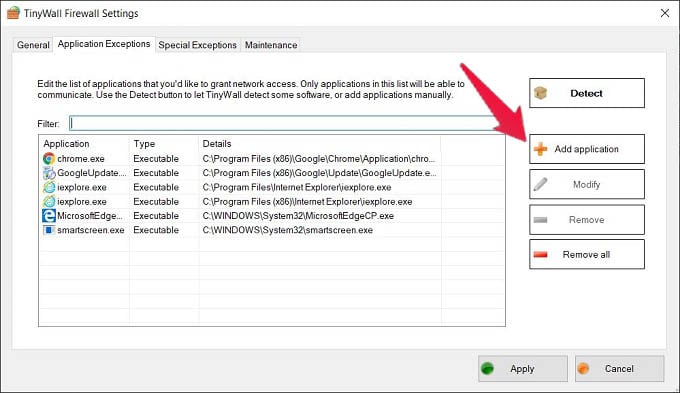
- This opens up the TinyWall Firewall settings window. Select the “Application Exceptions” tab and click on the “Add Application” button located on the screen’s right side.
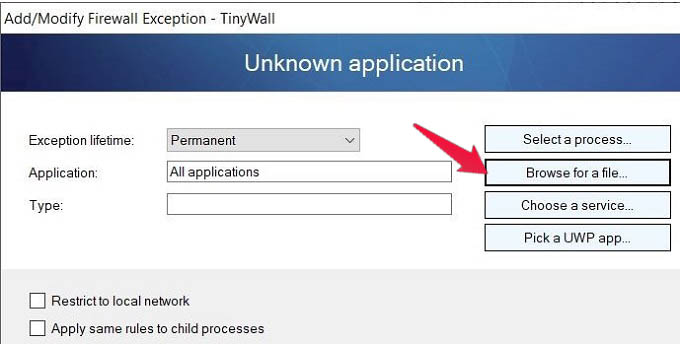
- Then, in the Add / Modify Firewall Exception window, you can choose the duration for the exception rule applied in the “Exception lifetime” field (E.g., Permanent, 5 minutes, 30 minutes, etc.). Click on “Browse for a file.” Select the Application executable file you wish to block the Internet connection.
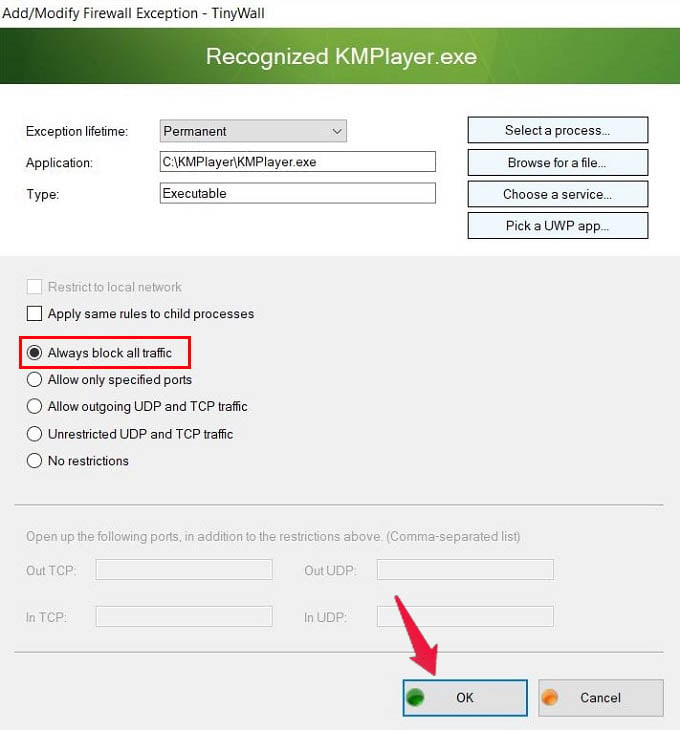
- Click on the “Always block all traffic” button below and click on “Ok.”
- In the “Application Exceptions” tab, click on the “Apply” button at the bottom. The process is complete.
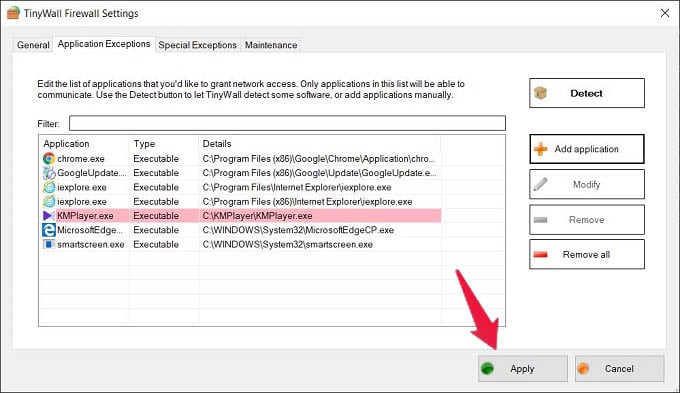 In case you would like to Unblock the selected program from accessing the internet, you can always go back to the “Application Exceptions” tab, select the Application and click on the “Remove” button to remove it from the exception list, and click on the “Apply” button.
If the particular app is used to show you unwanted ads, the program will no longer show you ads. You can thus block any program from accessing the internet on Windows PC using the TinyWall program.
Related: 12 Best Software to Monitor Internet Usage on Windows 10
Blocking Programs from the Internet Using NetLimiter
NetLimiter is another internet blocking app for Windows 10 users. The NetLimiter app lets you block any Windows 10 program from accessing the internet ever again. See how.
- Install NetLimiter on your System.
- Open the Application you wish to block Internet access.
- Once installed, then run the Application.
- Select the “Application List” tab. You can spot the Application you want to block in the middle pane (E.g., KMPlayer). Click on the required application name.
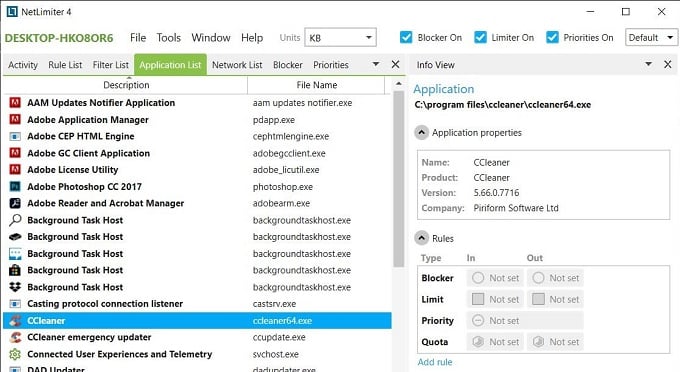
- On the right side of the window, you will find the “Rules” segment under the “Info View” section. Within it, you will find the “In” and “Out” options as Not Set for the “Blocker” type. Click on “Not Set” below the “In” option and select “Deny.”
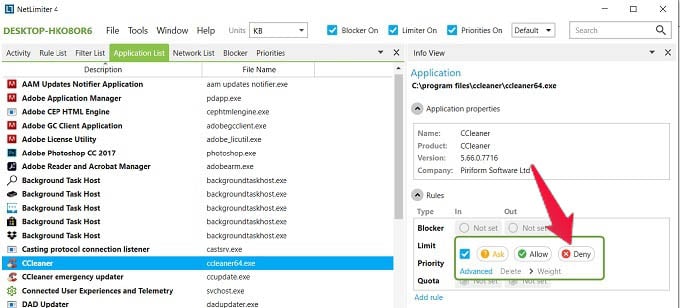
- Similarly, follow the same step for the “Out” option. This action will block and incoming and outgoing internet connectivity for the specific Application.
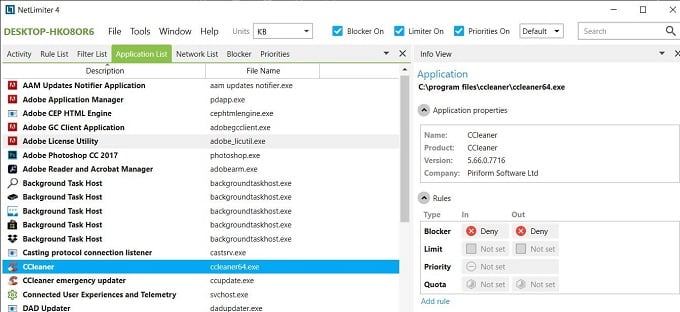 There you go. You now blocked the program from accessing the internet on your Windows 10 PC using the NetLimiter app. In case you want to unblock at a later point, you can select the “Allow” option. This action will restore the connectivity for the Application.
NetLimiter also has additional functionalities such as monitoring Internet Traffic, auditing the history of application connectivity, and statistics regarding data flow.
The background internet access by various applications on Windows 10 can hog your daily limit, mainly if you use mobile data for connectivity. It is crucial to block programs from accessing Internet access on Windows 10, that you do not require daily.
