
Mostly, the only issue iPhone users found with the iPhone selfie camera is that it mirrors all the images. When you take a selfie on the iPhone, you get the mirror image of it and not the actual picture. To get the actual version, you had to flip the picture manually by editing. Well, not anymore with the iOS 14 update. You can now actually enable or disable the mirror front camera so that you can avoid getting the mirror picture from the selfie camera on your iPhone.
In this article, we will show you how to mirror images taken with an iPhone selfie camera on iOS 14.
How to Mirror An Image on iPhone with iOS 14
Apple brought tons of feature changes o the iOS 14 for the iPhone users. The camera app got some big changes with the aim of increasing usability. That includes features from minor changes with options to the UI change in the camera app.
Option to get mirror images from the selfie camera is one of these features, which most iPhone users have been waiting for a long. If you have been the type of person who used to flip the selfie images manually before sharing, this is for you. You no longer need to edit each selfie pictures to avoid mirror image. You can now switch the mirror image option for the selfie camera on your iPhone.
Here is how to mirror an image on iPhone with iOS 14.
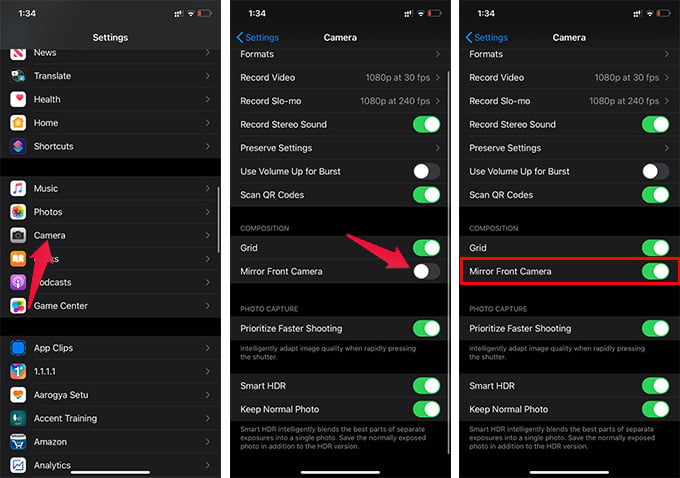
- Make sure your iPhone has iOS 14 or newer.
- Open Settings on the iPhone.
- Go to the Camera.
- Toggle on and enable “Mirror Front Camera.”
You can now go to the Camera app on your iPhone and take selfies. You will get the mirror picture for the images taken using the front-facing selfie camera on iPhone.
Get Mirror Picture from Selfie Camera on iOS 13 or Earlier
Apple included the option to mirror the pictures taken on the iPhone camera with the latest iOS 14 only. If your iPhone is running on iOS 13 or older, you cannot enable the mirror image for selfies by default. All you can do is to flip the images manually from the photo app.
Thus, you need to edit and flip each image to the mirror version in order to get a “normal” selfie on your iPhone. Here is how to flip a photo on iPhone with iOS 13 or earlier.

- Open Photos app on your iPhone.
- Open the image you want to flip.
- Tap “Edit” on the top right corner.
- Go to the “Crop” tab on the bottom.
- Tap the flip icon on the top left corner.
- Tap “Done” to save the mirror image of your selfie.
In case you do not want to manually edit every selfie picture to make a mirror version, you can make use of third-party apps. There are tons of camera apps and selfie apps available on App Store to take mirrored selfies using your iPhone.
Use Third-Party Apps to Get Mirror Picture
TO flip a selfie image on older iOS versions, you should perhaps edit it manually or get a third-party app to get it done. The non-mirrored selfies on the iPhone are generally seen with the iPhone’s default camera. However, most third-party camera apps capture selfie images as mirror images.
There are plenty of third-party apps available for iPhone which can capture mirror selfies. Some of them are Camera360, Youcam, CamCam, etc. and there are even more selfie apps available for the iPhone.
Would you love to get the mirrored selfies or normal images from the selfie camera of your iPhone? Share your thoughts as comments below.
I’d also add CooMeet to this list. It’s a good random chat for communicating with strangers, meeting new people and spending time in a pleasant company. Quality and safe platform that doesn’t require registration.