One of the many great features of Windows 7 that we still use today is taskbar window grouping. It puts all separate windows of an app into one group, thus reducing the clutter on the taskbar. But on Windows 11, you cannot ungroup taskbar icons, at least not from the settings.
In this guide, we will show you how to ungroup and separate multiple window icons from the taskbar on Windows 11 PC.
Content
Ungroup Taskbar Icons on Windows 11
Before there were no taskbar grouping windows together in Windows, it would show every open with a separate icon and label. You may remember how the taskbar used to behave on Windows XP. Since Windows 7, the taskbar always groups windows by default.
However, there had always been the option to ungroup taskbar icons if you wanted it the old way. That choice is unfortunately not available on Windows 11.
Since there is no option in Windows 11 to ungroup taskbar icons, we will need to rely on third-party solutions. There are a couple of options, and among them, the Explorer Patcher is completely free to use. Let’s see how to use it.

- Go to the GitHub releases page for Explorer Patcher.
- Click on ep_setup.exe to download Explorer Patcher.
- Double-click on the downloaded file (ep_setup.exe) to run it.
- If you see a blue box warning, just click Run anyway.


Explorer Patcher will immediately restart Windows explorer and your taskbar will be replaced. It may take a few minutes before it starts working as expected. But you will essentially now have a Windows 10 taskbar. By default, Explorer Patcher will ungroup taskbar icons, so you don’t have to do much else.

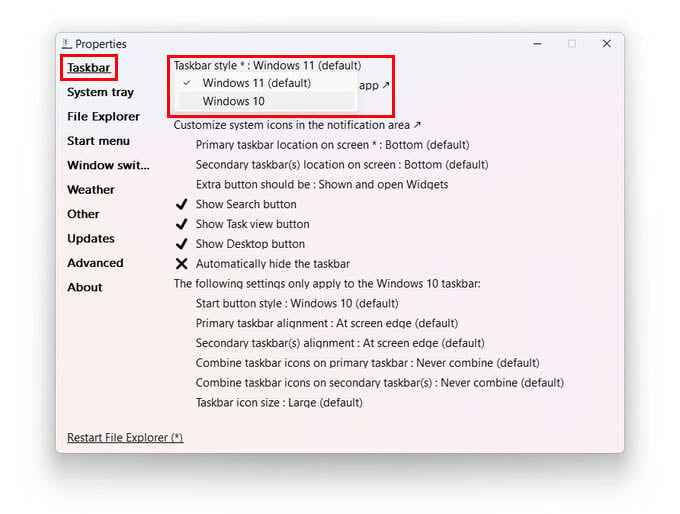
In case it does not, you can force it as well. Right-click on the taskbar and select Properties. Click on Taskbar style and select Windows 10. Explorer Patcher is still in early development, so you can expect a few bugs and crashes. That may not necessarily happen for you, though. There are plenty of other taskbar customization options you can explore in the Explorer Patcher Properties.
Apart from the customization options on the taskbar, the Explorer Patcher can also restore the classic right-click menu in from Windows 10 taskbar onto the Windows 11 PC.
Related: How to Open Task Manager in Windows 11: Find Apps Slowing Down Your PC
More Third-Party Tools to Ungroup Taskbar Icons
As mentioned before, there are many other third-party options as well. Most popular amongst them is StartAllBack. This is the successor to StartIsBack which gained popularity when Microsoft removed the Start button on Windows 8. Since Windows 11 already has a start button, the appeal of StartAllBack is that it restores the old Windows 10 taskbar and start menu.
The app costs $5.29 which might be a dealbreaker for many. But if you really miss your Windows 10 taskbar, StartAllBack is definitely worth it, with over 22 options for customization.
Download: StartAllBack

- Download StartAllBack from the link above.
- Double-click on the downloaded setup file and go through the installation wizard.
- Once the program is installed, launch it from the start menu.
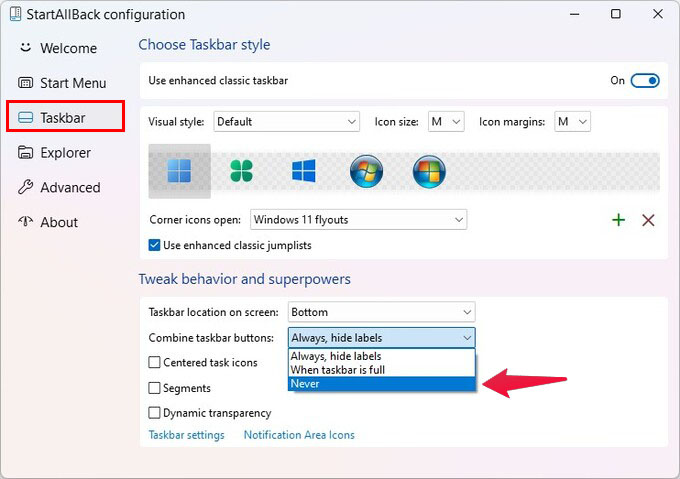
- Select Taskbar from the left column.
- Under Tweak behavior and superpowers, click on the drop-down next to the Combine taskbar buttons:
- Select Never.
Your taskbar will now behave like Windows 10 while looking like Windows 11. This is all you have to do to ungroup taskbar icons in Windows 11. However, StartAllBack is a pretty robust program with a multitude of features that you may find helpful as well. We would encourage you to check out the rest of the settings.
Another paid app worth checking out is Start11 from Stardock. Start11 mostly focuses on replacing the start menu and providing various options to improve the start menu experience. There is a new beta version out, however, which does include the option to ungroup taskbar icons among other features.
Related: How to Remove Weather from Taskbar in Windows 11
FAQ: Ungroup Windows Taskbar Icons
Windows 11 does not have any built-in options to separate taskbar icons. You can, however, use some third-party apps as mentioned above to get desired results.
