
Apple provides the top-lass music streaming service through Apple Music. With an Apple ID and monthly subscription to Apple Music, you can listen to any music right from your iPhone as well as Android smartphones. However, you might have some music collection with your which you would not get to listen to Apple Music. If you were unaware, it is possible to upload your local songs to Apple Music, so you can listen from any devices using the same Apple ID.
Here is how to upload local songs to Apple Music and listen from anywhere.
- How to Add Local Music to Apple Music using iTunes?
- How Do I Transfer Music from DatPiff to Apple Music?
- Enable iCloud Music Library on iTunes?
- Enable iCloud Music Library on iPhone?
How to Add Local Music to Apple Music using iTunes
Using iTunes, it is possible (even quite easy) to add the local songs to the iPhone with some drags and drops. Copying songs to the iPhone will let you access the songs from Apple Music under the local songs. You might as well get the same tracks from Apple Music streaming as well. However, there are many mixtapes and local songs you would never find out.
In such cases when you want to stream your collection of music over Apple Music, Apple got you covered. You can add your local music and mixtapes directly to the Apple Music and stream them from any device that uses the same Apple ID on Apple Music. Here is the complete guide to uploading your local music to the Apple Music using your iCloud account and stream from anywhere.
- Enable iCloud Music Library on the iTunes from your system. If you have not enabled, check out the section on enabling iCloud Music Library on iTunes.
- Open iTunes on your Windows or Mac.
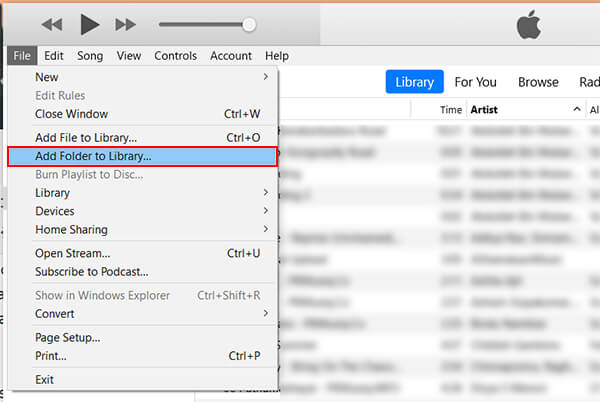
- Click File.
- Click “Add Folder to Library.”
- Choose the directory you want to add the music from your system to the Apple Music.
- Click on “Songs” tab from the left pane.

- Select the songs you want and then right-click.
- Choose Add to Playlist > New Playlist. Provide a name for your new playlist.
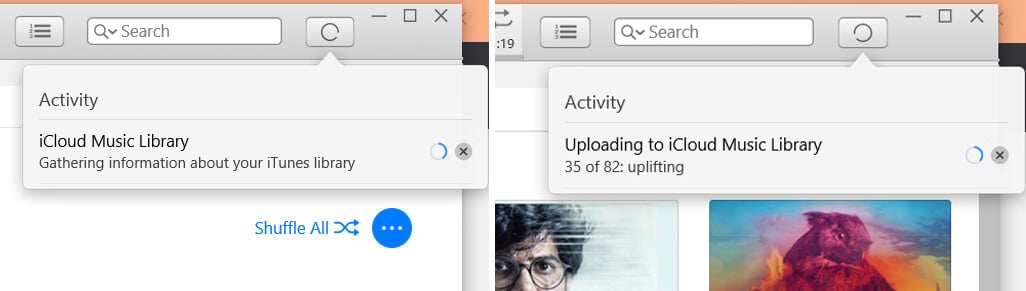
- Wait for the iTunes to sync with the iCloud Music Library. Make sure your computer has a proper internet connection.
- If the Syncing is not done automatically, right-click on the Album/Playlist > Add to iCloud Music Library.
You could only upload local songs to apple music if you already have a subscription plan. You need to subscribe to any of the Apple Music plans to use the iCloud Music Library on iPhone, Android, and other devices.
How Do I Transfer Music from DatPiff to Apple Music
Most of us love to listen to mixtapes, rather than the original soundtracks from streaming platforms. If you have been listening to your collection of Mixtapes from Datpiff, HotNewHipHop, or SoundCloud, you can ave them on your Apple Music as well. Datpiff already allows users to download music on the iPhone, to listen while you are offline. However, without taking that much space from your iPhone, adding them to Apple Music and streaming is a better option.
For that, you can follow similar steps as above. Follow the guide to make it quicker.
- Download the mixtape tracks from Datpiff or any other platform to your PC.
- Copy all of your mixtapes or remixes on to a single folder.
- Open iTunes on your system.
- Click File > Add Folder to Library.
- Select your Mixtape directory from the system.
- Wait for the iTunes to sync all the album and playlist to your iCloud Music Library.
After syncing, you can take the Apple Music on your iPhone or Android device immediately to check for the synced music and mixtapes. Before all these, you must be sure to know that the iCloud Music Library is already enabled for the iTunes and iPhone.
Also Read: How to Play Local Music on Google Home from Windows & Mac?
Enable iCloud Music Library on iTunes
Enabling iCloud Music Library will let you sync your local music with iCloud and then stream the songs over Apple Music. Having this feature enabled on your iTunes will never take up space from your iCloud Drive. Here is how to enable iCloud Music Library on iTunes from your PC or Mac.
- Open the iTunes app on your system.
- Click “Edit.”
- Choose “Preferences.”
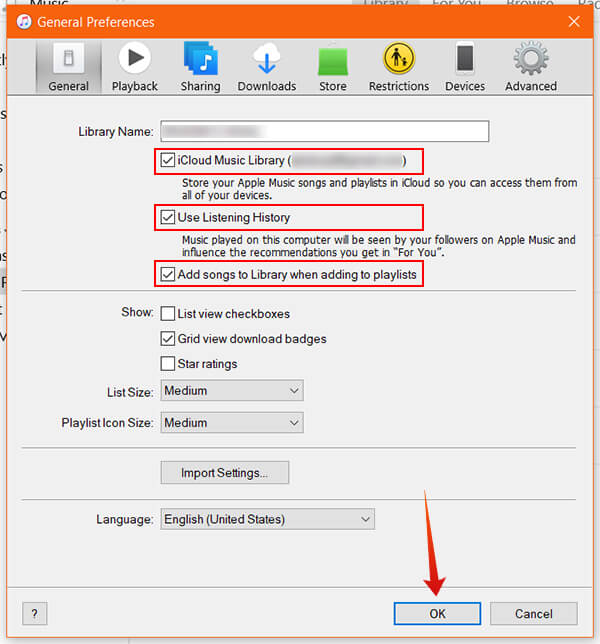
- Under the “General” tab, enable the”iCloud Music Library.”
- If you want to automatically add every song in the iTunes library to your iCloud Music Library, tick the option “Add songs to the library when adding to playlists.”
- Click “OK.”
After enabling the feature, every song you have added to the iTunes Library will get synced with iCloud as well.
Also Read: 8 Best Music Apps for Apple Watch
Enable iCloud Music Library on iPhone
After enabling iCloud Music Library and syncing the music from the iTunes, it is now time to enable the same on your iPhone, iPad or iPod Only after enabling the iCloud Music Library on your iPhone, you will get to find your synced local music and stream using Apple Music app. Here is how.
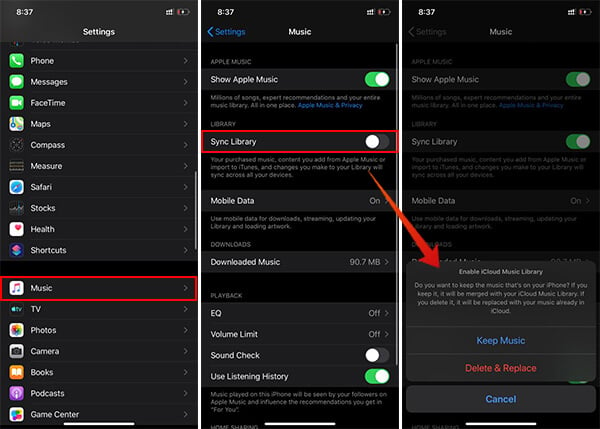
- Launch Settings app on your iPhone.
- Scroll down and tap “Music.”
- Toggle on “Sync Library” and confirm enabling.
After you enable the “Sync Library” feature on your iPhone, ever local music from your device will get synced across devices using the same Apple ID on Apple Music. Apart from iCloud Music Library, you can also make use of Automatic Downloads to get music on your iPhone without streaming.
Once you enable the “Automatic Downloads” feature on your iOS device, every newly added music to the Music Library will be saved on your iPhone for offline listening. You can choose whether to keep the offline copies or just to stream the local music from Apple Music. You can add up to 100,000 songs to your iCloud Music Library and stream through Apple Music.