
We all encounter distracting and counter-productive notifications or alerts on our computer while working on something serious. If you had been using the DND on your iPhone or Android, you must have wished to put the computer on Do Not Disturb. Windows 10 Focus Assist lets you put the PC in DND, and let us see how.
In this guide, we will walk you through Focus Assist on Windows 10.
Content
- Put Computer on DND with Windows 10 Focus Assist
- Schedule Do Not Disturb or Focus Assist on Windows 10
- Customize Priority List for Focus Assist on Windows 10
Put Computer on DND with Windows 10 Focus Assist
So what is Focus Assist on Windows 10? It is simply the DND (Do Not Disturb) mode for Windows 10 devices (both PCs and tablets). It has the same symbol (crescent shape) as in any Android or iOS phone and does the same job as them – muting any unwanted notifications to help you focus on work or sleep.
So, here is quick way to enable Focus Assist on Windows 10 to put your computer on Do Not Disturb.
First of all, launch the Action Centre/Notifications Centre on your PC by clicking the notification icon at the bottom right corner of the taskbar. Alternatively, you can press Windows Key and A at the same time to open Action Centre in Windows 10.
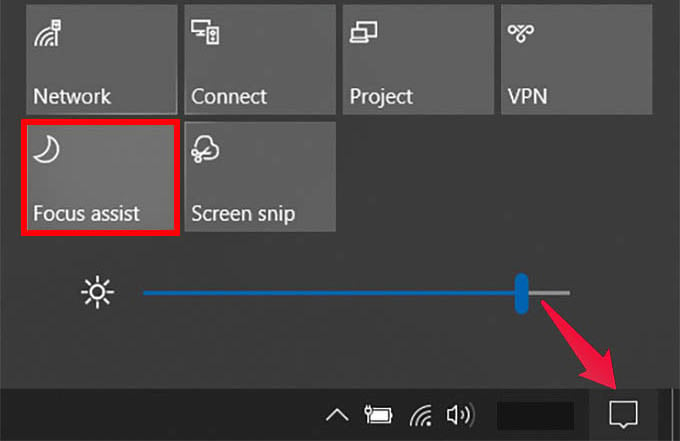
There you will see a bunch of quick settings actions at the bottom. If you see only four, click the “Expand” link above them and find out the icon with a crescent on it and says Focus Assist.
There you are! Just put your computer on Do Not Disturb mode so that no notifications can distract you. However, there are a couple of other modes for Focus Assist on Windows 10. Clicking again on the icon will toggle them, like Priority Only and Alarms Only. Choose any depends on what you want at the moment.
Related: How to Stop an App from Using Cellular Data on Android
Schedule Do Not Disturb or Focus Assist on Windows 10
You might not want to manually toggle on the Focus Assist every other day if you well know your working time. If you are on a 9 to 5 job and want to put the notifications aside, you can set it to work for certain hours. Your Windows 10 PC can schedule Focus Assist or Do Not Disturb for any hours every day.
To do that, open Settings on your Windows 10 PC. Go to Start > Settings or just press Windows Key + I to launch Windows Settings.
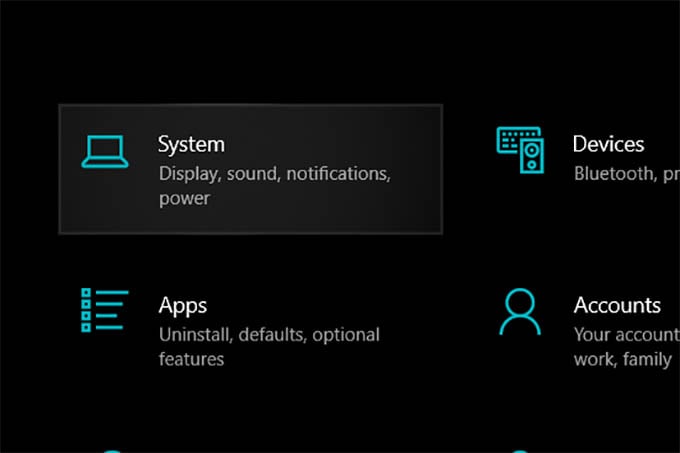
From there, go to System by clicking the first option you see on the window.
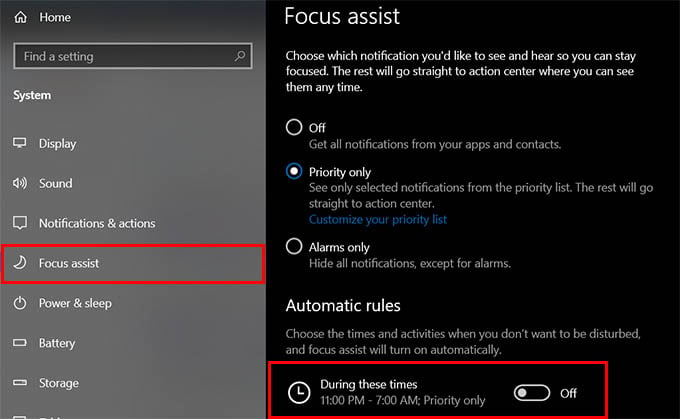
Choose “Focus Assist” from the left panel of the next window and there you will see all available options bounded to it.
Look under Automatic Rules and toggle on the option “During these times.”
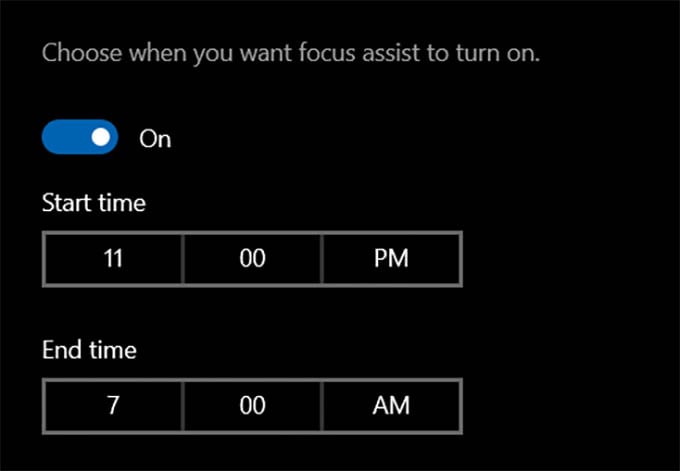
It does not ask you for the timing right away. You need to click the option (During these times) and set the timing, daily repeats, and DND mode from the next screen.
Your Focus Assist schedule will work as you expect and will hide any notifications during your work hours.
Related: How to Find Mouse Pointer in Windows 10 If It Goes Missing
Customize Priority List for Focus Assist on Windows 10
Focus Assist on Windows 10 switches to either Priority Only or Alarms Only, if you remember what you just read above. Among them, Alarms Only definitely hides all your alerts and notifications except the alarms. Turns out, good for those who go to bed expecting an alarm and nothing else before that.
The Priority Only on the other hand will keep certain notifications out of the list and can show you, for example, email notifications even while working. You get to customize the priority list for Focus Assist on Windows 10. By doing that you can get relevant notifications while hiding others. Let us see how to edit your priority list.
First, go to Settings > System > Focus Assist.
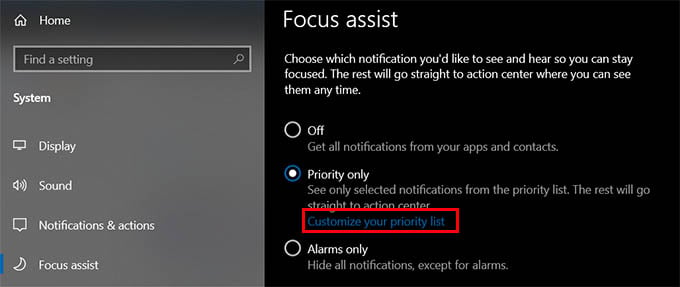
From the window, click on “Customize your priority list” under the option Priority only.
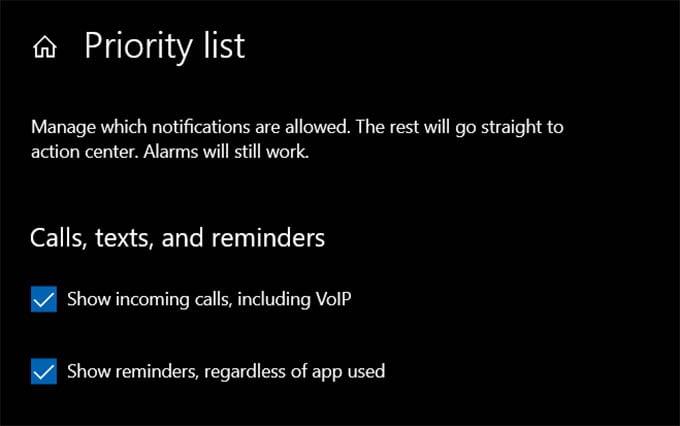
The next screen will guide you to add or remove alerts during DND mode or Focus Assist mode on Windows 10.
You can unmute important calls, avoid contacts, and more. By scrolling down, you could even add or remove apps from which you want to see notifications while working with DND.
Related: How to Update All Drivers in Windows 10 PC Automatically or Manually
It is a really good idea to put your computer on Do Not Disturb while working or sleeping. The Focus Assistant on Windows 10 really helps you get away without any distractions and let you see whatever you have missed while you were busy.