
Windows user accounts were just limited on local PCs before, and now, the power of these user accounts extend to online login, cloud storage, Game Console login etc. Hackers are more interested in vulnerable user account credentials to take over your PC, laptops, to leak the personal information. You should take enough precautions to secure your Microsoft user accounts to avoid any potential damage to your System, data files, game consoles etc.
We listed the best possible solutions to protect your Windows 10 Account and here is the guideline to Windows 10 Account Security and Encryption.
Windows User Account Control (UAC)
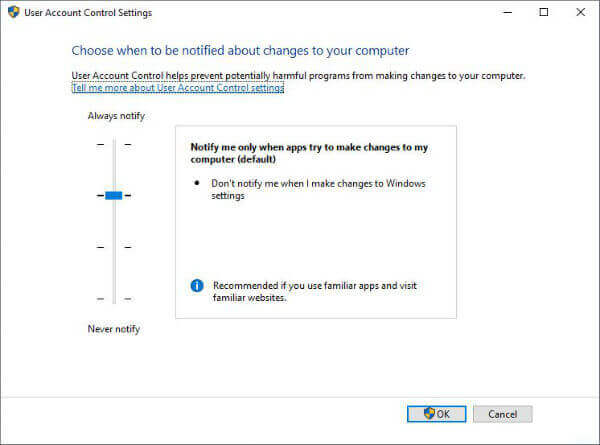
User Account Control is yet another security feature in Windows 10. This feature helps us control the level of alertness of the system whenever any programs try to make changes to your computer. The easy way to access this feature is to type in UAC to the search box in your taskbar.
The long way is to go to the Control panel then select Review your computer’s status under System and Security. Click on the Security option and select the change settings option under the User Account Control section in the drop down menu.
Both ways you will be provided with a window with a vertical slider which lets you change the notification frequency whenever programs try to make changes in the system. The notification level ranges from never to always.
Related: How to Set Windows 10 Auto Login to Skip Login Screen
Windows 10 BitLocker Encryption
Before discussing the BitLocker Encryption feature of Windows lets see what is encryption. In simple terms, encryption is the process of scrambling the data to make it unreadable to anyone other than to the person with authorization. This is what BitLocker Encryption of Windows 10 does.
BitLocker Encryption has some requirements to function. First of all BitLocker Encryption is possible only on Windows 10 Pro and Windows 10 Enterprise versions only. For Windows 10 home devices, device encryption is possible if the supporting hardware available in it. It is better if your computer is provisioned with TPM(Trusted Platform Module) chip. This microchip provides support for advanced security features and is mainly found in OEM devices. If your device does not have TPM chip it is still possible to enable BitLocker Encryption with additional authentication. Let’s look at it later.
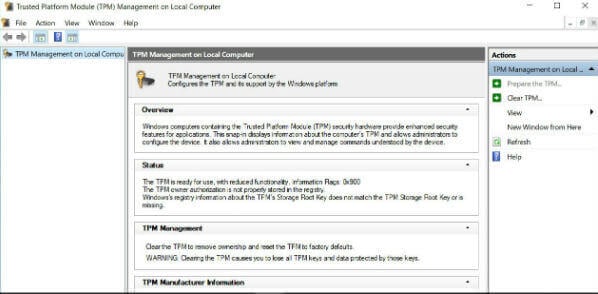
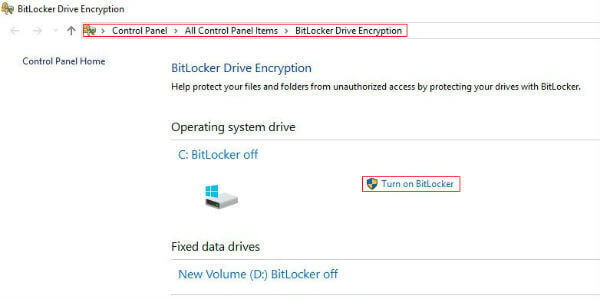
You can verify the availability of TPM by directly launching tpm.msc from Cortana Search bar. If your device is TPM ready, you can enable BitLocker by following the below steps. Head to the Control Panel, from there click on the System and Security option. Now from the list of option that appears select BitLocker Drive Encryption.
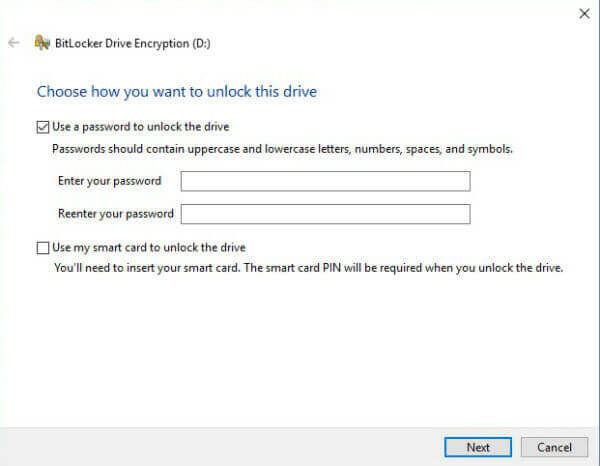
A page displaying drives on your system along with a ‘Turn on BitLocker’ option will be shown. Click on the Turn on BitLocker option. Now BitLocker Drive Encryption wizard will be open. This wizard will guide you through the steps to complete the encryption process. All you have to do is to select the required drive, type in a strong password and click some ‘Next’ buttons. At the end of the process, you need to reboot your computer to changes to take effect.
At the end of the process, you need to reboot your computer to changes to take effect. On reboot, you will be prompted to enter the encryption password that you have created during the encryption process. Now your drives are encrypted and are one level safer.
Windows 10 BitLocker Encryption without TPM
As mentioned in the previous section, you can enable BitLocker Encryption without TPM (Trusted Platform Module) capability. But this needs some authentication setup. Let’s see how to authenticate your device for BitLocker Encryption(without TPM).
Open the Run box on your system(Windows key+R), type gpedit.msc and click OK. From the left panel of the window expand the Administrative Templates, which is under the Computer Configuration. From the drop-down list expand Windows Components, then expand BitLocker Drive Encryption. Now click on the Operating System Drives option from the drop-down list.
A list will be displayed on the right panel of the window. From this list double-click on the ‘Require additional authentication at startup’ option. In the window that appears to select the ‘Enable’ option and also check the ‘Allow BitLocker without a compatible TPM(requires a password or a startup key on a USB flash drive)’ option. Then click OK. Now your system without a TPM chip is enabled for BitLocker Encryption. To setup BitLocker Encryption, follow the steps mentioned in the previous section.
Related: A Guide to Windows 10 Login Security Options to Protect your PC
Windows 10 Find My Device
Most of us are familiar with the concept of Find my device in smartphones. The Find my device in Windows does the same without the make sound, lock and erase data features. Also the pinpointing of your Windows will not be precise as it is in smartphones.
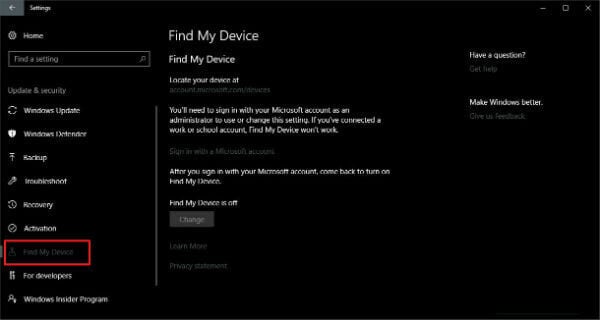
To access this feature go to Settings and select the Update & Security. In the left side panel select the Find my device. If you are signed in to your Microsoft you can turn the Find My Device option by clicking on the Change button.
After you have turned on this feature, you can check your device location by login to your Microsoft account from this URL: account.microsoft.com/devices.
This is the world of ransomware, phishing email, and spam websites. You have to take all necessary steps to secure your computer and online accounts from hackers. Please make sure you are aware of all the measures offered by Microsoft on Windows 10 to protect your account and personal data.
I think that the average Windows user shouldn’t have to use encryption, it’s a bit overkill. But, that’s just my opinion.