We do usually copy and paste many things, including files and texts on our PC. Only the last copied item is available for us to paste, by default. So, we might need to save the copied content on a notepad or elsewhere to access later. Microsoft recently introduced a solution for it. Despite the clipboard history apps on Windows, the new feature is bringing the same through an easier method.
Here is how to get clipboard history on Windows 10, using the new clipboard feature, as well as using the third-party apps.
Windows Clipboard
Microsoft pushed out many useful features and additions with the October 2018 update for the Windows 10 Operating System. Among them, the new option named “Clipboard” seems to be very useful. When you want to save your clipboard history and to access them later, you may need to get some third-party apps. Microsoft puts an end to such a situation with the new feature, and it lets you save or pin the clipboard history for later. You can even access them later using an inbuilt keyboard shortcut, without even running any extra application on the background.
In order to get the feature, you must use the latest version of Microsoft Windows 10. Since the feature is available only for the Windows 10 with the updates from October 2018 or later, make sure you have it. You can also check if your Windows 10 version is 1809 or newer. Check it from Settings > System > About > Version. Here is how to enable the new Clipboard feature on the latest versions of Windows 10.
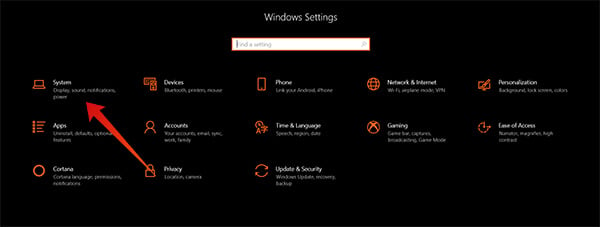
- From your Windows 10 PC/Laptop, open Settings. You can open it from Start > Settings or by pressing Windows Key + I.
- Click on Systems.
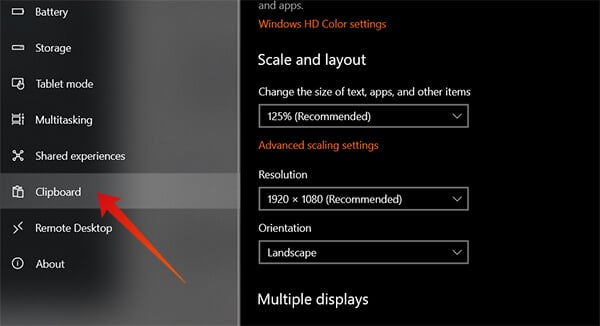
- Scroll down from the left pane and choose Clipboard.
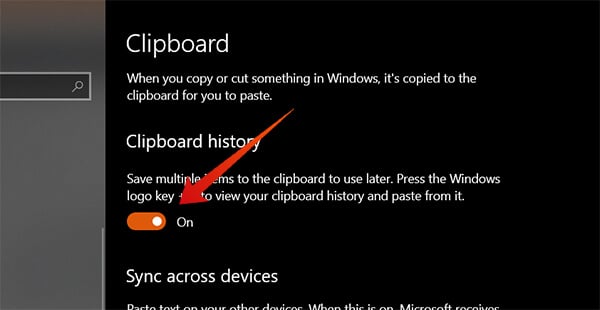
- From the window, find the Clipboard History and toggle it on.
This is it, and you have just enabled the feature which you were looking for a long time. Whenever you copy some text, it will be saved in the clipboard and you could access them later.
Whenever you need to access the copied clipboard items, you simply need to press the key combination Windows Key + V. The clipboard history will be shown in a floating window as a list, and you can use the previously copied item from there. Apart from the history feature on the Clipboard section, Microsoft also added a Clipboard Sync across multiple devices through the cloud. However, the sync feature is currently under testing only.
Note: Once you turn off the PC, all the saved clipboard items will be cleared. Therefore, you can turn on the Clipboard Sync feature from your Windows 10 PC Settings.
Related: How to Enable or Disable Windows 11 Startup Sound
Clipdiary
Moving from the official feature that allows clipboard history access, it is time to discuss a third-party tool for the same. Amongst the dozens of apps that are available for the same purpose, we chose the Clipdiary, which is quite easier to handle and lightweight compared to others. Also, it is entirely a freeware, showing even no ads. It comes with many features that the official one lack.
One of the major features it comes with is that the Clipdiary retains every copied texts and data. Similar to the Windows Clipboard, you can also set a permanent keyboard shortcut combination, for the sake of easiness. Here is how you can get your clipboard history on Windows 10 using the Clipdiary app.
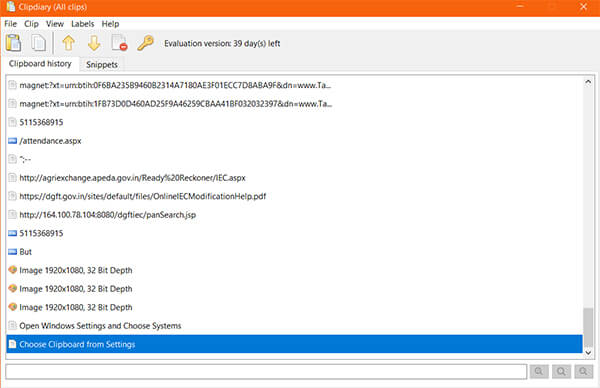
- Download and Install the Clipdiary app on your Windows 10 PC.
- Open the app.
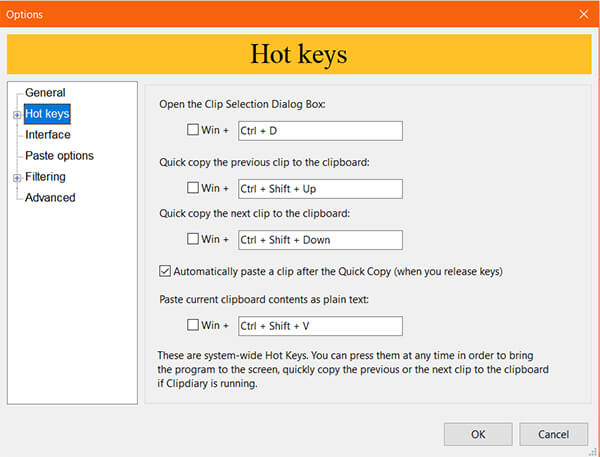
- Choose the keyboard shortcuts or set the default key combinations as your preference.
- Close the app.
If you chose the default options for the Clipdiary app, the keyboard shortcuts to copy, paste and show the clipboard items will be as in below.
- Ctrl + D: Clip selection dialogue box.
- Ctrl + Shift + Up: Quickly copy the previous item to the current clipboard.
- Note: When you do this, the previous item will be present in the clipboard and you can paste it directly using Right Click > Paste or Ctrl + V.
- Ctrl + Shift + Down: This combo will copy the last item or the next item to the system clipboard.
- Ctrl + Shift + V: This is an inbuilt or default “paste as plain text” keyboard shortcut for Windows and most browsers. After all, the text will be pasted without any formatting.
The above keyboard shortcuts will run as long as the Clipdiary app or its daemon runs in the background. So, the app will auto start at the time of booting. In case you are unable to access the clipboard using the key combination after a restart, you can check if the app is allowed to run at the time of start-up. Here is how to check if the app is allowed at start-up.
Also Read: Best Clipboard Manager Windows Tools for Efficiency
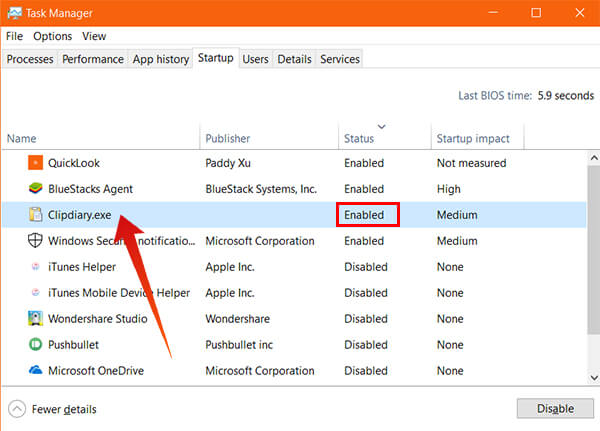
- Open Task Manager from Start.
- Note: You can also use the keyboard shortcut Ctrl + Shift + Esc to open the Task Manager.
- Switch to the tab “Startup.”
- Click the Clipdiary.exe and check the status.
- If it shows “Disabled,” change it to Enable by clicking the button at the bottom or Right Click > Enable.
- Close the Task Manager and restart your system.
From the next bootup onwards, you will be able to start using the Clipdiary.
With the above options, there is no more requirement of opening extra notepad or text editor to save a copied text. The system will retain every copied item and will show you for later access. The new Windows Clipboard might be one of the coolest features on the new Windows 10 update. Besides, there are many other apps available for clipboard access other than Clipdiary. If you do have more productive ways to handle the clipboard items and copy/paste contents seamlessly, do share with us.
