
We all agree on the fact that MacBooks are quite powerful enough to carry out even intense tasks. But when it comes to multitasking with multiple windows side by side, the Mac screen size is a huge roadblock you hit. You might not be as productive as you want with your MacBook’s 13-inch or 16-inch screen. To tackle this, you can connect your MacBook to an external monitor. You can plug and play most of the monitors, but there are a few things you should do you get the best experience with Mac monitors connected.
This guide will walk you through the steps to configure and connect your MacBook to an external or a second monitor, change the primary monitor, troubleshoot Mac monitor issues, and more.
- Connect MacBook to Monitor
- What Cable Do I Need to Connect MacBook to Monitor?
- Connect Two Monitors to Mac
- Use iPad as a Second Monitor for Mac
- Mirror Mac Monitor to PC Monitor Wirelessly
- Change Mac Primary Monitor
- Switch Monitor Sides of External Monitors in Mac
- Gather All Windows from All Monitors to Primary Monitor in Mac
- Connect Mac to Monitor: FAQ
Connect MacBook to Monitor
If you need an extended view of your Mac screen to be more productive at work, you need an external monitor with your Mac. There are tons of monitors available out there with wired and wireless connectivity. But for most large-sized, faster monitors come with wired connectivity. So, let’s see how you can connect MacBook to the Monitor and add a second monitor in the standard, wired way.
First, look for a Mac-compatible monitor within your budget. If you are confused about which one to buy, all monitors with HDMI port, DisplayPort, or USB C port are compatible with your Mac. Please go through our list of the best pick on Mac monitors to choose one.
Next, get the connector cables or necessary adapters to connect MacBook to the monitor directly. Plug your monitor into the power, connect MacBook with the wire, and wait for the MacBook to detect the external monitor.
Once your Mac or MacBook detects the monitor, it will show an extended view of your Mac screen. You can now move the cursor to the new monitor, open windows there, and even switch the menu bar to the external monitor.
Related: How to Check and Monitor MacBook CPU Temperature (Intel & M1 MacBooks)
What Cable Do I Need to Connect MacBook to Monitor?
If you were using a Windows laptop, getting a VGA cable or HDMI cable would be necessary to connect the PC laptop to an external monitor. MacBooks, however, have changed their connectivity for monitors over time and now need USB-C thunderbolt cables to connect to monitors.
Well, if your monitor does not have a USB-C port to connect the thunderbolt cable, we need to add some extra adapters. It goes the same for the older MacBook models as well. Here is a table explaining which cable you need to connect your MacBook to an external monitor.
| MacBook Model | MacBook Port | HDMI Monitor | DisplayPort Monitor | USB-C Monitor |
|---|---|---|---|---|
| MacBook Air (2013-2017) | Mini DisplayPort (Thunderbolt) | 1. Mini DisplayPort to HDMI Cable 2. | Mini DisplayPort to DisplayPort Cable | Mini DisplayPort to USB C Cable |
| MacBook Pro (2013-2015) | HDMI, Mini DisplayPort (Thunderbolt 1/2) | 1. Mini DisplayPort to HDMI Cable 2. HDMI to HDMI Cable 3. | 1. Mini DisplayPort to DisplayPort Cable 2. HDMI to DisplayPort Cable | 1. Mini DisplayPort to USB C Cable 2. USB C to HDMI Cable |
| MacBook Pro (2016-) | USB C (Thunderbolt 3/4) | 1. USB C to HDMI Cable 2. USB C to HDMI Adapter 3. USB C Hub with HDMI Port | USB C to USB C Thunderbolt 3 Cable (5K) | |
| MacBook Pro (2018-) | USB C (Thunderbolt 3/4) | 1. USB C to HDMI Cable 2. USB C to HDMI Adapter 3. USB C Hub with HDMI Port | USB C to USB C Thunderbolt 3 Cable (5K) |
Connect Two Monitors to Mac
Connecting your MacBook to an external monitor requires a single cable to the only monitor. When it comes to a dual monitor setup for your MacBook, you may need extra adapters or devices. Let us see how to connect two monitors to Mac.
To connect your MacBook to two monitors at a time, you need to connect them directly to USB C monitors over separate cables or use some adapters. Since most monitors are with HDMI ports, many USB C to dual HDMI port adapters are available. You can use the adapter to connect two monitors to Mac simultaneously.


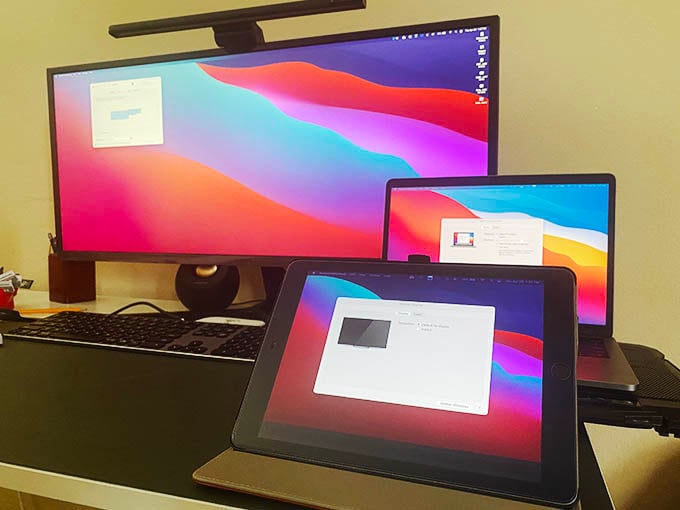
Use iPad as a Second Monitor for Mac
If you are looking to see a window separately always and nothing else, you can use your iPad as a Mac monitor for now. You do not need an expensive, bulky monitor to show an app or window for some time separately when you have an iPad. If you are using an iPad with iPadOS 13 or newer and a MacBook with macOS Mojave or later, you can easily use iPad as a second monitor for MacBook with SideCar.
Let’s see how you can turn iPad into a touchscreen monitor for MacBook using Sidecar.
First, make sure both your iPad and MacBook use the same Apple ID, same WiFi network and Bluetooth is turned on.
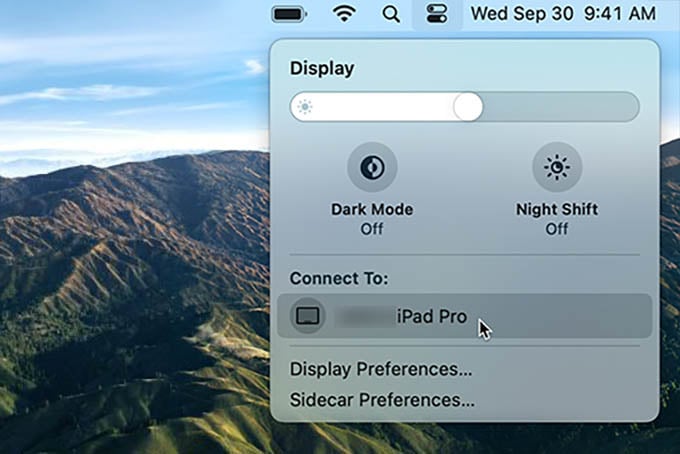
Now, click the Control Center icon from your Mac menu bar and choose the Display option. There you will see your iPad under “Connect To:” title.
Choose your iPad to start the Sidecar option and use your iPad as a second monitor for Mac. You can use the iPad touch screen to control Mac windows or use the Mac trackpad and keyboard as usual. You will also get necessary control keys like Command, Shift, Fn, and Control on the iPad screen.
Related: 10 Best Portable USB-C Monitors; Get a Second Monitor for Laptop
Mirror Mac Monitor to PC Monitor Wirelessly
I totally understand the difficulty in unplugging the PC monitor every time you want to see your Mac on a big screen. If you just want to mirror your Mac monitor to the larger monitor that is already connected to a PC, it is quite effortless.
You can AirPlay your Mac screen to the Windows PC monitor using certain tools. I tried AirServer (Download), which is one of the AirPlay apps for Windows PC. Once you run the app on your PC, you can follow the steps to mirror the Mac monitor to a larger PC monitor.
First, install any AirPlay app on your Windows PC. Make sure both MacBook and PC are connected to the same WiFi network.
On your Mac, click the AirPlay icon (TV icon) on the top menu bar. There you will see the name of your PC computer; click on it.
Once your MacBook connects with your PC over AirPlay, it will start mirroring the Mac screen to the large monitor your PC is connected to. You can AirPlay Mc to Windows totally wirelessly, and you can stop casting anytime you want.
Change Mac Primary Monitor
When you first connect your MacBook to the monitor, the external monitor mostly becomes the primary monitor for your MacBook. When you open an app, the primary menu bar will be shown on the primary monitor, so if you want to change it, you need to change the primary monitor on your Mac.
Everything will be focused on the primary monitor for all the important menus, docks, and app launching. Let’s see how to change Mac primary monitor and switch the Mac menu between monitors.
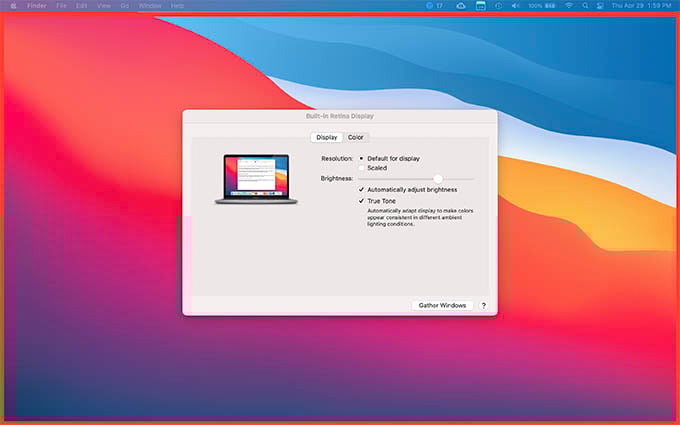
First, click on the Apple icon on the menu bar and open System Preferences.

From the System Preferences window on Mac, click on Display settings.
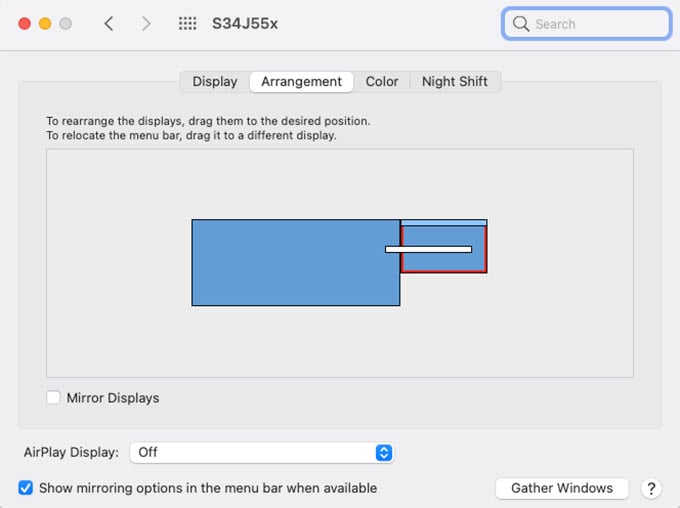
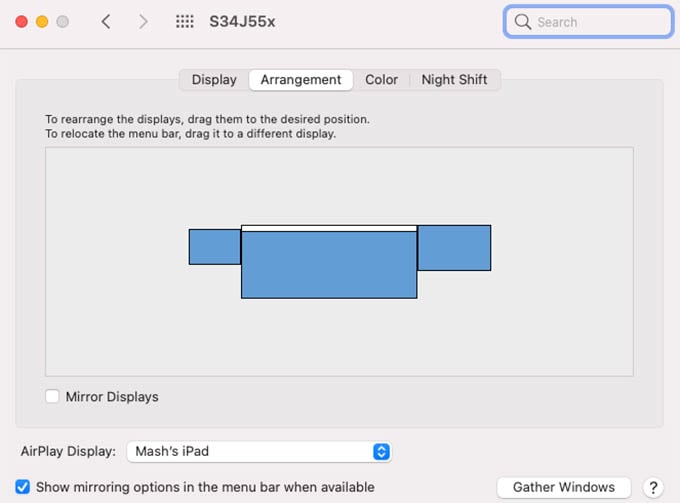
From the next screen, go to the “Arrangement” tab. There you will see the arrangement of your monitors in blue color, including the MacBook screen. If you look closely, you will find a white bar on either of the blue boxes you see on the screen. The primary monitor is the one with the white bar (menu bar).
To switch the Mac primary monitor from the current one to the other, click and drag the white bar and move it to the other blue box. Now, the monitor with the white bar (menu) is the primary monitor on your MacBook.
Before switching the Mac menu to the other monitor, you may get confused between the monitors shown. Click on the blue box to see which monitor it is; it will then show a red border around the respective monitor.
Related: 10 Best USB-C Hub Docking Stations with Hard Drive Enclosure for Mac Mini
Switch Monitor Sides of External Monitors in Mac
When you use an external monitor with your Mac, it extends the window to either of the sides. By default, Mac arranges the monitors in a way that you have to keep your Mac on the left side of the external monitor. Sometimes, this arrangement may be annoying for you. Also, if you use multiple monitors with MacBook, you need to make sure they are all rearranged correctly.
You can simply click and drag to change the monitor arrangement and change the monitor sides with your MacBook. For that, first, go to Mac System Preferences and click on Display.
Now, go to Arrangement tab and look for all the monitors connected. Before doing anything, click on each box to identify the monitors and know which arrangement they all are in.
Now, click on the monitor you want to change the arrangement, drag it to any sides, and change the monitor arrangement. You can do this to your primary monitor as well as the other connected monitors and change which side they are to be positioned on.
Related: 2022 MacBook Air M2 vs. Pro M2: Reasons You Should Buy the MacBook Air M2 Instead of Pro
Gather All Windows from All Monitors to Primary Monitor in Mac
Do you not see anything on your MacBook external monitor? Are some windows on the Mac monitor are missing or not in the screen right now? You can gather all of them into the primary monitor of your MacBook in on click. This will gather and group all open windows into the single screen, even from the external monitors.
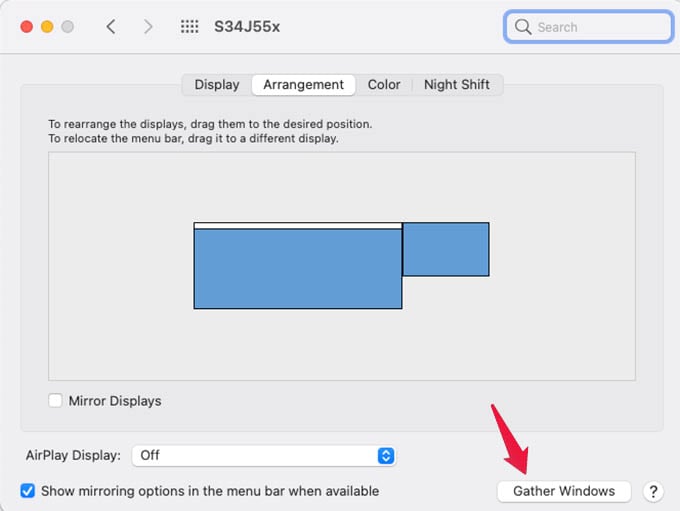
To gather all windows from all monitors on Mac, go to System Preferences > Display > Arrangement. From the screen, click on the “Gather Windows” button at the bottom. This will do it all, pull back all the windows scattered in all connected monitors into the current monitor.
Related: 15 Best Accessories for M1 MacBook Air & Pro with M1 Chip
Connect Mac to Monitor: FAQ
Still, some of your questions about connecting your MacBook to the monitor may be unanswered. Many of them need simple answers, and we have answered them here in the MacBook external monitor FAQ. Go through the questions below and find a solution for your problem using a MacBook monitor.
You can connect multiple monitors on your Mac using the USB C cables or multiple monitor adapters. Also, you can use your iPad as a second monitor for your Mac.
MacBook Pro supports up to four external monitors through cable, whereas you can connect multiple iPads and AirPlay displays as wireless external monitor for your MacBook.
The new MacBooks has Thunderbolt 3 ports for display connectivity, but they all come in USB C. Not all USB C ports are Thunderbolt 3, but the Thunderbolt 3 for Mac are USB C ports.
Whenever you want to extend your Mac screen visibility and improve your productivity, you connect your MacBook to monitor externally using cables or wirelessly. There are even more things to care about than simply plugging and playing. I hope this guide helped you clear all your questions and walked you through the detailed steps to add a second monitor to your MacBook.
I’m trying to connect my 2018 MacBook Air to a large multi (8) panel monitor (to give a presentation to an audience). However, the Mac only triggers the first (top left) panel, with 1/8 of the desktop showing. How do I get around this?