
Disk Utility is a powerful but at the same time “use with caution” kind of app. Apple developed this for its Mac and Desktop models so that power users can do a lot more. With this, they can easily manage disks, add or manage volumes, and manage RAID disks sets. But, these operations are not completely at beginner’s level, some of them require a minimum knowledge of disk operations. So it’s always a good practice to know about the tool before use.
Today, we will walk you through some of the common operations that you can perform through this application.
History of Disk Utility app
Before we dive into disk utility supported operations. we need to know the history of it so that we have a clear picture of its objectives. Before merging, Disk Utility and Disk Copy were two separate proprietary software, presented in macOS X Jaguar. But from macOS Panther (version 10.3) both merged into one standalone application, offers all disk related operations.
The Disk Utility app is responsible for partitioning, erasing, verifying and managing of a disk drive. Whereas, Disk Copy app is mainly for creating and mounting disk images files. Now let’s take a look on some common FAQ’s related to Disk Utility application:
Content
- How to access Disk Utility app in macOS?
- What are the file system formats available in macOS?
- How to perform Encryption from Disk Utility?
- What are the tasks Disk Utility application can perform?
- How to Repair disk drive using Disk utility?
- What is Partitioning in macOS?
- How to Erase disk from Disk Utility tool?
- How to Restore Macbook using Disk utility application?
- What does Unmount utility do in disk utility app?
How to Access Disk Utility app in macOS?
Disk Utility tool is presented inside either Other folder or in Utility folder, depends on OS versions. To see this, you need to follow below steps:
Navigate through Launchpad
- First, Click on Launchpad from Dock.
- Here you will see many other apps that are installed in your system.
- Find the folder named Other.
- Tap on it, here you will find Disk Utility app.
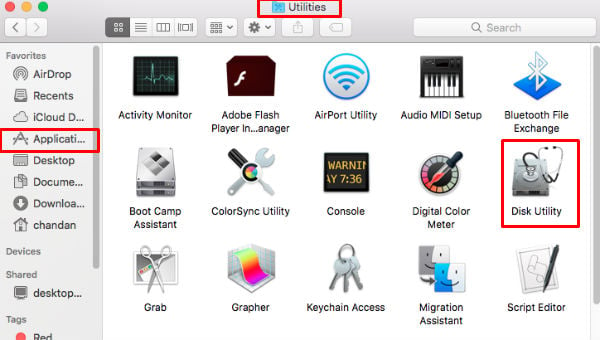
Navigate through Application
- Click on Finder again from Dock.
- On left side, tap Application presented in Favourites menu.
- This will open a view where you will see Utilities folder, other than several common apps.
- Now, Tap on Utilities folder and here you will find Disk Utility app.
Apart from above-mentioned ways, You can ask Siri to open the Disk Utility app. All you need to click on Siri, presented in the dock or in Screen top bar with battery, wifi, time and search options. Once it opens, say
Hey Siri, Open Disk utility app
Siri, being an impromptu assistant, Open that’s for you. Moreover, You can also click on Spotlight Search field and type, Disk Utility app. Now hit Enter and it will open Disk Utility app.
Also Read: A Complete Guide for Using Quick Look on MacOS
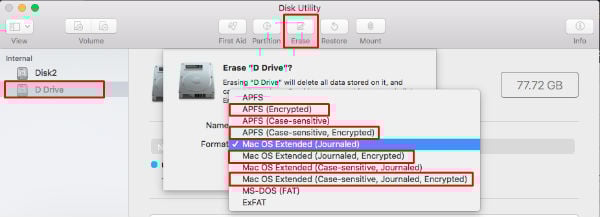
What Are the File System Formats Available in MacOS?
For its macOS, tvOS, iOS and watchOS Apple have enabled support for Apple Files System file system type. For example, macOS High Sierra, APFS is one of the default file systems. Other than this, Mac OS Extended, MS-DOS(FAT) and ExFAT are some common file formats that are available in Current macOS High Sierra OS version.
APFS Format
Apple File system is the latest file format type from Apple. This file system type targets SSD’s to provide numerous advantage over its predecessor HFS+. Several striking features are strong encryption, space sharing, snapshots, fast directory sizing, and improved file system fundamentals.
But the usages are not limited to SSD’s only as you can also use it with traditional HDD’s as well as external directly attached drives. APFS allocates storage space by using Container on demand. Which means you can add or remove containers to extend or shrink available space. The free space can be shared with any individual containers as required. Also, you can specify or reserve quota sizes for each volume.
Other related formats for APFS are APFS, APFS(Encrypted), APFS(Case-sensitive) or APFS(Case-sensitive, Encrypted).
MS OS Extended
MS OS Extended is also known as HFS+, is an improved version of Apple’s Hierarchical File System. This version is presented in an earlier version of macOS Sierra and predecessors. However, it is still supported by current version macOS High Sierra but not comes by default for volumes. It has several types such as :
- (Case Sensitive) Mac OS Extended: it is similar to MS OS extended file system type, but treats file names different if their names are in different cases.
- (Journaled) Mac OS Extended: This one too is the same file system, but different in term on protecting data loss from an unexpected event of disk corruption.
- (Journaled, Encrypted) Mac OS Extended: It uses the Mac format, and posses encryption other than journaling.
- (Case Sensitive, Journaled) Mac OS Extended: Another similar file system types, but comes with combined properties that were presented separately in other file system type.
- (Case-sensitive, Journaled, Encrypted) Mac OS Extended: It uses Mac format, and properties case sensitive, requires a password and encrypt volume.
- MS-DOS(FAT): Similar to windows own file system version, which doesn’t hold data more than 4GB (or bigger) per file in a volume. Also, note that the volume shouldn’t hold more than 32GB file size.
- ExFat: It is used for windows volume that holds over 32GB.
How to Perform Encryption from Disk Utility?
If you are privacy concerned user who is looking for disk encryption, then disk utility tool can help you. With Disk Utility app, you can encrypt your internal or external disk drives. But before doing so, save any data that present in the drive, because this will erase the drive.
Steps to Encrypt Drive
- Select the volume from the left menu, which you want to encrypt.
- If that’s an external drive, then connect it with your Macbook.
- Enter the name of the volume.
- Now, select encrypted volume types from the format drop-down.
- Tap on Erase.
- On prompted, provide a password to format it.
Also Read: How to Sync Android Notifications Across Windows, Mac and Linux
What are the Tasks Disk Utility Application can Perform?
Disk Utility can do several disk-related tasks such as First Aid, Erase, Partition, Restore and Mount/Unmount.
How to Repair Disk Drive using Disk Utility?
Disk related errors are common, once you have reached to some ages or limits. So for proper functioning, you can repair disk drive using Disk Utility. The First Aid utility program can check and repair file system errors. Moreover, this can check and fix certain other problems such as multiple apps quit unexpectedly or a file is corrupted and even if your computer won’t start up.
To scan a disk, follow below mentioned steps:
- Tap on Apple logo from your Mac
- Click on Restart.
- Press and hold the Command and R keys until the Apple logo appears during the restarting time.
- Release the keys.
- Click on Disk Utility, and then Continue.
- In the sidebar, select the disk you want to repair.
- Click on First Aid button.
- if Disk Utility tells you the disk is about to fail, backup your data and replace the disk. You can’t repair it. Otherwise, click on Run.
- Once done, disk repair will show you about the disk. if you want to see details then click Show Details to see more information about the repairs.
If it reports “overlapped extent allocation” errors, which means two or more files occupy the same space on your disk. And one of them is likely to be corrupted. You can check them one by one in the list of affected files. Most of the files in the list have aliases in a DamagedFiles folder at the top level of your disk.
-
- Once you found that specific file, you can replace or re-create it or delete it.
- If this file contains the information you need, you can open and take note of it and use further.
If the Disk Utility app is unable to repair the disk or reports it with the following message “The underlying task reported failure” then try again to repair the partition or disk again. if it still doesn’t work then take backup as much as possible, erase the disk, Re-install macOS and restore backup data.
What is Partitioning in MacOS?
Partitioning of disk drive enables us to perform several different tasks such as change separate disk volume format or installation of multiple OS. However, if you are looking for windows OS installation then use Bootcamp Assistant rather than doing it manually.
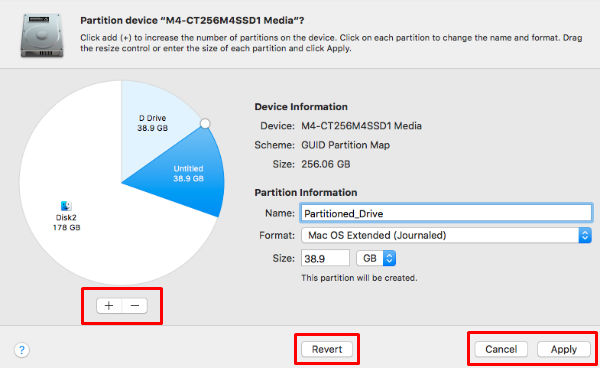
To add a volume without erasing existing data you can :
- Select the device from the sidebar menu.
- Click on the Partition button available on top of Disk Utility app.
- Tap on Add button which will create a new volume.
- This will leave another volume with existing data and another empty volume.
- Provide some name of that newly created volume.
- Select appropriate volume format from the drop-down and click Apply.
- Tap on Done, once Disk Utility finished creating the volumes.
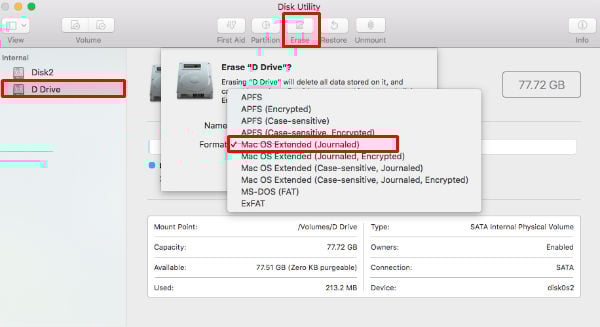
How to Erase Disk from Disk Utility Tool?
Disk drives are erased in order to get rid of corrupted data when the repair doesn’t work. This step empties disk volume and makes it available for further use. Erasing one volume doesn’t affect other volumes.
Editor’ Note: Before you proceed with erasing the computer’s startup disk, you must start up from another disk. And, make sure you create a backup of it.
- Select the disk or volume you want to erase, from the sidebar.
- Click on Erase button.
- Tap on Format pop-up menu.
- Pick any one of volume format.
- Enter a name for the disk or volume.
- Click on Erase button and then Done.
Editor’s Note: If you want to prevent the erased files from being recovered. Then, Click on Security options, use the slider to choose how many times to write over-erased data. Now click OK.
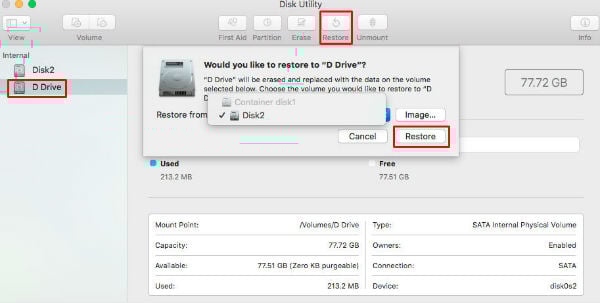
How to Restore Macbook using Disk Utility Application?
Disk Utility application is used for Restoring a disk/volume or Restoring disk image to a disk. When you restore volume to another volume, it will make an exact copy of the original. Please note that this will erase the destination volume data. So, before proceeding, make sure that you are saving any files on a different volume.
- Select the volume from the sidebar, which you want to restore.
- Select the Restore button.
- Click the Restore pop-up menu, then choose to target the volume that you want to copy.
- Tap Restore, then click Done.
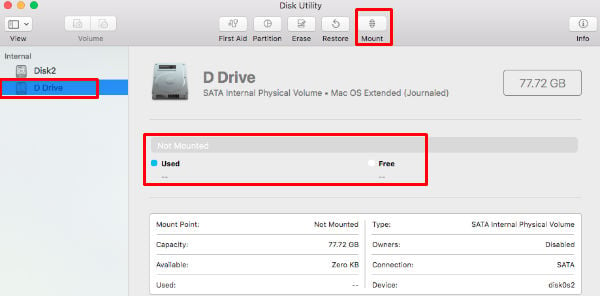
What does Unmount Utility do in Disk Utility App?
Unmount utility helps you to remove safely the boot drive from any background process in mac. Before formatting or Partitioning drive you must unmount disk drive so that this doesn’t hamper data.
If you click on Unmount button, it toggles to Mount leave all info fields blank. Contrary to Mounted Disk, which provides details about how much Used or Free space present. Moreover, details like Mount Point, Capacity, Type, Owners etc are present for each volume through-out all operations.
With Mac OS, you can do pretty much everything on Disk Utility for your hard disk. The OS updates start supporting SSD and coming with built-in tools that support SSD drives. However, we have covered about the Disk utility application and the availablee features and hope this will help you.