
With lockdowns in place all over the world, conferencing tools have experienced a major uplift in the number of users. These tools have become a staple for many connecting with their schools and workplaces regularly. That being said, many people are facing certain issues with Google Meet and Zoom. Microphone not working is one of the common problems with Google Meet users. If you are facing the same problem, there are a lot of troubleshooting methods you can perform.
This guide will assist you in performing said troubleshooting steps in order to fix Google Meet and Zoom microphone issues.
Clean Your Mic
You should always make sure that your mic holes are clean and lint-free. In the case of Zoom mic not working, or Google Meet microphone not working on the laptop, most of the time, dust and lint clog up the laptop’s mic clearings. It’s one of the most common reasons why your mic might not be able to capture any sound input.
You have to clean it thoroughly from time to time using a microfiber cloth and concentrated isopropyl alcohol. You should only use isopropyl alcohol in order to clean your electronics as it is non-conductive and evaporates very quickly.
You can also clean your external mic in the same way. Just remove the pop filter before cleaning, in case there is one.
Check for Hardware Issues
Google Meet microphone not working due to a hardware problem is pretty rare. Still, before we start fiddling with the browsers and Meet/Zoom settings, we need to first verify that the mic hardware is functioning properly. Before jumping in, make sure that you have the latest audio driver installed from your motherboard, laptop, or prebuilt PC vendor’s website.
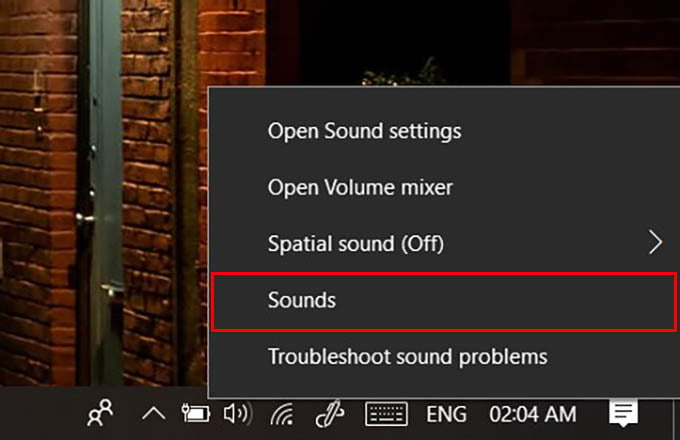
- Right-click on the sound icon on your taskbar.
- Then click on Sounds.
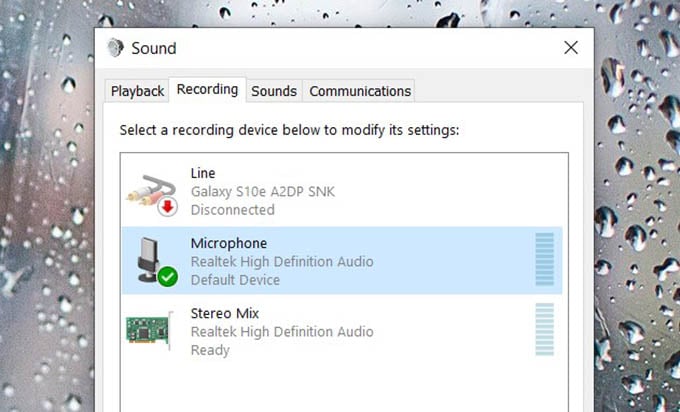
- From the sound control panel, go to the Recording tab.
- Check if you can see your mic there.
- If you have a USB headset with an inbuilt mic, and it still doesn’t show up, try reconnecting it through a different USB port.
- If your mic or DAC has a physical mic mute switch, make sure to turn that off.
If the inbuilt microphone on your computer is not showing up, ensure you have the latest drivers. Also, try reconnecting if you can detach it. If it was a hardware issue, the mic should be working with Zoom or Google Meet by now.
Set Your Main Microphone as the Default Device
If you have multiple microphones connected to your PC, Windows automatically sets one of those as default. When you disconnect and reconnect your primary mic, sometimes Windows doesn’t revert it as the default device automatically. If that happens, you need to manually visit the Recording tab back again in order to fix the Google Meet mic not working.
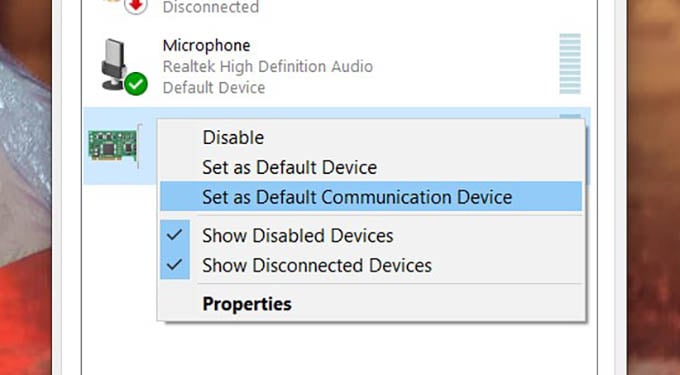
- Right-click on the sound icon and go to Sounds window.
- Go to the Recording tab.
- Right-click on your main mic.
- After that, click on Set as Default Communication Device.
- Then right-click your main mic again.
- And this time, click on Set as Default Device.
- Finally, click OK in order to close the window.
After changing the default microphone on Windows, your PC will start using the selected microphone. It will set the microphone as the default input device for Google Meet and Zoom as well.
Change Default Microphone from Browser Settings
Google Chrome and Firefox browsers let you select the default microphone for websites. It does not matter which mic is set as default for your computer, you can set another mic as default for Chrome. In case Chrome or Firefox sets the wrong microphone default, you can change them.
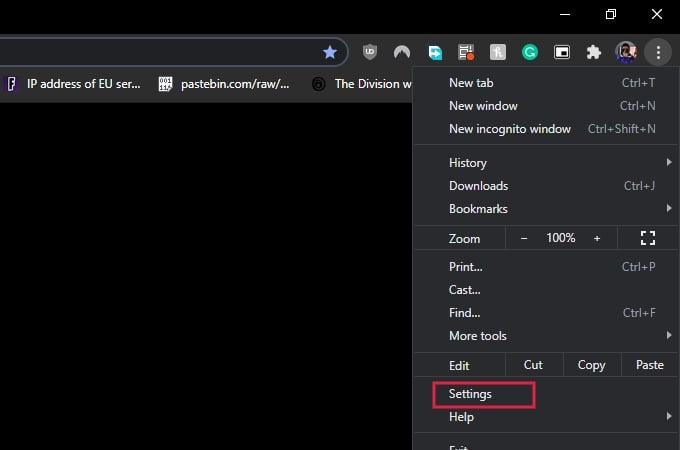
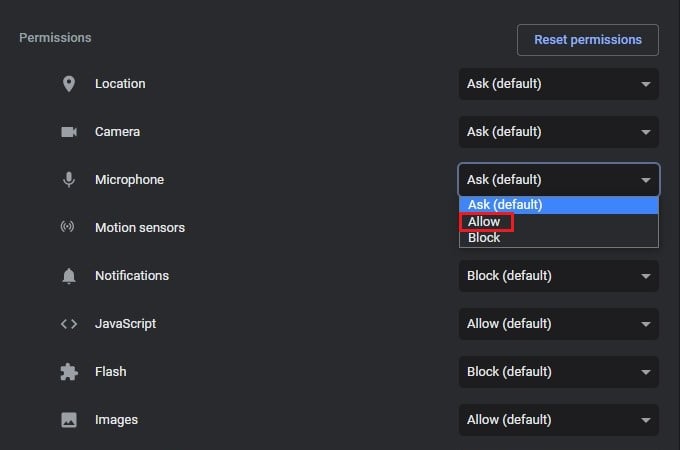
- Open Google Chrome and click on the three-dots menu button.
- Go to Settings.
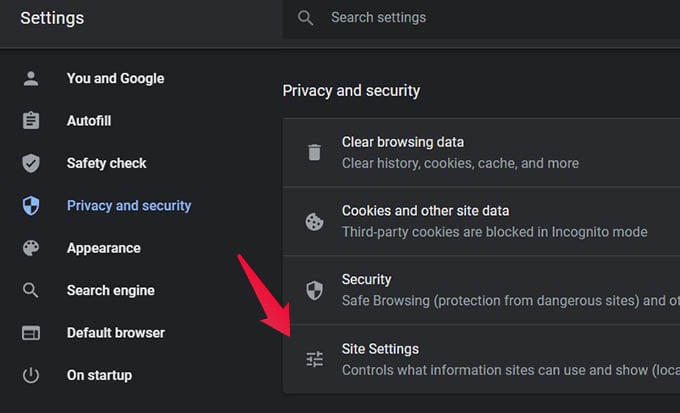
- After that, go to the Privacy and security section.
- Next, click on Site Settings.
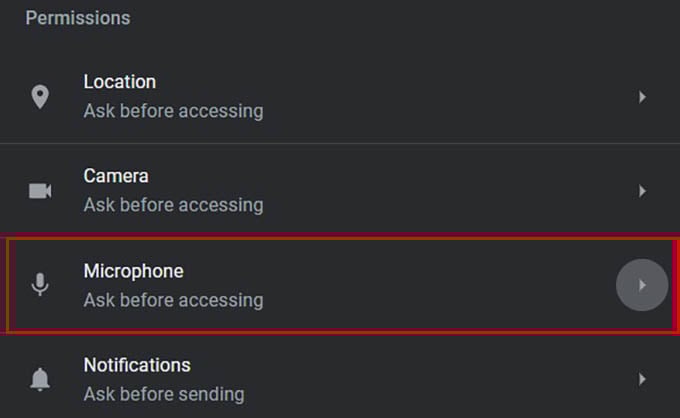
- Click Microphone.
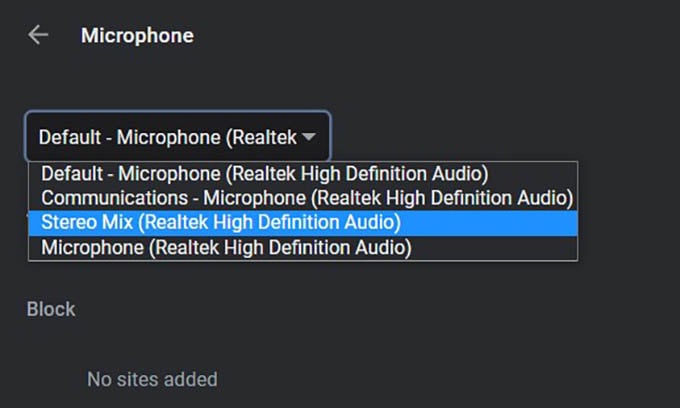
- Select your mic from the drop-down menu.
If you are using the Firefox browser, you can choose your default mic while the website asks for the microphone permission.
Change Microphone Privacy Settings
Some privacy settings on Windows 10 prevent apps from accessing the mic whenever they want. It can sometimes prevent browsers including Chrome and Firefox from accessing your mic. You can change these privacy settings from Windows Settings and fix Google Meet and Zoom microphone not working.
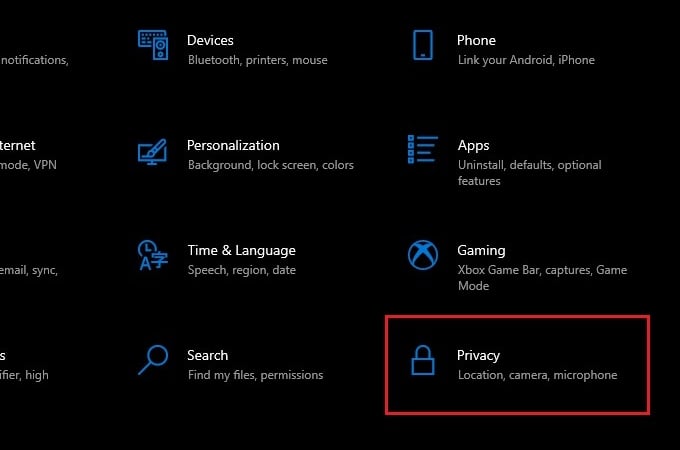
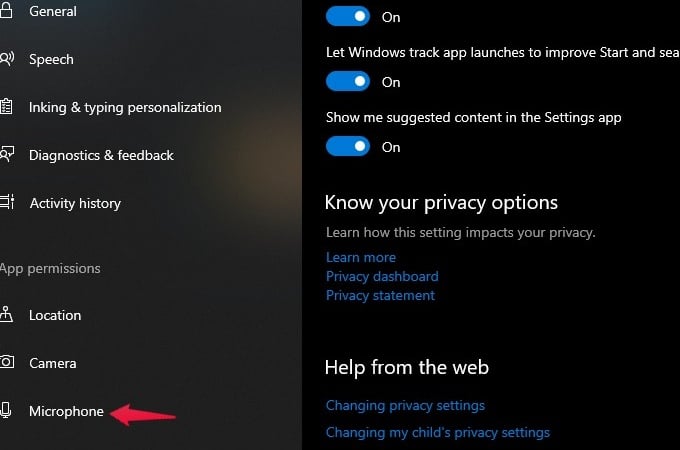
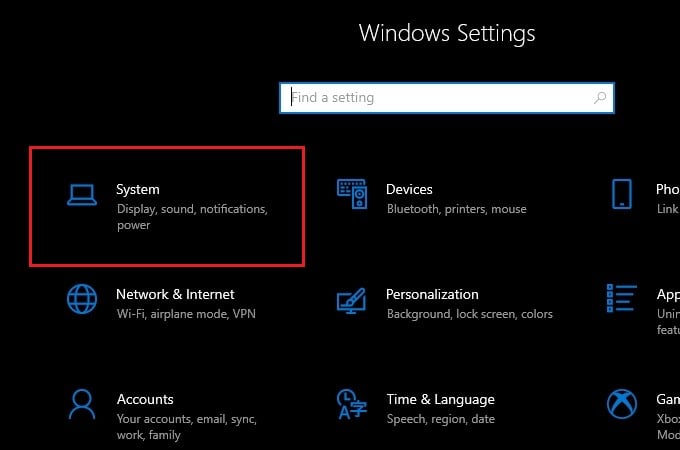
- Open Windows Settings on your computer.
- Click on Privacy.
- Select the Microphone section.
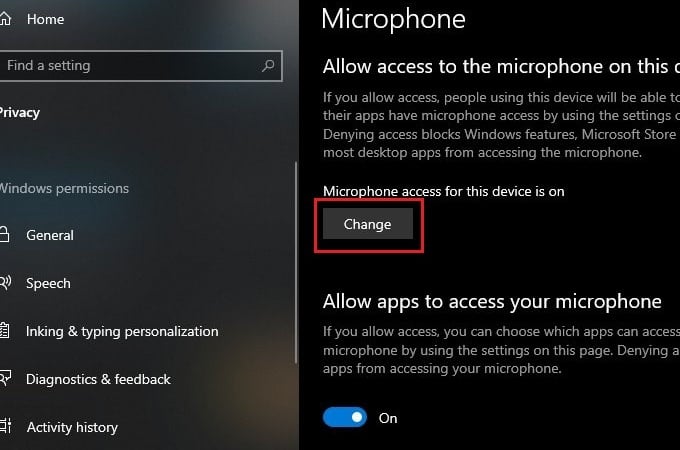
- Now click on the Change button and make sure that it’s toggled on.
- Go to “Allow apps to access your microphone” and toggle it on.
- Scroll down to “Allow desktop apps to access your microphone” and toggle that on as well.
Your browser should now be able to access your mic. In case your microphone doesn’t work with Google Meet or Zoom even after following the above methods, move on to the next solution.
Disable and Re-enable Your Mic
If your mic not working on Zoom or Google Meet, sometimes disabling and re-enabling it from the sound control panel helps. The process refreshes the mic, and it should start working after that.
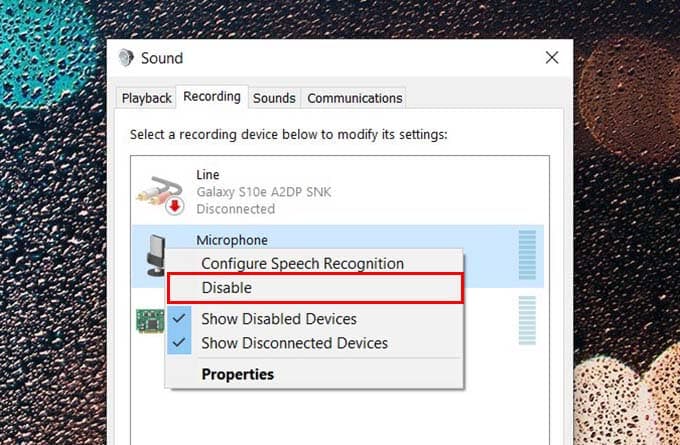
- Right-click on the Sound option on the taskbar and click on Sounds.
- Go to the Recording tab.
- Right-click on your microphone.
- Click Disable.
- Right-click again, and this time, click Enable.
Give Mic Permission to Zoom and Meet
Just like Windows, most modern browsers ask for permission from you before giving any website access to your devices. Zoom and Google Meet need Camera and Mic access. If you skipped the pop-up, that could be the reason for Google Meet and Zoom mic not working. Even if you denied it the first time, you can still go back and enable it.
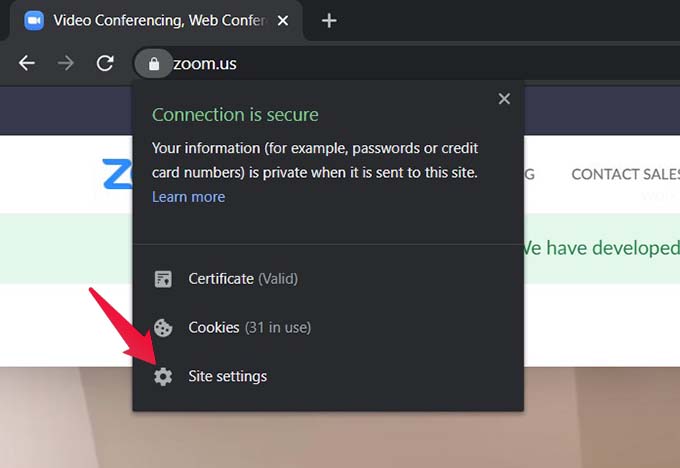
- Visit Google Meet or Zoom on the Chrome browser.
- Click on the padlock icon left to the address bar.
- Then, click on Site settings.
- Click on the drop-down menu beside the Microphone option.
- Select Allow.
Now let us take a look at what to do on Firefox to fix the mic not working on zoom or Google Meet.
- On Firefox, click on the padlock icon on the left of the URL.
- In case your mic isn’t working, it should say Use the Microphone Blocked Temporarily.
- Click on the cross button beside it in order to clear the permission and ask again.
- Next time when Google Meet or Zoom asks for mic permission, allow it.
Reset App Volume and Device Preferences
If your mic icon shows muted on Zoom and Meet, and you can’t unmute yourself, it must be muted on the system level. You can manually reset app volumes and sound preferences on Windows 10.
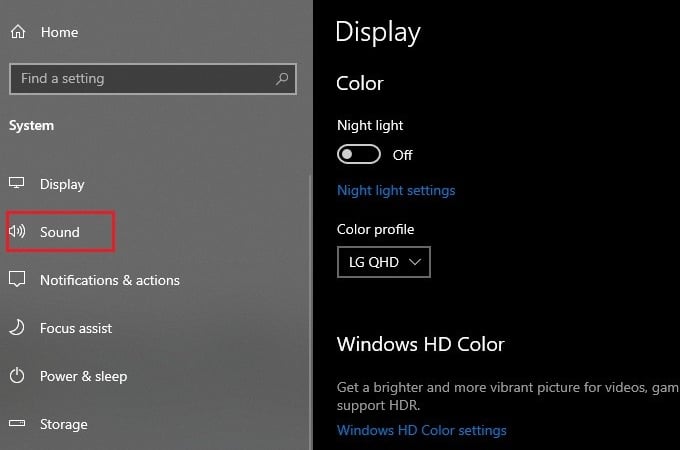
- Open Windows 10 Settings and click on System.
- Go to the Sound section.
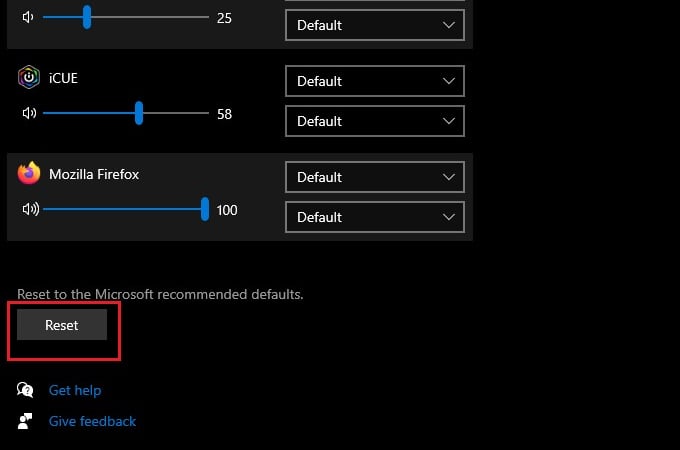
- Scroll down and click on /App volume and device preferences.

- Click on Reset.
After this, reload the page, and you should be able to unmute yourself. But in case you still can’t, you may need to go back to the sound control panel
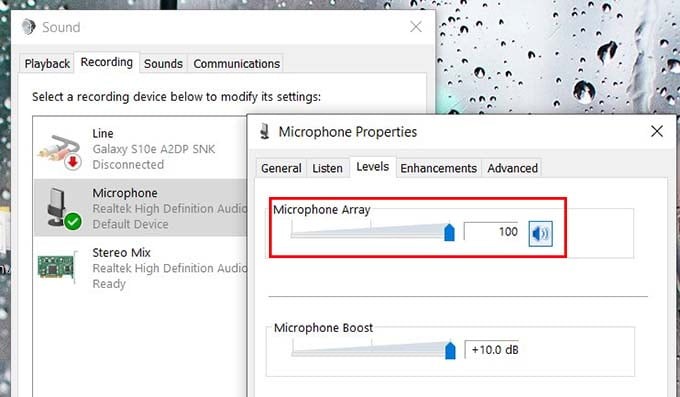
- Go back to the Recording tab the same way as explained earlier.
- Double click on your mic and go to the Levels tab.
- Click on the muted mic icon. It should revert back to an unmuted mic icon.
- You can also increase the microphone volume and microphone boost if necessary.
- Click OK and close the remaining windows.
Change Microphone in Zoom or Google Meet
Both Google Meet and Zoom allow changing your input and output devices from within their respective web apps. So if you have multiple microphones and still can’t use your main one, try selecting it from there, and it should work after that.
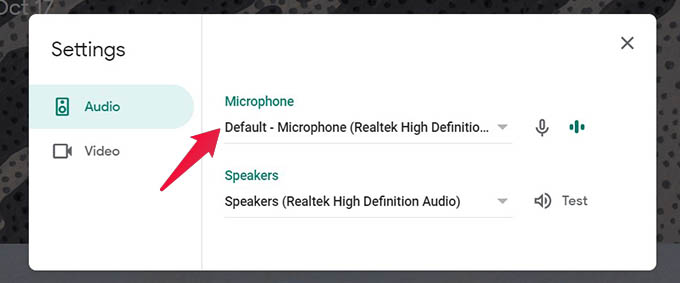
- Click on the Settings cogwheel icon on Google Meet.
- Google Meet should give you the option to change your mic right away.
- Select your desired mic from the drop-down menu.
- Click on Done.
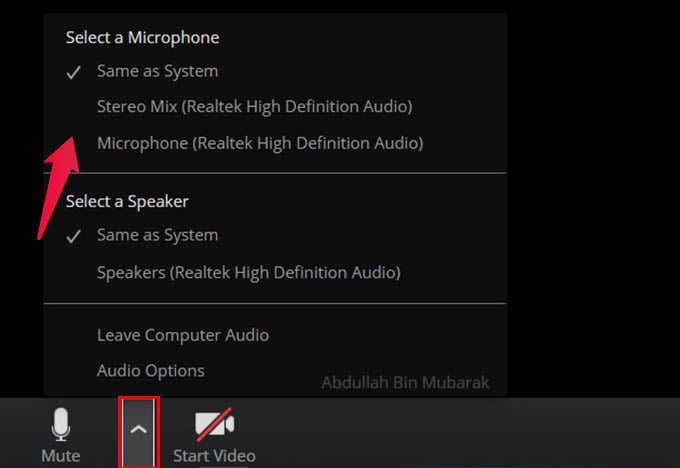
To change the microphone used on Zoom, you can click the arrow up button alongside the microphone icon and choose the mic of your preference.
This is it! We have gone through all the possible troubleshooting methods in this guide to fix the microphone not working on the Zoom or Google Meet issue. The microphone on your Google Meet or Zoom must be working as of now. Finally, you can communicate with your teachers, co-workers, and friends without much trouble.