
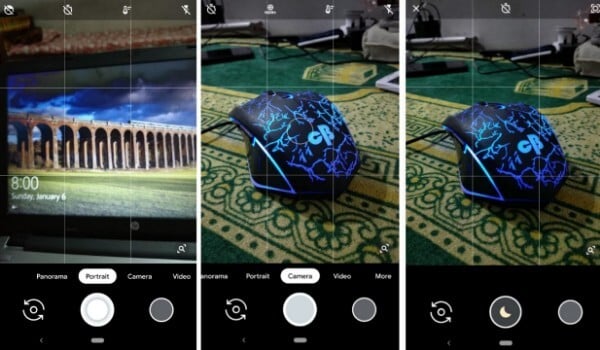
Google released the new version of the epic Google Camera with the latest Google Pixel 3 and Pixel 3 XL smartphones. The new update of the Google Camera adds a Night Sight mode, which allows you to take impressive low-light photography. The app officially supports Pixel series smartphones only. But, the Google Camera Night Sight Mode can be enabled on any smartphone.
Here is a complete guide to use Google Camera Night Sight Mode on any Android smartphone. Following steps are involved in the entire process.
Root Your Smartphone
You might be thinking why you should root your smartphone for such a feature. Well, the smartphones hide the key features and system-level modifications features under the root directory and you will not be able to access them. Therefore, in case of Google Camera Night Sight Mode enabling, it takes a rooting.
It is mandatory to root most of the Android smartphones to enable Camera2 API, which is disabled by default. Then only you can use Google Camera with Night Sight Mode. There are many ways you can root your Android smartphone. Here we use the Magisk Manager to root the smartphones.
FYI, Magisk is an open-source Android rooting solutions. So, you will be safe from being vulnerable to the third-party attacks and backdoor access. This is one of the best alternatives to the Chinese rooting module SuperSU. Following steps are involved in rooting your Android smartphone using the Magisk Manager.
- Unlock Bootloader
- Flash TWRP Recovery
- Flash Magisk Manager
Also read: How to Bring Amazing 3D Animals to Your Living Room
Unlock Bootloader
The bootloaders on Android smartphones are locked by the OEMs by default. You need to unlock it using ADB/Fastboot utility on your system in order to install custom ROM or Custom Recovery. Here is how to unlock the bootloader using Windows 10.
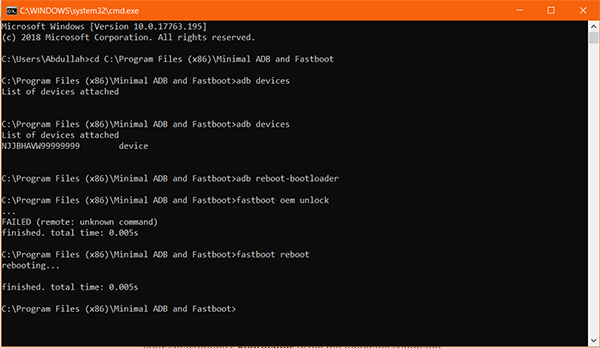
- Install Minimal ADB and Fastboot on your Windows PC.
- Press Windows Key + R and enter CMD to open Command Prompt Window.
- From the Command window, navigate to the installation directory of the Minimal ADB and Fastboot. It will look as follows.
cd C:\Program Files (x86)\Minimal ADB and Fastboot - On your Android smartphone, navigate to Settings > Developer Options.
- Enable USB Debugging.
- Connect your smartphone to the PC over USB Cable.
- Now enter the following command:
adb reboot-bootloader - Tap Allow on the pop-up prompt to proceed with further actions.
- Now your smartphone is in Fastbootstate. From here, you can unlock your smartphone’s Bootloader using the following command.
fastboot flashing unlockfastboot oem unlock
This will instantly unlock the bootloader of your smartphone. Therefore, you will be able to flash custom recovery easily.
Also Read: How to Install ADB and Fastboot on Windows, Mac & Linux?
Flash TWRP Recovery
After unlocking the Bootloader, you can install the TWRP recovery. Please note that this step can result in a complete data loss from your smartphone. So, be sure to take a backup before proceeding with the steps. Anyways, do not exit from the Fastboot window after unlocking the bootloader. Now, proceed as follows.
- Download and copy the TWRP Recovery (compatible with your smartphone model) to the Minimal ADB and Recovery installation directory.
- For the sake of easiness while accessing, rename the file to twrp.img.
- Now from the Command Prompt (the same which we used to unlock bootloader), enter the following command,
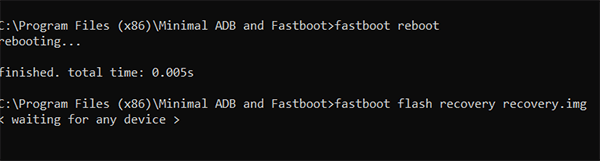
fastboot flash recovery twrp.img - When the flashing is finished, you can reboot to the system using the below command:
fastboot reboot
Now, move on to the next step. Do not disconnect the smartphone or close the CMD window. Don’t worry. You are almost there to enable Camera2 API and install the Google Camera with Night Sight Mode.
Flash Magisk Manager
The Magisk Manager is available from the Magisk’s official website. There is no device restriction, so you can flash any version available publicly. Here is how to flash Magisk on your Android smartphone.
- Download Magisk Manager Zip file.
- Copy the file to the root of your device directory.
- On the CMD window, type the following command to boot to the recovery:
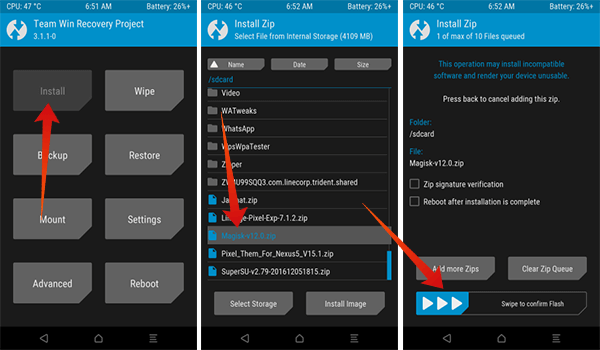
adb reboot recovery - From the TWRP Recovery home page, tap Install.
- Choose the Magisk Manager ZIP file (Magisk-v12.x.zip) from the directory.
- Tap Install Image.
- Swipe to confirm flash.
- Choose Reboot after flashing.
Your smartphone is now rooted using the Magisk Manager module, and you can grant root access to other apps and services.
Enable Camera2 API
Since we enabled the root access on the Android smartphone, it is time we enable the Camera2 API. As mentioned earlier, Camera2 API is necessary to run the Google Camera with Night Sight Mode, HDR+ and more.
There are two ways you can enable Camera2 API on your Android smartphone after rooting.
- Use Magisk Module
- Edit build.prop
Use Magisk Module
Magisk Module itself offers an application alongside the root manager. So, you will be able to manage the root access and enable various features using the modules, therefore the Camera2 API enabler. After enabling Camera2 API this way, you can instantly use Google Camera.
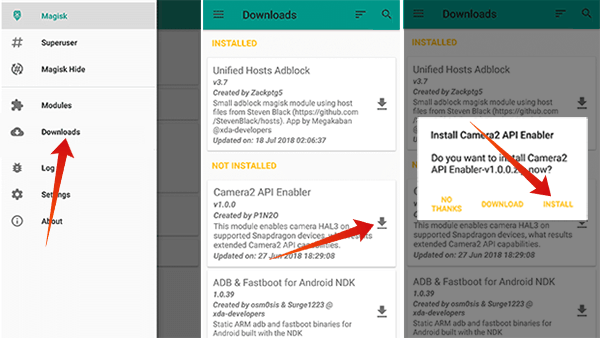
- Open Magisk Module app on your smartphone.
- Swipe from left to right.
- Tap Downloads and find the Camera2 API Enabler from the window.
- Tap the Download icon next to Camera2 API Enabler.
- Choose Install.
After flashing the module, you can reboot the smartphone. Camera2 API will be enabled then.
Edit Build.Prop
If you do not want to install Magisk Module, you can go with enabling Camera2 API manually from Build.Prop file. This file contains information and features regarding your smartphone. Android smartphones running the version Lollipop or later has the Camera2 API feature inbuilt, but disabled by default. This method will enable it.
- Install Build.prop Editor app from Google Play Store.
- Open the app and swipe from left.
- Tap build.prop to edit the file.
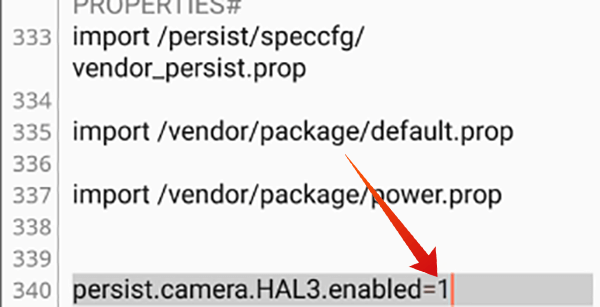
- Tap search icon and search for persist.camera.HAL3.enabled=0
- Edit the code and change it to persist.camera.HAL3.enabled=1
Or, you can use the Terminal Emulator to enable it. On the terminal emulator, enter the commands as follows.
su
su persist.camera.HAL3.enabled 1
exit
exit
Install Modded Google Camera APK
The Google Camera with every feature was only released for supported Pixel smartphones. In the meantime, the Google Camera or GCam is available for every other smartphone, but with limited features. The unique options such as HDR+, Night Sight Mode, Portrait, etc. are available only on the one exclusively for Google Pixel. However, many developers have managed to port the same for other smartphones.
The newly ported Google Camera mods work with almost every smartphones, that have Camera2 API enabled. Here are some links to the popular Google Camera mods to use Night Sight Mode on any Android smartphone.
Download: Modded Google Camera APK
Note: The Google Camera Modded APK with Night Sight Mode and HDR+ works with most of the Android smartphones. If it does not run with yours, you can do a quick look on the XDA-Developers Forum for the APK version compatible with your smartphone.