
When you take screenshots on your Mac to send to someone, you need the same on your iPhone as well. Usually, we need to AirDrop or send them through cloud services in order to get the screenshots on your iPhone. However, you can totally avoid these steps and get the screenshots automatically on your iPhone in real-time without much hassle.
In this article, we will take you through the best ways to get Mac screenshots on iPhone in real-time automatically.
Content
- Paste Mac Screenshots on iPhone Apps from Clipboard
- Get Mac Screenshots on iPhone through iCloud
- Use iTunes Sync to Get Mac Screenshots on iPhone Instantly
- Take Mac Screenshot on iPhone Using Remote Desktop
Copy & Paste Mac Screenshots on iPhone Apps from Clipboard
In case you are unaware, there is a universal clipboard on Apple devices that lets you copy on one device and paste on another. That is, you can copy a picture or a text on your Mac and paste the same on your iPhone, on supported apps.
Therefore, you can copy screenshots on your Mac and get them easily on the iOS apps too. We can now discuss the universal clipboard feature across your Apple devices to paste Mac screenshot on your supported iPhone apps easily. Here is how to paste a Mac screenshot on iPhone apps.
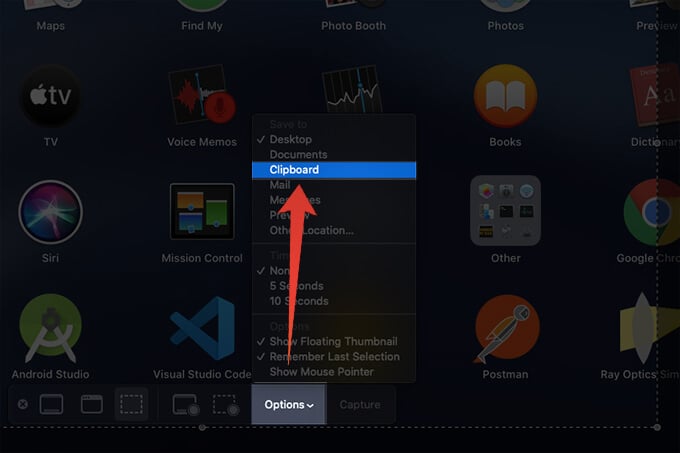
- From your Mac, press Cmd + Shift + 5 to open the screenshot app.
- Click on the Options button.
- Choose “Clipboard” to save the screenshot to your clipboard instead of saving on Desktop or other folders.
- Take screenshots on your Mac to save them to your clipboard.
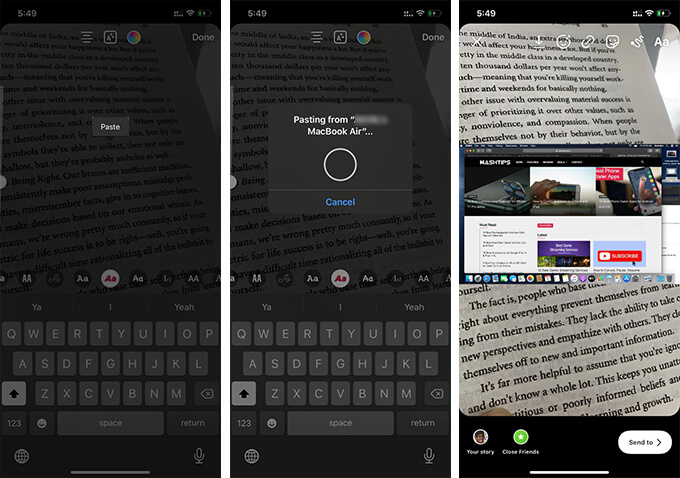
- Now open an app on your iPhone to paste the copied screenshot from Mac.
- Long-press on cursor and tap “Paste“
- Now you can see the synced screenshot pasting on to the note you just created.
This option will avoid saving screenshots on your MacBook and always sync with the universal clipboard on iPhone or iPad. If you do not want to copy all the screenshots to your iPhone, you can simply choose the “Desktop” from the Screenshot app. To copy a saved screenshot or image to your iPhone, right-click on the file and choose “Copy” from your Mac.
The screenshot you copied on your Mac will be available to paste on your Mac. You can simply tap on any text field, including the Instagram story to get the screenshot instantly on
Before using the universal clipboard option to take screenshots on your Mac and paste on your iPhone, make sure that both devices are using the same Apple ID to enable the Handoff feature.
Also, both of the devices need to meet the Apple Continuity requirements. The Universal clipboard won’t sync otherwise. The copied item on the universal clipboard will stay for very lesser time and you have to paste it on the target device before it disappears.
Get Mac Screenshots on iPhone through iCloud
The iCloud sync on your Mac and iPhone is one of the best ways to sync the photos and documents with all your Apple devices in real-time. If you have an active iCloud Sync enabled on your Mac, it is easy to sync the screenshots with your iPhone as well. In case you have not enabled iCloud Photos on your Mac, check out how.
- Click on the Apple menu from the menu bar on your Mac.
- Open System Preferences.
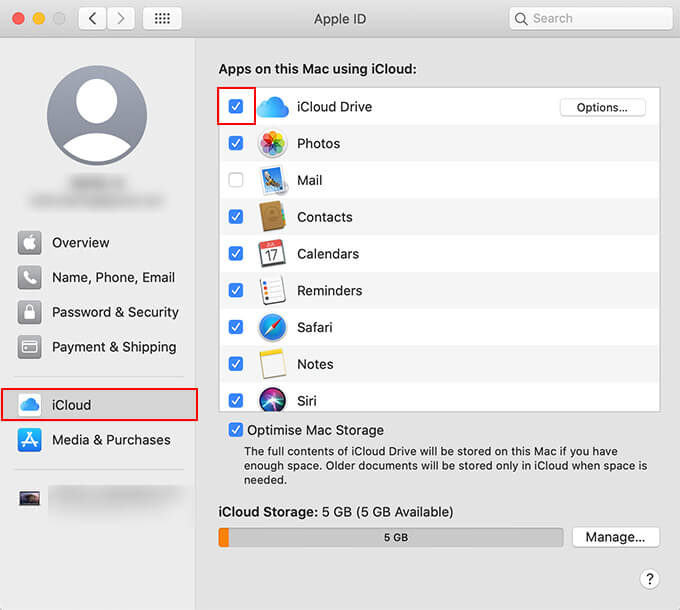
- Click on Apple ID.
- Go to “iCloud” from the left pane.
- Check the “iCloud Photos” to automatically sync all your pictures with your iCloud.
Since all the photos on your Mac get synced with the iCloud Photos, you can get them instantly using your iPhone as well. Thus, you can get Mac screenshots on your iPhone easily.
Related: How to Prevent Others from Taking Screenshots on FaceTime Video Calls
Use iTunes-Sync to Get Mac Screenshots on iPhone Instantly
The iTunes on Mac and Windows can automatically sync a specific folder from your system to your iPhone whenever you connect it. In case you are on the latest macOS update, you can find the iTunes replacement right from the Finder app itself. Anyways, you can enable the wireless sync of your photos from a specific folder every time you connect your iPhone with the Mac. Go through the steps below.
- Connect your iPhone with your Mac using the USB cable.
- Open a new Finder window.
- Click on your iPhone from the left pane.
- Go to the “Photos” tab and enable “Sync Photos.”
- Choose the folder you want to sync. In normal cases, “Desktop” is where all your screenshots are saved.
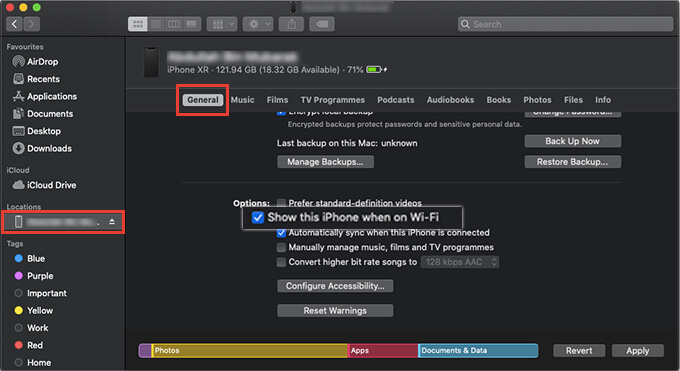
- Now go to the “General” tab.
- Check and enable “Show this iPhone when on Wi-Fi” and “Automatically Sync when this iPhone is connected.”
When these features are enabled, your Mac can sync photos from the specific folder to your iPhone. It also requires both your Mac and iPhone to be on the same Wi-Fi network.
Also Read: How to Transfer Files Between iPhone and Mac
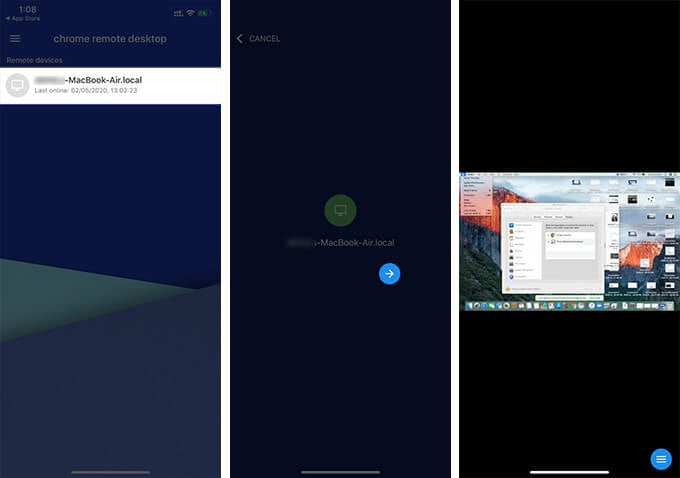
Take Mac Screenshot on iPhone Using Remote Desktop
Well, all of the above steps work when both your iPhone and Mac are on the same network. What if you want to capture screenshots from the Mac that is not with you, or your friend’s? Screen Mirroring the Mac to your iPhone and capturing screenshots directly sounds like a good idea? Well, it is pretty easy to set up a screen mirroring app on your iPhone and get the same screen on your iPhone as well.
Even though Apple provides the Apple Remote Desktop which is a paid tool, you can get pretty much the same using the Chrome Remote Desktop as well. Here is how to install Chrome Remote Desktop on your Mac, mirror to your iPhone, and take screenshots.
- Download and Install “Chrome Remote Desktop” on your Mac.
- Login using your Google Account and follow the instructions to set up Chrome Remote Desktop on your Mac.
- After setting up on Mac, install and open Chrome Remote Desktop on your iPhone.
- Sign in using the same Google account.
- Tap on your Mac from the window when you find it on the list.
- Provide the PIN you have set on your Mac during the setup.
- When the screen mirroring starts, navigate to the window you want to capture and take a screenshot on your iPhone.
You are literally taking screenshots of your iPhone screen. However, since the remote desktop app has your Mac screen projected, it is the same as taking a screenshot on Mac directly and sharing them with your iPhone.
You now have a clear idea about getting your Mac screenshots on your iPhone instantly through all these possible ways. You can go through our iOS section to find out more interesting guides like this.