Apple’s Mail app is one of the best email clients for Mac users. The Mail app is stable and supports most of the email accounts. For a large number of people, Mail app of Mac OS is one of the best clients present out there for emails. Apple has introduced a lot of features on Mac Mail client on these recent OSs. The Mac users can easily make the most of this Apple EMail client by simple Apple Mail tips and tricks. A little tweaking with the available Apple Mail tips and tricks allows the Mac user improve the productivity. The versatility of the Apple Mail makes it easy for the users to customize it as per their use.
If you are a using the built-in Mac email client as the main email app, these the list of these Mac Emil tricks and tips are right for you to improve the efficiency.
Set Flag for Important Emails
Among the hundreds of mail received and sent on a day, a couple of them are needed for future reference. However, most of us do search for these emails and take hours to show up after the search. The user can mark important emails as flags to access instantly whenever they want. 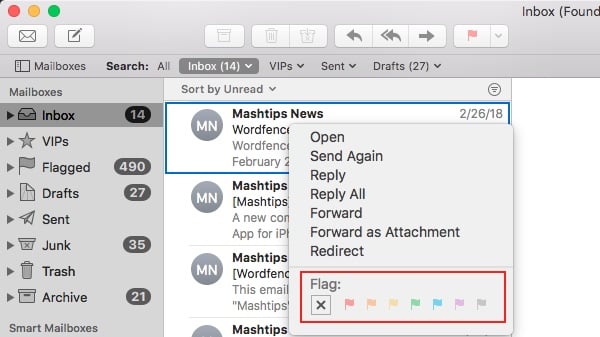
Related: 7 Best Email Clients for Mac to Replace Apple Mail
Categorize eMail with Smart Mailboxes
Any Apple Mail user can manage his or her inbox with this Apple Mail tip. The mail client inherits a Smart mailbox feature that allows you to create a new mailbox and assign rules to it. With this, the incoming mail will automatically go to that smart mailbox, saving your time consumed in moving it.
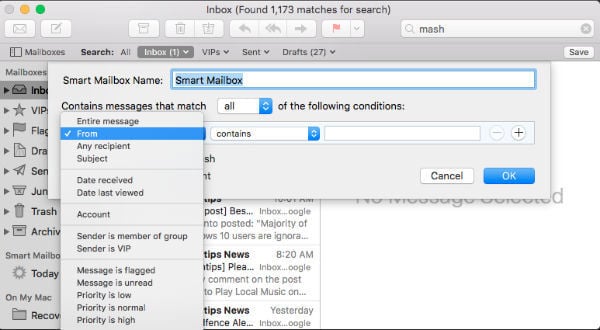
Go to the Mailbox menu, then to New Smart Mailbox and name the mailbox as your preference. Create the rules to sort the emails automatically as you want them. You can automatically move your important emails to this Smartbox and can be selected based on From address or Date Received etc.
Email: A Simple Solution to Schedule Email on Mac to Send Later.
Change Email Updated Frequency
The Apple Mail automatically synchronizes the emails and check for new ones after every 5-minute time interval. However, the time period is more than sufficient, but most of us do require a quick checking. The email user can reduce the time spent in the synchronization of the incoming emails.
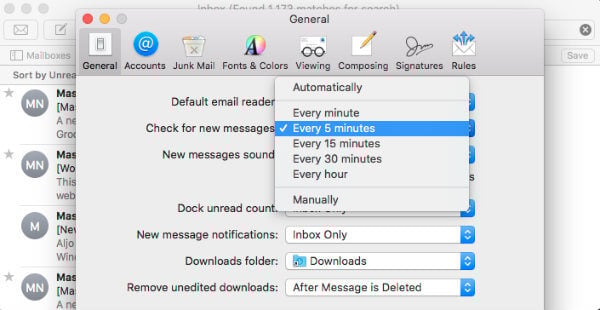
Open the Mail Preferences option on the app and click on the General tab. After this, head to the ‘Check for new messages’ and select the ‘Every minute’ option from the drop-down menu. On exchange-type server, the user gets instant notifications of incoming emails by default. If you are not sure how much time you need, then select Automatically.
Also read: 3 Solutions to Retrieve back Apple Mail Inbox Unread Count Badge Display
Disable Image Previews to Increase the Mail Performance
Due to the regular exchange of mail, the Apple mail becomes slow in working. The sluggish working of the mail makes the process of sending and receiving the mail slow. Apple Mail opens the images attached in the mail by default and there is no separate option to disable it. However, with a simple terminal command, you can disable them easily. Open Terminal and paste
defaults write com.apple.mail DisableInlineAttachmentViewing -boolean yes
command in it. After this, hit the Return key to run the command. Relaunch the app in order to ensure that your messages show the images. To restore back and enabling the image previews in Apple Mail, use the terminal command
defaults write com.apple.mail DisableInlineAttachmentViewing -boolean no.
Relaunch the app once again and you will see the image previews like before. Even though you disabled this image option, you can manually click on image click to preview.
Scribble and Add Annotations on Attached Image
We all send image attachments in the mail. Sometimes, we do have to enter the important part of the image in text form to highlight it. And you can annotate the on the images attached right from the Mac email. In fact, Mac user can easily avoid the whole typing process, by scribbling and annotating the image. There is no need to open the image on different software to perform the basic editing of images.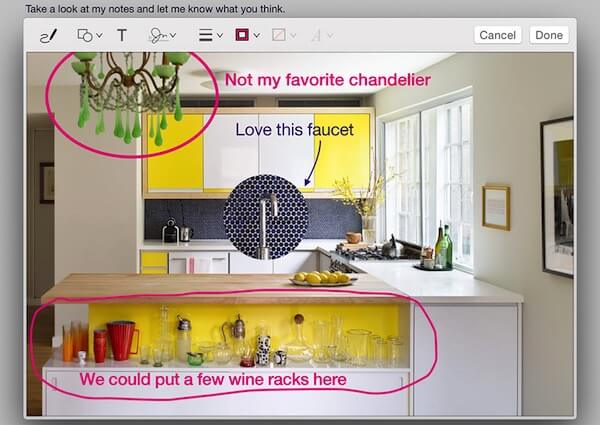
Compose the email and add the image to the mail. After the image uploads, double tap or click on the attachment. A set of options will come up and tap on the arrow option of the pop-up menu. On clicking the arrow, select Markup and add the annotations in the way you want
Use Powerful Search for EMails
Apple Mail is a powerful email client in every manner. Offering everything extraordinary, the search feature of the tool is quite efficient and good. The Mac user can make the search for emails with great ease in their own language whenever they want to.
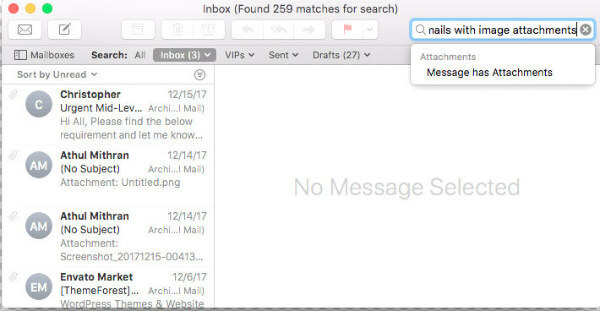
You can easily access the search feature of the tool and get the emails that you want to see. For example, you can get emails with image attachments, just by entering “Emails with image attachments” in the Apple Mail. You can easily search for any particular mail in the tool.
Check Email’s Source
Identification of the mail’s source is quite important as it helps in knowing whether the mail is a spam or not. Every mail inherits an email address stating about the organization or person sending it. On Apple Mail, you can look at the source code data for a mail quickly and efficiently.
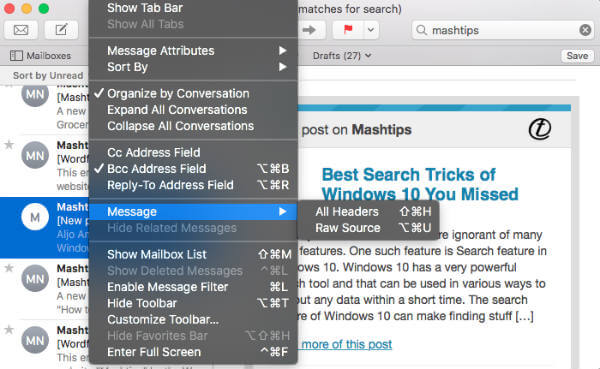
In order to know the mail’s source, the user needs to select the mail and go to View option. On opening the View option, click on the message and click on the Raw source from the menu. In addition, the user can also use the keyboard shortcut Option-Command-U to see the source.
Instant Access to Selected Email Thread
Keep track of the incoming messages of some very important people by marking them as VIP on Apple Mail. Mail’s VIP feature allows most of the Mac users to get instant notifications on receiving the message from VIPs. The mailbox of VIP is quite similar to Smart Mailbox. A Mail user can add up to 100 VIPs in the mail.
Each VIP is identified with a star placed next to their names. For adding a contact or person to the VIP list, go to the message list and select the particular message of the person, which you want to add as a VIP. Click on the arrow present beside the sender’s name or email id present in the header. Select the Add to VIPs option to complete the process. For getting instant alerts, hover the mouse to Mail and go to preferences. On the new message notifications, select the VIPs option to get alerts on incoming messages.
Block Spam Emails and Sender
Bothering mails are a part of our daily life and we all receive tons of them. You can easily avoid the messages from unwanted senders by simply blocking them easily. Blocking the senders is straightforward on Apple Mail. The user needs to have at least one mail from the person or organization that he or she wants to block. With this Apple Mail tips and tricks, no message will come up in the future from the blocked address. Open Preferences on Main Menu and go to the Rules tab on the menu.
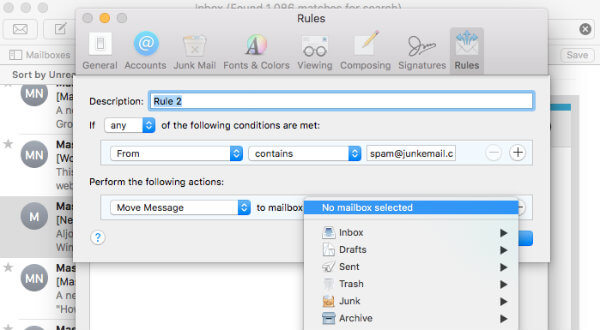
Click on Add rules for generating the criteria saying from Contains. Input the email address and ensure that the message is chosen under this rule. Click on Ok and select Apply option to apply the rule. Under this rule, the messages will be automatically deleted from the select sender.
Setup Alerts for Incoming Emails
Know any incoming reply on the sent mail instantly it comes on your iOS. Get a notification on the incoming reply to any email sent by you. Open the Mail app on your iOS device and tap on the compose mail button. In the subject field, you will see a Bluebell icon present on the right end of the Subject field area. On tapping the icon, you will get a pop-up menu below on the screen and select the Notify Me option on the menu. On selecting it, you will get instant notification whenever someone replies to the mail.
Most of us spend about two to three hours of our day reading and replying to emails. Almost millions of emails exchanges on a daily basis and it allow the people to overcome the limitations of traditional media. There are several email clients available and many of them come preloaded in the systems. Mac OS has the Apple Mail operating like the other offerings present in the market.
Apple is constantly upgrading its services and introducing new features to Apple Mail. This native email client on Mac OS is a reliable and secure email client. For the last few updates of Mac OSs, the email app has improved significantly and on its way to give tough competition to well-established clients. We listed on the top Apple Mail tips and tricks and the user can make their working over the tool simpler and get the optimum results.
