
Would you like to mimic the theatre experience of watching your favorite movies/TV shows from streaming services like Amazon Prime/Netflix? Well, you don’t always need a bunch of speakers connected to your TV. Instead, you can get the surround sound experience from your iPhone/iPad itself by making use of the Spatial Audio feature.
What Is Spatial Audio on AirPods Pro?
Spatial Audio is a 360-degree sound tech that provides an immersive audio experience by simulating surround sound effects. Surround sound generally refers to multiple speakers placed at different points around the room. With Spatial audio, you can get a similar effect by just wearing your headphones.
To experience Apple Spatial audio, you need to connect an AirPods Pro, AirPods Max, AirPods (3rd generation), or Beats Fit Pro to your iPhone/iPad. Plus, the version on your iOS device should be at least iOS 15.1 or later. You can get Spatial Audio on both AirPods even when you connect two AirPods Pro or AirPods 3 to your iPhone simultaneously.
Related: 8 Best AirPods and AirPods Pro Charging Case If You Just Lost the Original One
Spatial Audio Supported iPhone/iPad Models
Apple introduced the Spatial Audio for AirPods Pro in 2020 with the iOS 14 release. According to Apple, if you have any of the following iPhones and iPods paired to a supported AirPods (3rd gen, Pro, Max) or Beats Fit Pro, you can experience the immerse surround sound effects using Spatial Audio:
- iPhone 7 or later
- Pad Pro 12.9‑inch (3rd generation) and later
- iPad Pro 11‑inch
- iPad Air (3rd generation) and later
- iPad (6th generation) and later
- iPad mini (5th generation) and later
Besides iPhones and iPads, you can also get Spatial Audio on Mac starting from the macOS Monterey.
How to Setup Spatial Audio on iPhone
You can quickly enable spatial audio on any compatible iPhone/iPad connected to AirPods to experience the 3D sound effects. Let’s see how to do that.
First, make sure that your AirPods are connected to your iPhone and turned on.
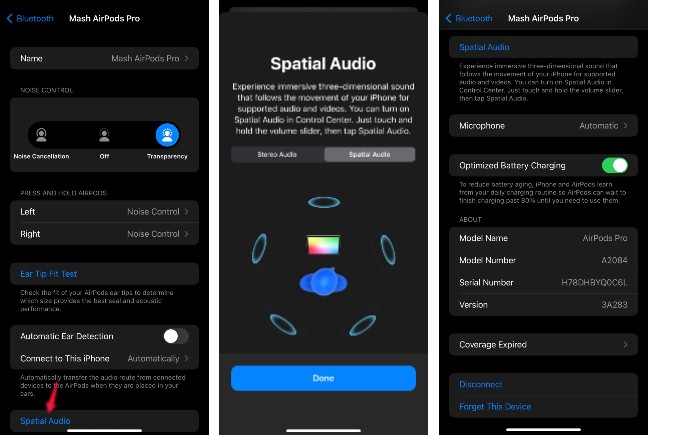
- Next, go to Settings > Bluetooth and tap on your AirPods name.
- From the screen, scroll down to the bottom and tap Spatial Audio.
- While setting up for the first time, you will see a description screen that explains Spatial Audio.
- Tap Done on that screen.
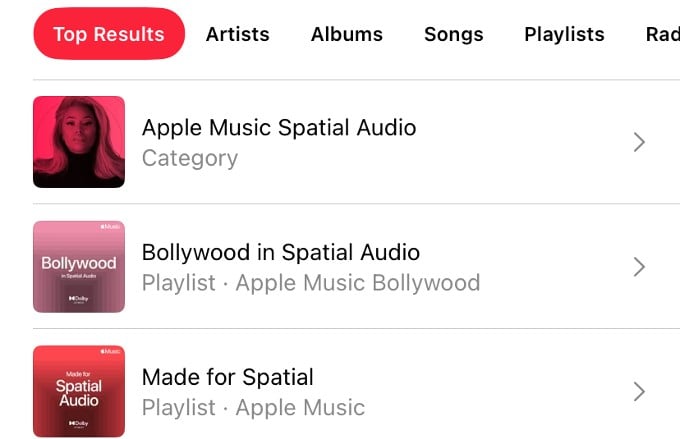
Now, Spatial Audio has been enabled on your device. Do you want to test how it works? Open the Apple Music app and type “spatial audio” on the search box at the top. You will see a list of playlists that supports Spatial Audio. Tap any of that to hear the music with surround sound experience.
Related: How to Use Different Apple ID for Apple Music and App Store on iPhone
How to Enable Personalized Spatial Audio on iPhone
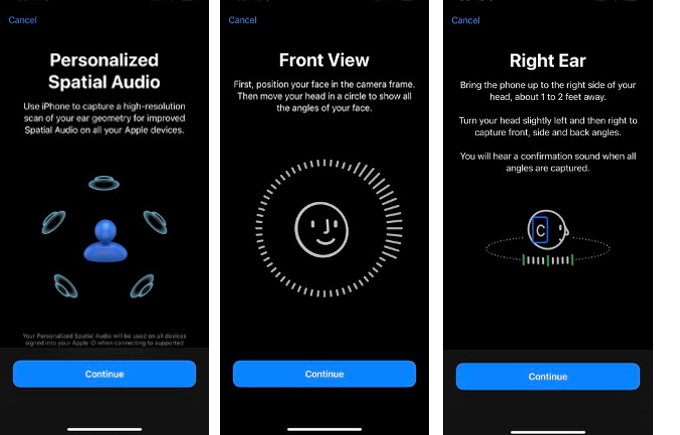
With iOS 16, Apple further enhanced its Spatial Audio feature to provide a personalized experience for the users. According to Apple, Personalized Spatial Audio allows users to create a personal profile by using the TrueDepth camera on iPhone to scan their ears.
Based on the size and shape of the ears, the user’s profile will be fine-tuned to provide a customized listening experience. Now, let’s see how to enable this personalized spatial audio feature.
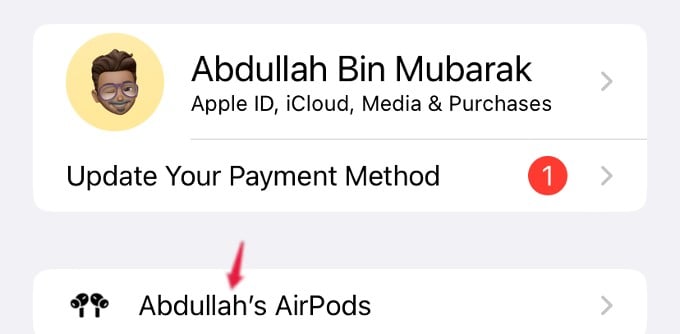
On your device, tap Settings. If you have connected AirPods to your iPhone, you will see its name right below your Apple ID.
Tap on your AirPod name and scroll down to the bottom of the screen. Here, tap Personalized Spatial Audio and follow the on-screen instructions to scan your Face, Right earn and Left ear. Once the scans have been completed, tap Done.
That’s it. The Personalized Spatial Audio has been set up successfully, and you can turn that on/off from the Control Center.
How to Control Spatial Audio from Control Center
Once you have enabled Spatial Audio from the Settings menu, you can easily enable/disable its effects from the control center.
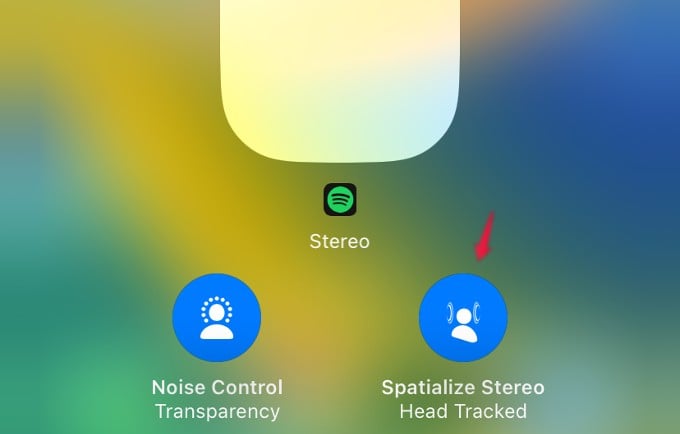
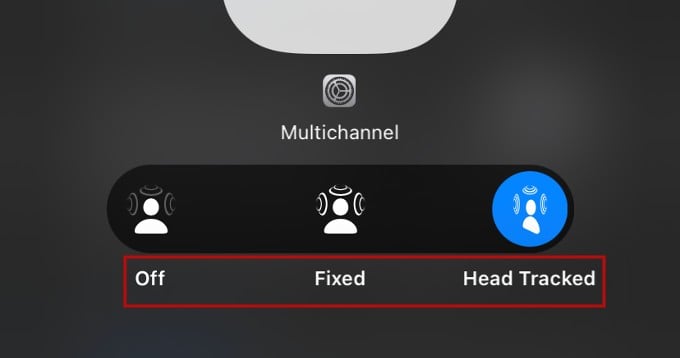
On your iOS device, launch Control Center by swiping down from the top right. You can see the blue icon Spatial Audio turned on when you tap and hold the volume control.
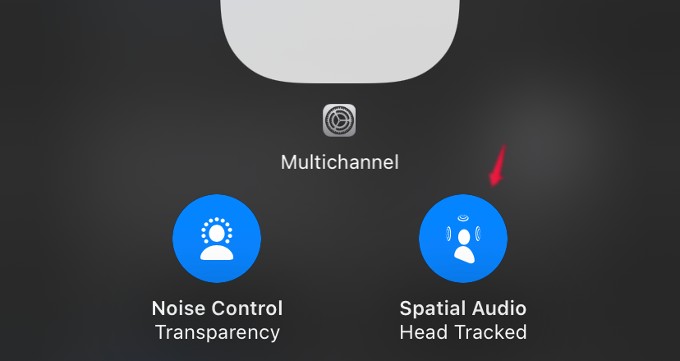
If you turn on spatial audio with head tracking, audio adjusts based on your head movement. When you tap the Spatial Audio icon, you will see values. To turn on both spatial audio and dynamic head tracking, tap Head Tracked. To turn on only spatial audio only, Fixed. If you want to turn off both Spatial Audio and Head tracking, tap Off.
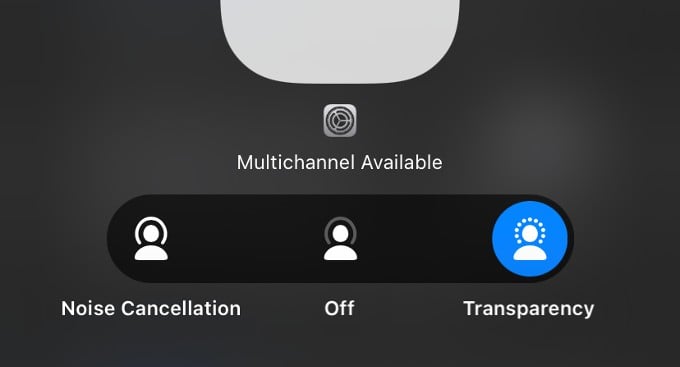
You can also control other effects like Noise Cancellation and Transparency from the Control Center.
Related: How to See Battery Percentage on iPhone Without Opening Control Center
FAQ: iPhone Spatial Audio
You can see the Spatial Audio option only if you have connected AirPods to a compatible iPhone/iPad that runs at least iOS 15.1 or later. Also, you need to have the latest firmware on your AirPods.
Apple has added the Personalized Spatial Audio feature in its iOS 16 version. You can set custom spatial audio if you have a compatible AirPod and an iPhone/iPad running iOS 16.