
Do you need to transfer the photos from your iPhone to your Windows computer? Well, you don’t need to search and download any third-party software for that. If you have a USB cable, you can quickly transfer photos from your iPhone to a Windows computer using any of the methods explained in this post.
Let us begin.
Content
Use Windows Photos App to Import Photos from iPhone
If your computer is running Windows 10 or 11, you can use the inbuilt Photos app to import photos from your iPhone and store them on your computer. Also, you need to have the latest version of iTunes installed on your computer for importing photos from your iPhone. Let’s begin.
First, connect your computer and iPhone using the USB cable. When you connect the devices for the first time, you will get a pop-up on your iPhone.

Go ahead and tap Trust to allow your computer to access your iPhone. Only then, you will be able to import photos from your iPhone.
Next, launch Photos app on your computer by clicking the Start menu and entering the word photos in the search box.
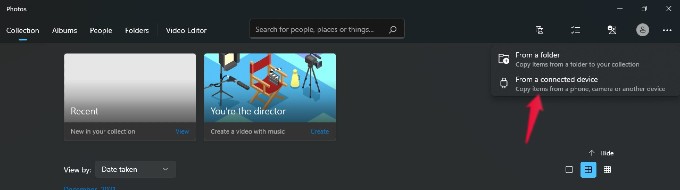
In the Photos app, click the Import icon located on the top right of the screen.

Here, you will see two options: From a folder, From a connected device. Go ahead and click the option From a connected device.
If you had already connected your iPhone and computer using a USB cable, you will see a message “Looking for new photos and videos”.

After a few seconds or so, you will see a new screen titled Import items where you can see the thumbnail preview of all images stored on your iPhone.

By default, the photos will be imported to the Pictures folder in OneDrive. If you want to choose a different location on your computer, then click the link Change destination and select your desired folder.
To import all the photos from your iPhone, click the Select drop-down box and select the value All Items.

Or if you want to import only selected photos, you can click the checkbox shown in the thumbnail for the image.
In case you want to delete the photos on your iPhone after importing them to your computer, you can do that by selecting the checkbox Delete original items after import.
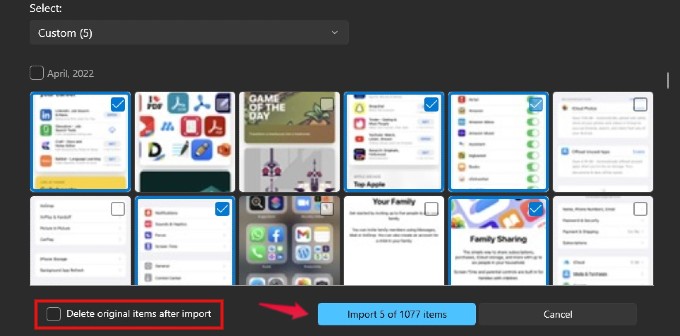
Once you are done selecting the photos, click the Blue Import button on the bottom. That’s it. Now, all the selected photos will be copied to the destination folder you had chosen on your computer.
Related: How to Transfer Photos Without Losing Quality-A Complete Guide
Transfer Photos from iPhone Using File Explorer
Instead of using the photos app, you can also transfer photos from your iPhone to the computer using Windows File Explorer. Of course, you need to connect the computer and iPhone using a USB cable.
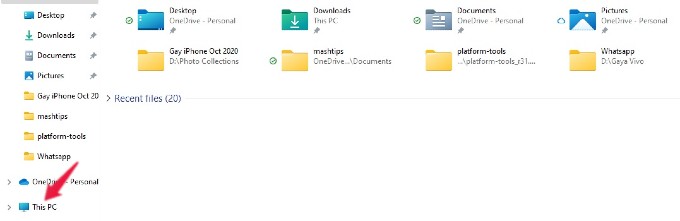
Once the devices are connected, open File Explorer on your computer from the taskbar (Yellow color folder icon). Or you can click the Start menu and navigate to File Explorer using the search box.
In the File Explorer screen, click on This PC displayed on the left.
Next, under Devices and drives, you will see the Apple iPhone or [Your Name]’s iPhone. Double click on that.
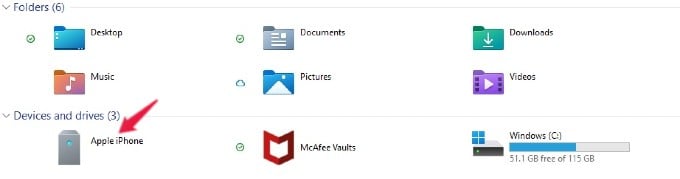
Then, double click Internal Storage followed by DCIM.

Now, you will be on the path This PC> Apple iPhone > Internal Storage > DCIM. Here, you can see multiple folders that contain the images and videos stored on your iPhone.
The folder name will have the format YYYYMM_. For example, if the folder name is 202202_, then it contains all the photos and videos captured in February 2022.
Opening each of these folders will show you photos and videos from the respective month. Simply drag and drop these photos into a different folder on your PC, or simply copy and paste them as you do usually.
This method of transferring photos might come in handy if you want to transfer photos from your iPhone during a certain period.
Related: How to Transfer Photos from iCloud to Google Photos Quickly
Download Photos Directly from iCloud to Windows
Are you someone who stores all or your important photos on iCloud? Then, you don’t even need a USB cable to connect your iPhone and computer for transferring photos.
You can access your iCloud storage from the browser on your computer or you can use install the iCloud app from the Microsoft store. Then, you can download a single photo or all photos from iCloud and store them on your computer. Check out our detailed guide on How to Download All Photos from iCloud to Windows.
Related: iCloud Storage Full? See How to Survive with 5GB iCloud Storage on iPhone Without Paying
Use AirDrop to Transfer Photos from iPhone to Windows PC
Did you know that you can transfer files between a Windows PC and iPhone using AirDrop? Though it is not as smooth as between an iPhone and iPad/Mac, you can still wirelessly transfer photos. Sending photos from your iPhone to Windows is not directly by using AirDrop, but by using SMB, a network file sharing protocol.
To AirDrop files between your iPhone and computer, they need to be connected to the same Wi-Fi network. Plus, your iPhone should run on at least iOS 13 or later.
For the complete steps on how to transfer photos between iPhone and computer, check out our detailed guide on how to AirDrop between iPhone and Windows PC.
FAQ: Transfer iPhone Photos to PC
Yes. Even if you are using a Windows-based computer instead of a Mac, you can import photos from your iPhone by using a USB cable and the Windows Photos app.
If you have backed up your iPhone photos to iCloud, you can directly access that from any browser on your computer. Or you can AirDrop photos between your iPhone and computer using the SMB method.