
There are tons of ways we can share the pictures we take using our iPhone or Android smartphones to our PC or Mac. However, sometimes it will be a pain in the neck when we try to share photos to our computer from the phone or camera without losing its original quality and metadata. If you are looking for solutions on how to send photos without losing quality, here are the best of them.
In this article, we can discuss the best ways to send photos without losing quality, between any devices.
- Use AirDrop to Share Photos Between iPhone and Mac
- Get iPhone Photos on Mac Using iCloud Photos
- USB Transfer Photos from iPhone to PC
- Share Photos from iPhone to Mac/PC over Wi-Fi
- USB Share Photos from Android to Mac/Windows
- Share Photos Between Android and Windows Using AirDrop Alternatives
- Cloud Sharing Platforms
- Use Google Photos Backup
- How to Send High-Quality Photos as Docs on WhatsApp
- Get Photos from Your Camera to Mac/PC
- Tools to Sync Photos from Phone to PC
Use AirDrop to Share Photos Between iPhone and Mac
AirDrop is one of the best, fastest file-sharing services exclusively for Apple devices. This handy feature lets users share files among other iPhone or Mac users without even using a third-party app.
This inbuilt feature on iOS and macOS devices makes use of the Bluetooth and wi-fi in order to identify the nearby Apple devices and share files. You can send high-quality photos from your iPhone to another iPhone or Mac over AirDrop, even with complete photo EXIF and metadata.
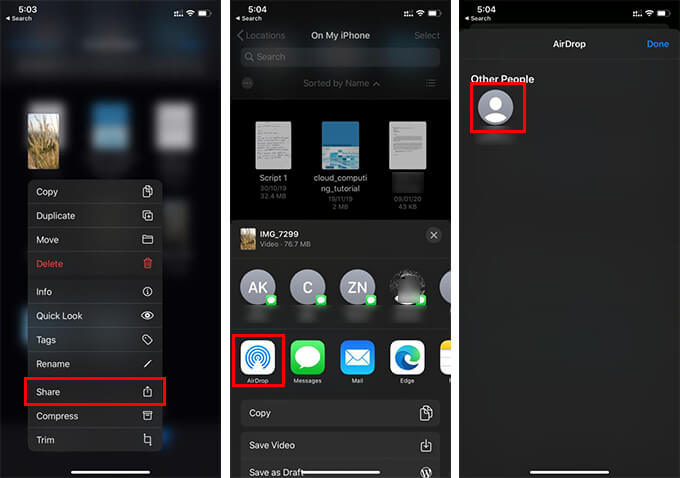
Here is how to send photos without losing quality using AirDrop from the iPhone.
- Turn on AirDrop on our receiving device.
- Open Photos app on your iPhone.
- Select the photo you want to send without losing quality.
- Tap the share button at the bottom left corner.
- Tap the “Options” at the top.
- Enable “Location” and “All Photos Data.”
- Tap Done.
- Choose “AirDrop.”
- Choose the Apple device you want to share the photos, from the window.
- Tap “Accept” on the prompt window on the receiving iPhone or Mac.
In case you cannot find your iPhone or Mac in the AirDrop list, make sure it is enabled and visible in the receiving device. Check out how to enable AirDrop on iPhone.
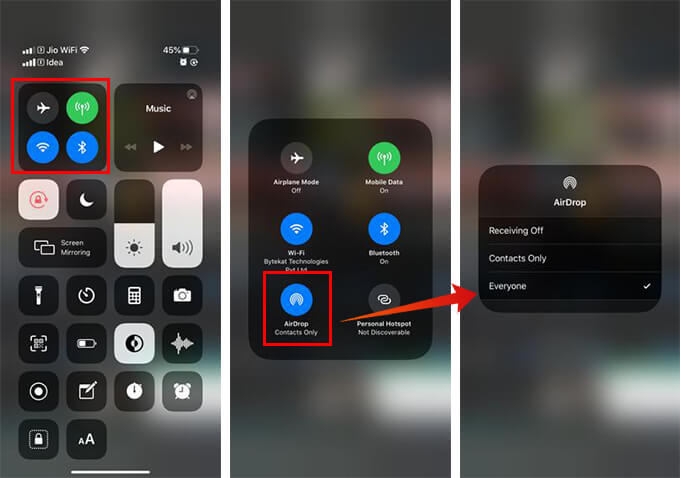
- Open Control Center on your iPhone.
- Long press the connectivity section on the control center.
- Tap the AirDrop icon.
- Choose “Contacts Only.” If the other device is not in your contact list, make sure you choose “Everyone.”
If you are on Mac, follow the steps to enable AirDrop on macOS.
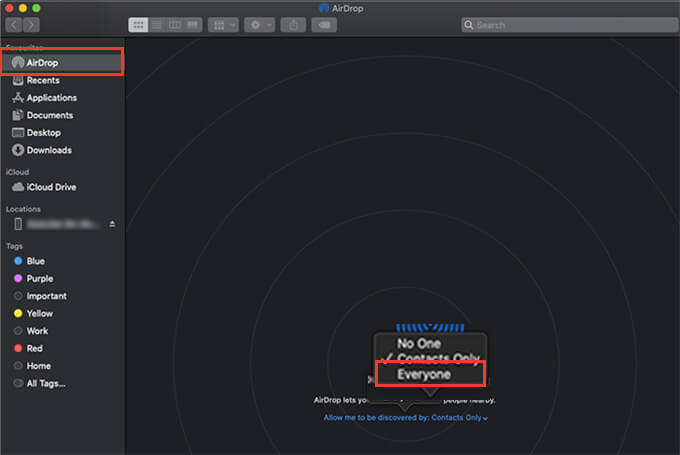
- Open Finder window in your Mac.
- Click the “AirDrop” from the left sidebar.
- Change “Allow me to be discovered by:” into “Everyone” to start receiving from an iPhone which is not in your contact list.
If you only want to share photos without losing quality between nearby Apple devices, AirDrop is the best method for the same.
Get iPhone Photos on Mac Using iCloud Photos
The iCloud services are inevitable parts for Apple devices, which work as the primary cloud backup and storage service for all your data. The iCloud Photos provides the real-time backups of your iPhone’s camera roll and uploads all the images with the highest quality.
Unlike other cloud services, the iCloud stores al the images as if it is stored in your iPhone storage. If our iPhone has iCloud Photos enabled, you can get al the photos taken using your iPhone on your Mac or Windows PC over the internet.
Here is how you can enable iCloud Photos and get iPhone photos on Mac without losing quality.
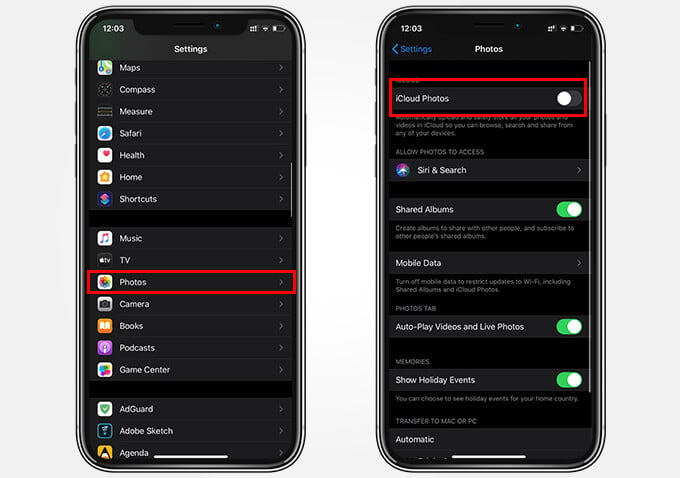
- Open Settings on your iPhone.
- Scroll down and tap “Photos.”
- Toggle on “iCloud Photos” if it is disabled.
Keep in mind that Apple only gives you 5GB of free storage space on iCloud and you will have to pay extra to avail more storage space. However, an iCloud storage is worth paying for, since it can keep all the data as it is on your iPhone itself. After enabling iCloud Photos and backing up all your iPhone photos, you can access the images without losing quality from your Mac or PC. Follow the steps.
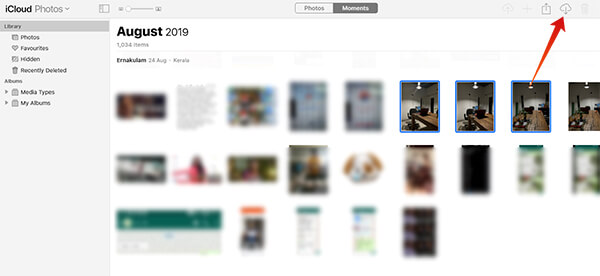
- From any web browser on your Mac or Windows, go to icloud.com.
- Sign in using your Apple ID.
- Click on Photos and you can get photos from your iPhone without losing quality.
You can download photos individually from the iCloud Photos to your laptop at full quality. You can also go through our article if you want to download all your iCloud Photos at once.
USB Transfer Photos from iPhone to PC
Our smartphones can act as a USB storage device when connected to a computer. Therefore, you can make use of this conventional method of file transferring to transfer photos from iPhone to a computer without losing quality. Here is how to USB transfer photos from iPhone to Windows PC easily.
- Make sure your Windows PC has iTunes installed in it.
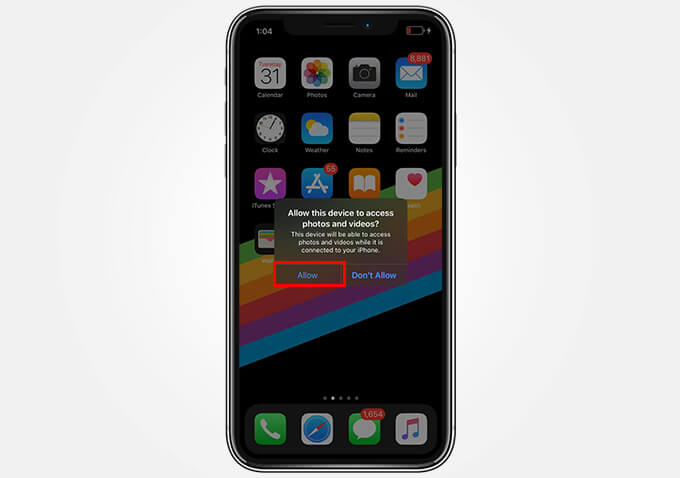
- Connect your iPhone to PC using the USB to Lightning cable.
- Tap “Allow” on the popped up prompt.
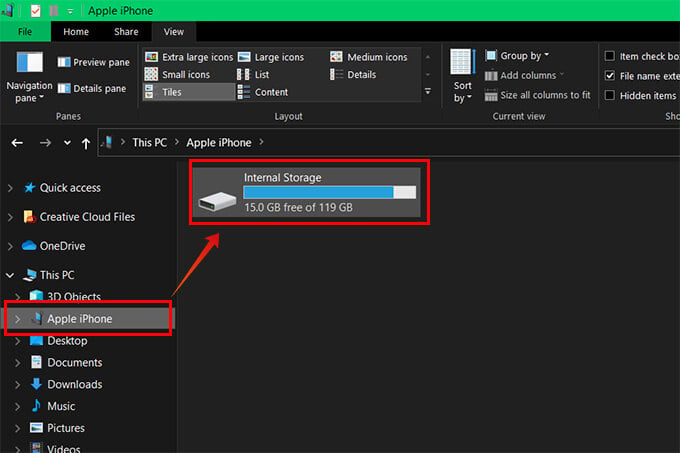
- On your Windows PC, open Explorer window and click “Apple iPhone” from the left side panel.
- Open the folder “Internal Storage.”
- All your iPhone photos will be classified under various subfolders in the “DCIM” folder.
Unlike Android devices, you will only have the read permission for iPhone storage. Which means, you can copy images from the iPhone, but cannot copy anything to the device.
Similarly, on Mac, you can directly connect your iPhone using a USB cable and find the iPhone from the Finder window.
Related: How to Restore Deleted Photos, Videos and Contacts from iCloud
Share Photos from iPhone to PC over Wi-Fi
As discussed above, you can easily transfer photos from iPhone to the computer using a USB Lightning cable. Meanwhile, Apple iTunes or other support tools do not allow wireless data transfer with non-Apple devices.
However, there are various tools that allow Wi-Fi file-sharing support with any device including Android and Windows devices. One of the most popular applications that help to transfer photos from iPhone to PC is Xender. Here is how to share photos from iPhone to PC over Wi-Fi using Xender.
- Install Xender on your iPhone from App Store.
- Connect both your iPhone and PC to the same Wi-Fi network.
- Open Xender on your iPhone.
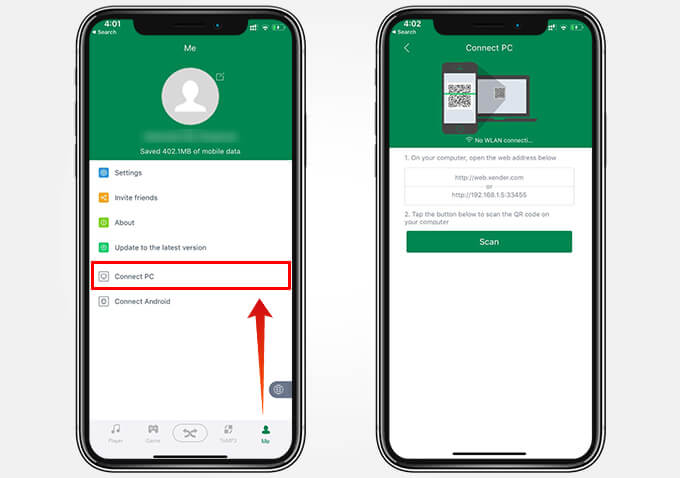
- Tap “Me” from the bottom navigation bar.
- Tap “Connect PC.”
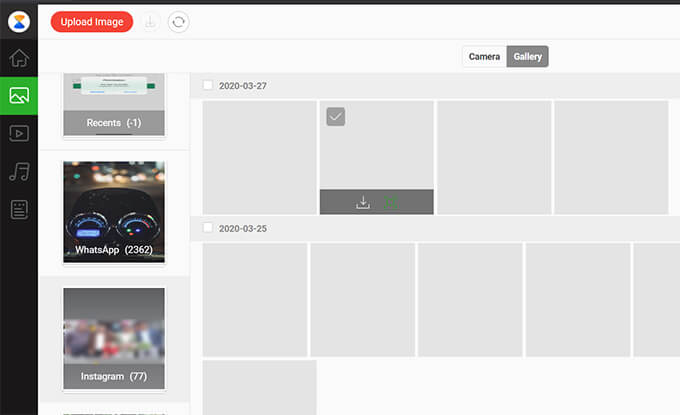
- Type the URL shown in the page on your PC’s web browser (eg. 192.168.1.5:33455).
- Tap “Allow” on your iPhone.
- From the PC Xender web, you can explore and find all the pictures on your phone.
Using the Xender web, you would be able to easily access and get photos from iPhone on PC without internet or a USB cable. You can even send files and photos to your iPhone from PC using Xender.
USB Share Photos from Android to Mac/Windows
You need the iTunes application installed on your PC in order to transfer photos from iPhone without losing quality. Although, Android devices are a little different in this case. You can easily plug your Android smartphone int your Windows PC and in most cases, it auto-detects and installs the Android device driver on its own.
If your system fails to detect your Android phone, all you need is to install the Android drivers from the internet. Here is how to transfer photos from Android to Windows PC and vice versa.
- Connect your Android smartphone to your PC using a USB Cable.
- Choose “Media Transfer Device” or “MTP Device” on your Android device from the USB action prompt.
- Open File Explorer in Windows and find your device under “Devices and Drivers.”
- You can copy files and images from and to the Android device using your Windows PC.
You can also follow the same steps to connect your Android device to Mac and transfer photos at the highest quality.
Share Photos Between Android and Windows Using AirDrop Alternatives
AirDrop is an exclusive feature for iOS and macOS devices to share photos, videos, files, etc. Unlike Bluetooth or another medium, you do not need to go through setup or pairing steps in order to share data between devices. As of now, there is no such exact alternative for Android and Windows users. However, you could get some third-party applications that can replicate the AirDrop functionality.
There are several applications including KDE Connect and Filedrop that can give you an AirDrop-like experience with sharing photos between your Android and Windows PC.
If you want to share Photos between Windows PCs, there is a better AirDrop alternate on the latest Windows 10 updates named Windows Nearby Sharing. Similar to AirDrop, you can find the Windows devices nearby that have enabled the Nearby Sharing receiving. Here is how to share files between Windows 10 PCs using Nearby Sharing.
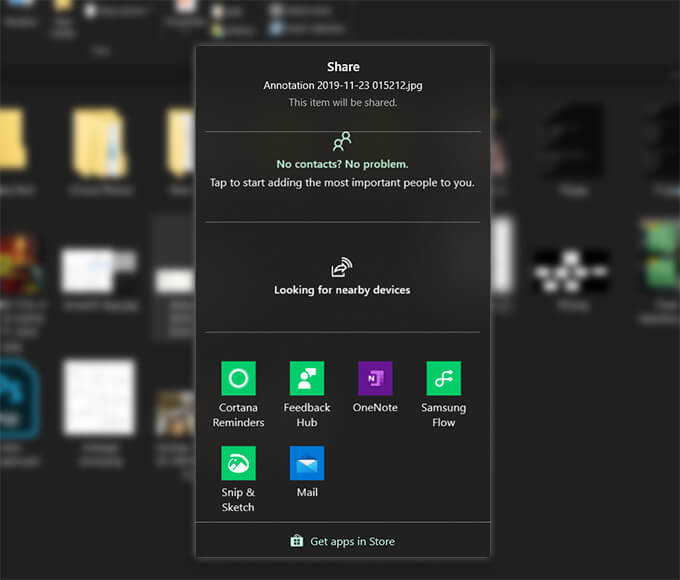
- Open the Notification panel on both of the Windows devices and turn on Nearby Sharing.
- From the sending device, select and right-click the photos you want to share.
- Select the nearby device from the popup window and share it.
The other device has to be a Windows PC in order to send files.
Use Cloud Sharing Platforms
Cloud storage is one of the best ways to send photos without losing quality and original properties. Cloud platforms like Google Drive and Dropbox allow you to take the original backup of your photos and share it with your other devices. However, Dropbox is more focused on the photo-sharing aspect. You can automatically sync all your photos from iPhone or Android with your computer (PC/Mac) over Wi-Fi a well as the Internet. Here is how to enable camera uploads on Dropbox to send high-quality photos from your iPhone to the computer.
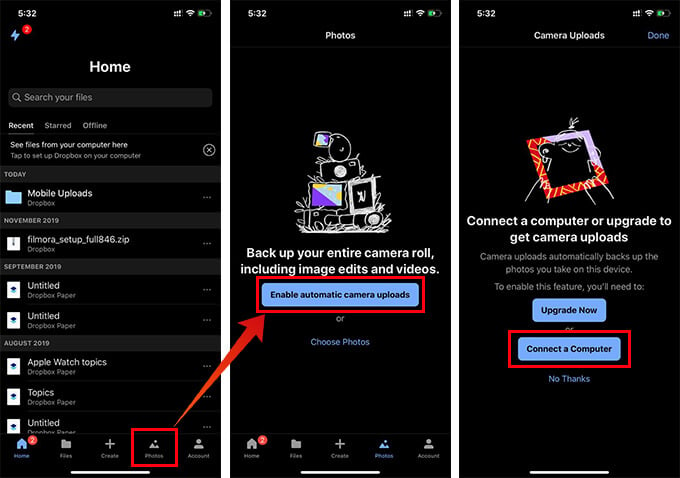
- Install Dropbox on your Android or iOS smartphone.
- Log in using your Dropbox account.
- Tap the Photos tab from the bottom navigation bar on the Dropbox app.
- Tap “Turn on Camera Uploads.”
- Follow the steps and install the Dropbox on your computer from the app on your phone.
- Once you start syncing the Camera Uploads on the Dropbox on your smartphone, all the photos will be automatically added to your dropbox drive.
- While installing a dropbox in your system, you can choose offline storage to get all the photos synced directly to your hard drive.
In case you want to stop auto syncing photos to the Dropbox, you can turn off Camera Uploads from the Dropbox app.
Use Google Photos Backup
Google Photos can backup all your photos at the best quality to your Google account, with unlimited service. You can upload as many photos as you can and access it from any device. However, the unlimited storage backup in Google Photos only backs up a standard size copy of the images, and not at full quality. But if you want to upload images at full quality, you can choose for the same as well. Check out how to backup photos without losing quality on Google Photos.
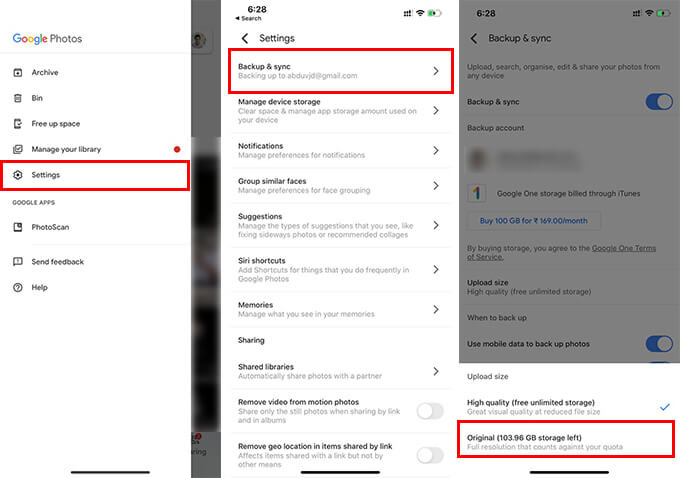
- Open the Google Photos app on your iPhone or Android device.
- Swipe from left edge and tap “Settings.”
- Tap “Backup & Sync.”
- Select “Original” from the “Upload Size” option on the window.
Note that if you are choosing high quality, you can backup and upload unlimited images. However, the original quality pictures will be stored directly to your Google Drive storage and will eat up your allotted space.
How to Send High-Quality Photos as Docs on WhatsApp
Sharing photos through WhatsApp is a real pain for smartphone users. All the images shared through WhatsApp will be compressed into low-quality images. You can never get the full quality image if you share through the WhatsApp. In order to solve this, you have to share the images as documents through WhatsApp. All the EXIF and Metadata of the images will be preserved along with the original pixels when you share pictures as docs.
Here is how to send photos without losing quality from iPhone as WhatsApp docs.
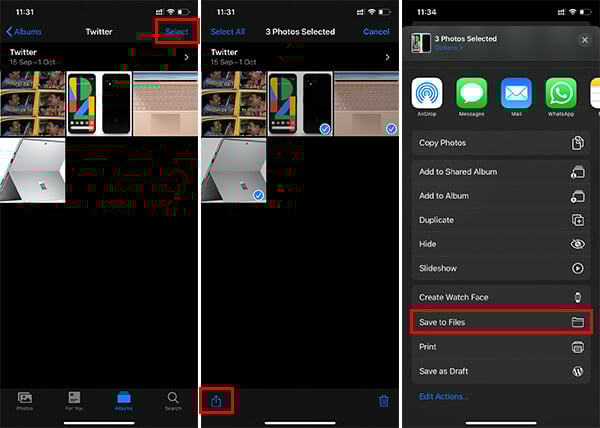
- Open Photos app and select images you want to share as WhatsApp documents.
- Tap the share button at the bottom left corner.
- Choose “Save to Files” from the share sheet.
- Choose a directory and save in your Files app.
- Now go to WhatsApp and open the chat to share images.
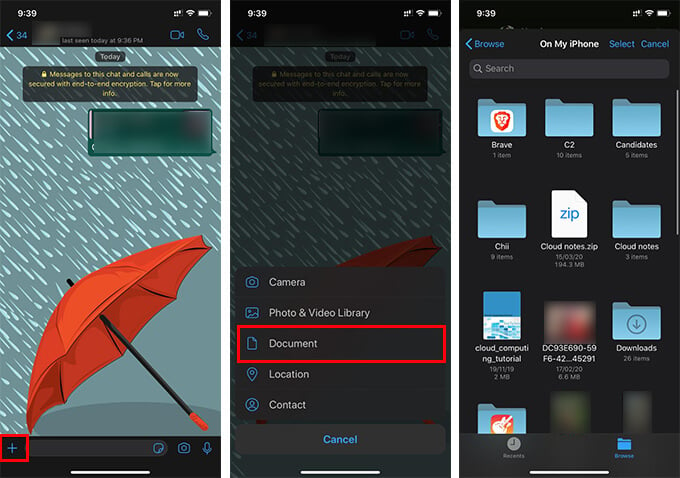
- Tap the “+” icon to the left of the chatbox.
- Tap “Documents.”
- Select images to share as docs and tap “Open.”
- Tap “Send” to share all the images at the highest quality as document files.
If you are an Android user, follow the below steps to send photos as documents on WhatsApp.
- Open the WhatsApp chat and tap the paperclip icon at the bottom.
- Tap “Document.”
- Select the image files to share and tap “Done.”
- If you want to share photos from the camera roll, go to DCIM > Camera directory to see all of your photos.
Get Photos from Your Camera to Mac/PC
Unlike smartphones, digital cameras do not have such third-party apps or inbuilt features to share photos instantly. There are some basic features most of the cameras come with that enables you to get photos from your camera to Mac, Windows, iOS or Android.
You can check your camera’s wireless communication support and use the corresponding app to share photos in real-time to your smartphone or PC. You need to make sure the camera has at least Bluetooth or Wi-Fi to share photos with the connected devices.
Another possible method is to use the data cable to transfer photos from camera to PC or Mac. You can either connect your camera directly to the system using the [rovided USB cable, or connect the SD Card directly to your system to get the data.
Tools to Sync Photos from Phone to PC
There are exclusive photo sharing and syncing apps available for multiple platforms including Android, iOS, Mac, and Windows. Apps like PhotoSync allows you to sync all your photos taken using mobile camera with your PC or Mac realtime.
You can also make use of such apps in order to sync and share photos without losing quality over Wi-Fi. There are various other offline and online methods to transfer photos without losing quality from your iPhone and Android devices. Share your thoughts.