
Google Maps recently updated with a mindblowing feature that lets users plan the hangout destinations with their friends all together. The addition of new feature turns Google Maps from a navigation app to a great planning tool, which does not even need an additional installation if you are on Android.
This guide will show you how to create groups, add more destinations, share with friends, and run polls on Google Maps.
Content
- Create a Group and Add Destinations in Google Map
- Share List with your Friends
- Dismiss the Floating Shortlist Icon
- Rename Google Maps Shortlist
- Delete Google Maps Shortlist
- Remove a Location from the List
- Change Google Maps Shortlist View Mode
Create a Group and Add Destinations in Google Map
Google Maps allows you to create a group of destinations to plan a trip or a hangout with your friends. You can do this from the Google Maps app home screen (Find Vegan and Gluten-Free Restaurants). Here is how to create and add destination groups.
- Open the Google Maps app on your smartphone.
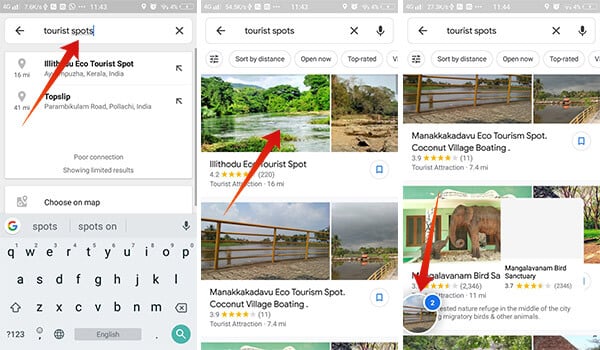
- Tap on the search bar and search for the type of places you want to visit. (For example, Restaurants, Spa, Tourist spots, etc.).
- When the list of locations appears, swipe up and expand to see the entire list of destinations in your area (or a location that you want).
- Touch & hold on your choice of places. The first one will create a list and you can add others to the same list by tap & hold on other locations.
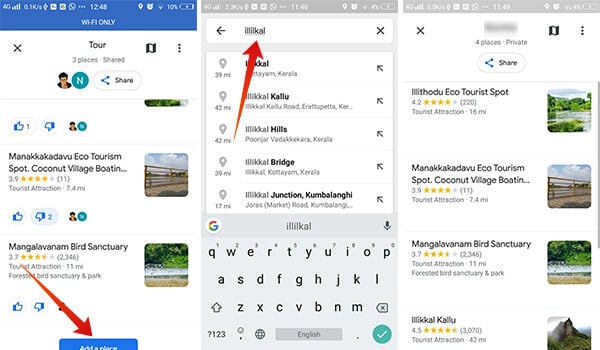
If you want to add another place to the shortlist, which is not in the current search result follow the steps.
- Tap on the floating shortlist button to expand.
- Scroll down and tap the button Add a place.
- Search for the location and choose one from the search preview itself.
- The new place will be now added to your shortlist.
Share List with your Friends
The created list will be visible on the top of the screen in the floating circular head. You need to tap to open it and touch the share button at the top to share links with your friends. They can also join the group to edit, add destinations, vote for the poll, etc. Here is how to share the shortlist to add more friends for polling.
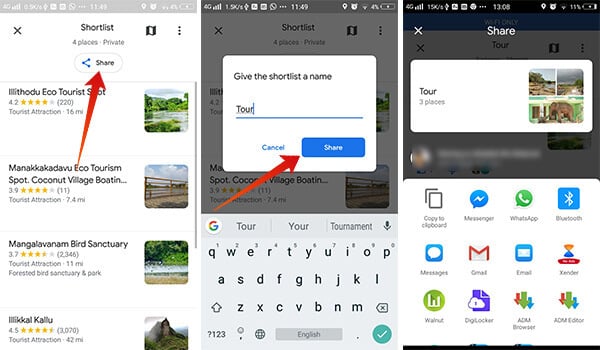
- Tap the floating shortlist icon on the smartphone screen.
- Tap the Share button at the top.
- Provide a suitable name for the shortlist.
- Tap on the share button and you will see the options to share the link.
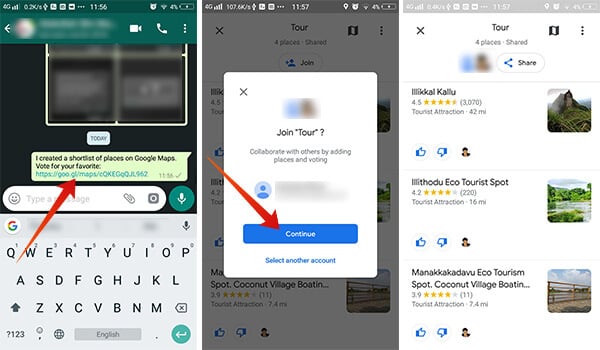
The link to your new shortlist can be shared with any of your friends. When they tap the link, they will be asked to join the group using any of their Google Accounts. The group members can also rename the shortlist, add places, vote, etc.
The Voting method is using like & dislike buttons. Places added by each will be liked by the person itself. It also adds badges to the places that are top upvoted.
Related: How to Share Location With Google Map/Waze/Apple Maps?
The edit access for the shortlists provided to every member and they can even rename the group. Only the person who created the shortlist can delete the entire list. Others can only leave the group. Here is how to edit the group info or delete the entire shortlist.
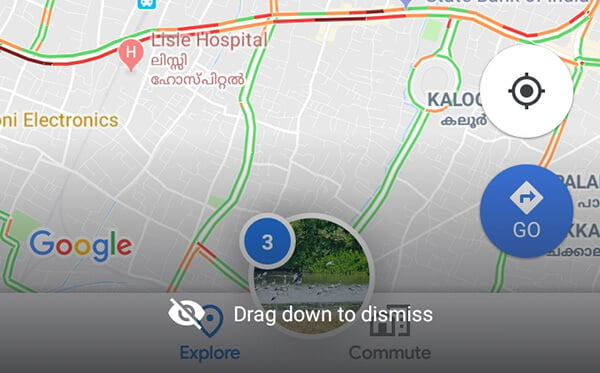
Dismiss the Floating Shortlist Icon
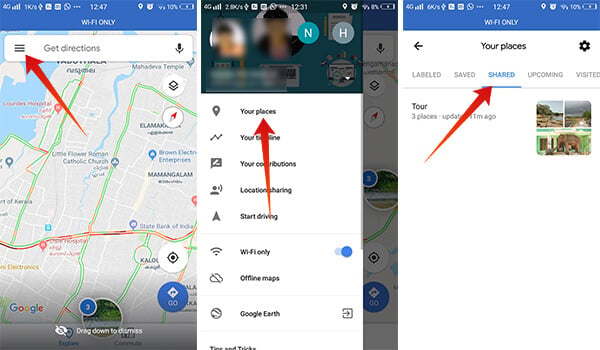
If you want to remove the floating shortlist icon from your screen, you can simply tap and drag it to the bottom edge of the screen. The dismissed lists will be saved in the Maps and you can get back to it later. Once a list is dismissed, you can also create another type of shortlisting instantly. To find the dismissed list, go through the steps.
- Swipe from left to right or tap on the hamburger menu icon.
- Go to Your places.
- Swipe to go to SHARED tab.
- Tap on your list to open and the floating button will be back on your screen like before.
Related: Google Family Link: A Complete Guide to Parental Control on Android
Rename Google Maps Shortlist
You can set a name for the shortlist when you tap on the share button. Only the share window has the option to set a name for your list. Once a name is set, you can easily rename the list.
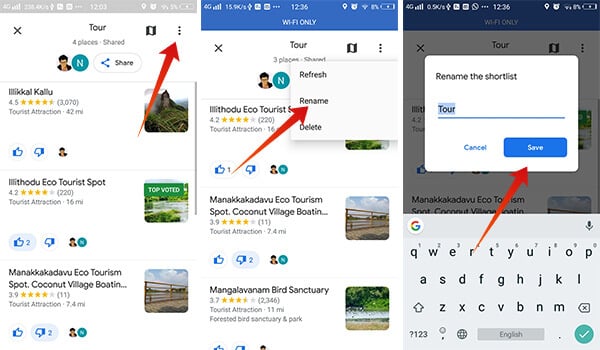
- Open the shortlist and tap on the three dots icon in the top right corner.
- Tap on rename.
- Provide a name and tap Save.
Related: How to Set Google Maps to Remind You to Leave on Time
Delete Google Maps Shortlist
- Touch and expand the shortlist from the floating button.
- Tap on the three dots icon (ellipsis) at the top right corner.
- Tap on delete. There will be no confirmation and you will not be able to recover a deleted list.
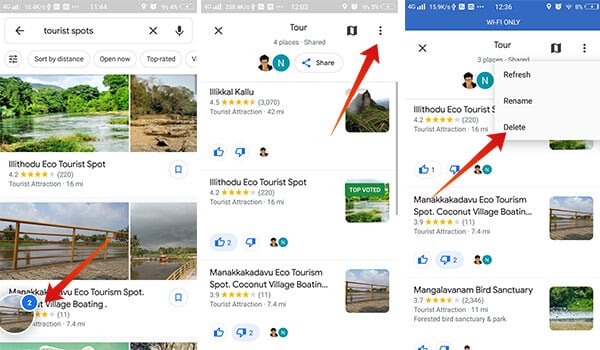
Only the creator of the group/list will be able to delete the entire list.
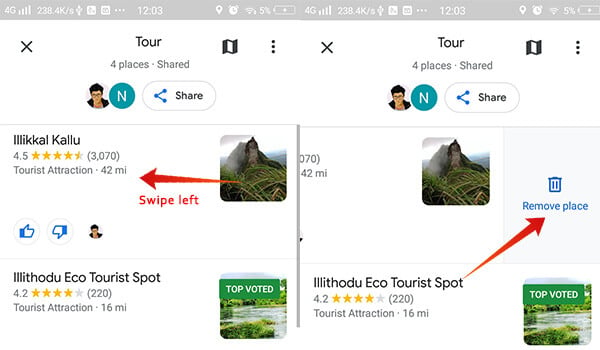
Remove a Location from the List
Unlike deleting the entire list, any members can easily remove a location from the list with a simple gesture. All you need to do is to swipe the location from right to left to find the delete button. Tapping on the revealed button will remove the location from your shortlist.
Change Google Maps Shortlist View Mode
There are currently two view modes available in the Google Maps group planning feature — Ma, and list. You can simply switch between the two. The listview only shows the name of the location, a snippet with the image, overall Google rating, and the distance from your location. On the other hand, the Map view shows the entire details of the location and the spot of the destination on the map.
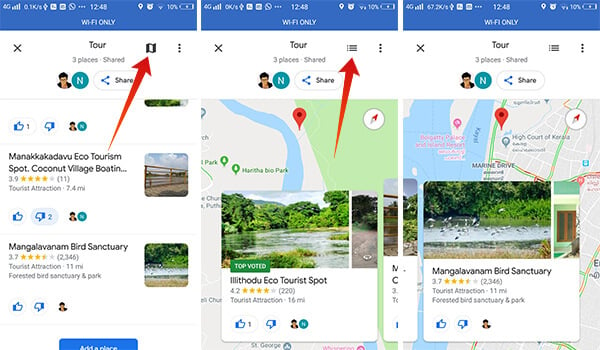
In order to switch between the view mode on the Google Maps group planning shortlist, tap on the Map icon at the top of the list. To revert it back to the list view, you can simply touch the list icon.
The group planning feature has just rolled out many users and many do not know how to use. Hopefully, the article helped you with utilizing the new feature on Google Maps. It is also expected to come with more features in future updates.
Can you export saved list markers to group lists?