
Whether you have just moved from old MacBook to the newer ones, or switched from the Windows platform, the latest MacBook Pro has a pretty bunch of features you should be aware of. The MacBook Pro laptops from Apple are well-equipped with a bunch of hardware to meet the power-user expectations in you. If you are new to Apple’s macOS, things is a bit different here. We are here to make them easier for you.
Follow our guide to get to know about a few of the major things you should keep in your mind after getting your new MacBook. Here are the top things to change after buying the new MacBook Pro.
Content
- Customize the Dock
- Customize Touch Bar Buttons
- Customize Trackpad Gestures
- Speed Up Cursor Movement
- Use Dark Mode
- Setting Antivirus on macOS
- Setup Periodic Backups
- Change Keyboard Press Repeat Delay
- Get a USB Hub for MacBook
- Set up Sidecar with iPad
- Set up Screen Time
- Unlock Using Your Apple Watch
Customize the Dock
The very first thing you notice after switching to the new MacBook Pro is the app doc at the bottom fo the home screen. It is the dock to every opened and pinned apps to switch quickly between the apps. The dock, by default, has a group of apps pinned to it. From there, you can directly open them and switch between other opened apps easily.
Every app that is being opened in the foreground (or even the minimized ones) is listed on the dock. However, if you want to change the behavior of the macOS dock on your new MacBook Pro, follow the below steps.
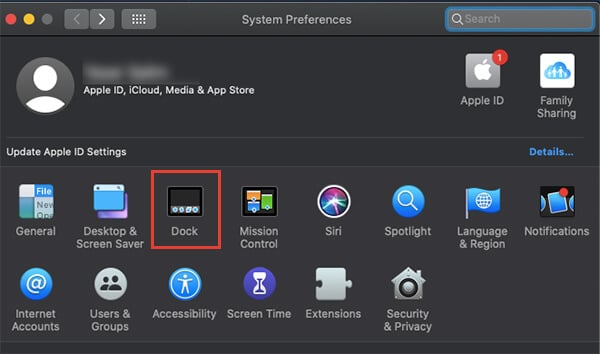
- From your MacBook Pro, click on the Apple logo at the top right corner.
- Choose System Preferences.
- Click “Dock.”
- Drag the “Size” slider to resize the dock at the bottom.
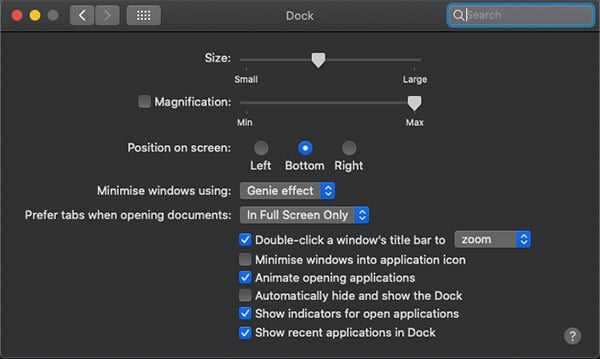
- Check the Magnification option to turn on magnifying the dock items during mouse hover.
- You can also choose the dock position as left, right, or bottom.
- Make use of other available options on the same window to customize the appearance of the Dock on MacBook Pro.
From the below steps, you can also find out how to pin apps to the docks.
![]()
- Open the app you want to add to the Dock.
- Right-click on the app icon from the dock.
- Click Options > Keep in Dock.
The app icon will stay on the dock even after you close the same app. Here is how you can remove the docked app from the macOS dock.
![]()
- Right-click the icon on the dock.
- Choose Options > Remove from Dock.
Customize Touch Bar Buttons
The all-new MacBook Pro models come with the iconic Touch Bar as a default hardware feature. Apple replaced the conventional function key groups on the keyboard with the innovative touch bar, which contains soft buttons depends on the app you are currently in.
From changing brightness to choosing color palettes, there is literally no limitation to what you could do with the stretched Touch Bar on your new MacBook Pro. Here is how you can customize the appearances and default buttons on the Touch Bar on MacBook Pro.
- Open System Preferences by clicking the Apple logo on the top right corner of the Menu bar.
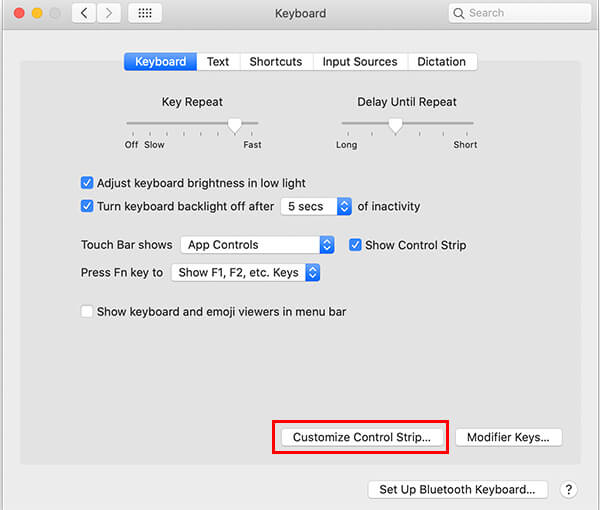
- Click Keyboard.
- Click the button “Customize Touch Bar” at the bottom.
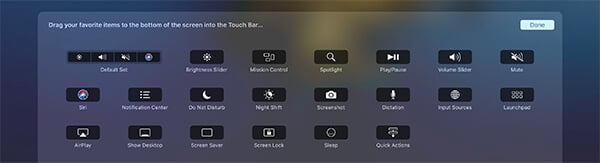
- Drag and drop the buttons you want to add to the default view of the Touch Bar on your MacBook Pro.
- Click Done.
Every app has its own custom set of buttons shown in the Touch Bar. Therefore, if you want to customize the Touch Bar for the specific supported app, go through the following steps.
- Open the supported app.
- Click View from the menu bar.
- Choose “Customize Touch Bar.”
- You will see the list of available control buttons and can choose for your convenience.
You can also drag and move the buttons on the Touch Bar to change their positions while customizing the Touch Bar icons.
Related: How to Check RAM on Mac
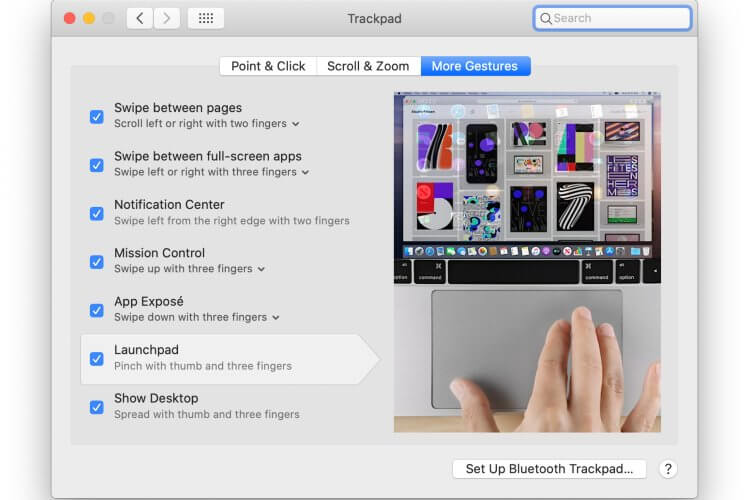
Customize Trackpad Gestures
You can control the trackpad with two fingers and three fingers. These combinations of trackpad controls can speed up your work. There are a bunch of gestures settings you can do on MacBook trackpad to speed up your work. You can switch between pages, App Expose and other gesture controls you can set up with trackpad.
Speed Up Cursor Movement
The larger touchpad on the MacBook gives you plenty of room to work around the device with just one finger without any limitations. Although, many users including me have found it a bit slower than the usual cursor movement rate on Windows or Linux. It is even worse with a larger track, that you have to move your hand a lot to move around the screen. If you too felt so, here is how to speed up the cursor movement of your new MacBook Pro.
![]()
- Open System Preferences.
- Choose “Trackpad.”
- Drag the “Tracking Speed” slider to set the cursor speed of your desire.
Use Dark Mode on Mac
Back in 2018, Apple introduced the Dark Mode for the macOS Mojave. It offers a complete dark mode for the supported apps and system themes, for better viewing without much eye strain. Here is how to use dark mode on MacBook Pro.

- Open System Preferences from your new MacBook Pro.
- Click General.
- Choose “Dark” from the “Appearance” section.
Setting Antivirus on macOS
When it comes to computer viruses, people are misinformed that the macOS is never affected by the virus. This is not entirely true. Only a few malware attacks target Mac users, and the extra security features make it secure to an extent. This does not mean that your MacBook Pro is immune to any kind of virus attack. There can be silent malware or adware attacks that might enter your Mac through third-party apps installations.
Like Windows OS, there are also several antivirus programs available for your Mac to detect and remove possible threats. Even though the built-in security features on Mac helps to stop the attacks on the bay, we recommend you to analyze your MacBook with some other tools as well. You can check some of the popular antivirus apps for macOS.
- AVG
- Avast
- Kaspersky
- Bitdefender
Setup Periodic Backups for MacBook
Well, we all are afraid of data loss in all of a sudden from our daily drivers. In case your Mac fails to boot, you are at the risk of losing all your data, and will be unable to recover them back. To avoid such situations, keep the matter of backing up critical data to an external drive in mind.
The Time Machine feature on MacBook is to create periodic backup disks of your Mac to an external hard drive, USB Drive, or a Thunderbolt storage device. You can even use network storage locations, or even another Mac as the backup destinations to save the backup images.
Here is how to set up Time Machine backups to an external drive on MacBook Pro.
- Connect a USB Drive or External HDD/SSD to your MacBook.
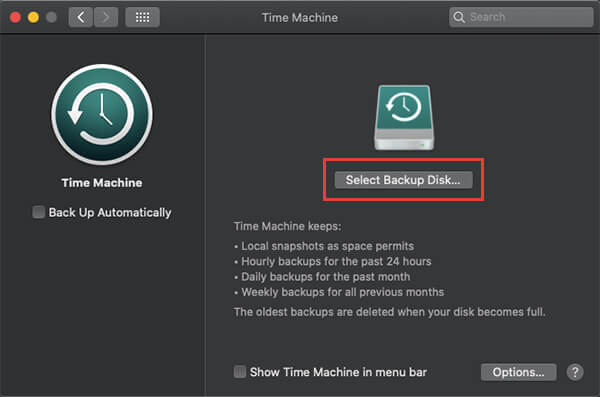
- Open System Preferences > Time Machine.
- Click “Select Backup Disk.”
- Choose your drive and start backing up the snapshot of your Mac.
- Check the option “Back Up Automatically” to schedule an auto-backup to the external drive.
- Choose the period and time schedule to backup the Mac data.
Once the drive gets full, it will automatically remove the older backups and add newer versions of your MacBook. Thus, you can get all the data back from any restore point available on your external backup drive.
Change Keyboard Press Repeat Delay
When you press and hold a key for a few seconds, the key action will repeat until you release it. The speed of repeating the key action can be altered on your Mac so that you can do things faster or slower, as per your wish.
Suppose you want to delete the text characters much faster than the usual, you need to press and hold the delete key. If the speed is not that enough for you, go and change the repeat delay as mentioned below.
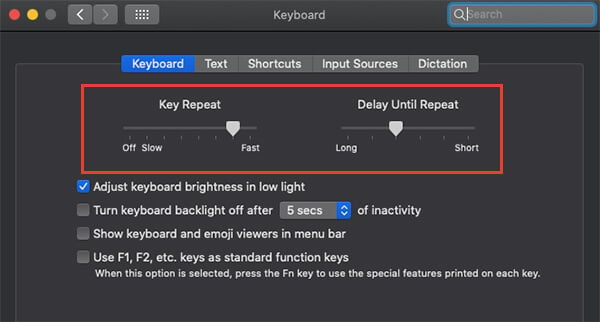
- Click Apple logo > System Preferences.
- Enter the “Keyboard” option.
- Click and drag the “Delay Until Repeat” slider towards the left or right to change the repeat delay.
Get a USB Hub for MacBook
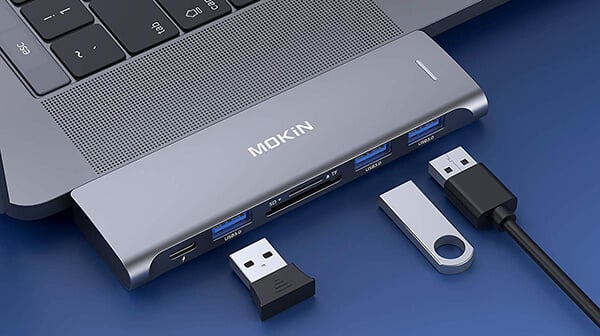
Apple is no more selling the MacBook models with standard USB 2.0/3.0 ports. Instead, all they have now is the USB Type-C which is way universal than we think it is. Your new MacBook Pro uses the same USB Type-C ports to plug the charger, connect external devices, storage, and even secondary display.
Due to this reason, you might not be able to use all of the ports at the same time, and even the number of USB ports is not even enough for many of us. The solution for this is to get a compatible sleek USB hub, which will double the number of USB Type-C ports in your MacBook Pro. Also, you could get some conventional ports on the hub itself including HDMI, SD Card slot, etc. Here are some.
- Dodocool USB C Hub Adapter for MacBook
- Mokin USB C Hub Adapter for MacBook Pro
- USB C Hub Adapter for MacBook Pro
Set up Sidecar with iPad
One of the biggest addition by the company with the macOS Catalina is the Sidecar feature, which lets you use your iPad as the secondary monitor for your MacBook. You can connect your iPad through the wire or even wirelessly to the MacBook Pro of yours and move windows to the iPad just like a secondary screen. Follow the steps to use your iPad as the second screen for MacBook Pro using Sidecar.
- Open System Preferences in your MacBook Pro.
- Click SideCar.
- Choose your iPad from the available devices and connect.
- If your device is not found, click the AirPlay icon on the menu bar of your Mac and connect with your iPad.
- Now hover the mouse pointer over the maximize button on any window and click “Move to Your iPad.”
- You will then see the same window on your connected iPad and can use the MacBook to control the same.
If you want to know more about using the iPad as a secondary screen, do check out our detailed guide.
Related: 12 Best MacBook Pro Cases For 13, 15 & 16 Inch Models
Set up Screen Time
Screen Time is a part of Apple’s digital wellbeing suit for its users, which was initially released for iOS users. You can now use the same on your MacBook as well. It enables you to set usage restrictions and time limits for apps as a daily routine. You will be blocked from accessing apps and wasting your time too much on the device, based on the time limit you set. We have a detailed article based on Screen Time for Mac. Here is a quick recap of it to use on your MacBook Pro.
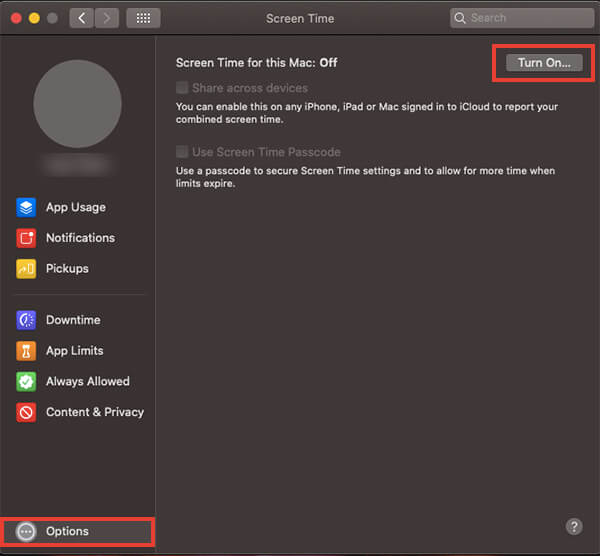
- Open System Preferences > Screen Time on your Mac.
- Click “Options” from the left pane.
- Check the Status of “Screen Time for this Mac.”
- Click the “Turn On” button if the status is “Off.”
Unlock MacBook Using Apple Watch
Are you an Apple Watch user too? That’s cool. You can unlock your Mac without using the passcode, but just by using your Apple Watch on your wrist. Follow the steps to connect and unlock your MacBook using Apple Watch.
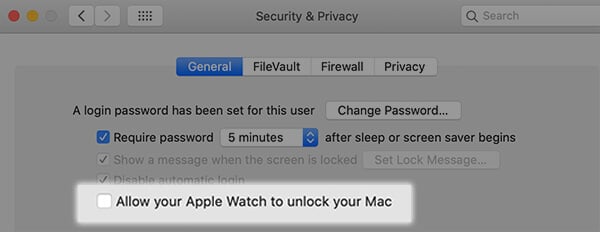
- Open the System Preferences >Security & Privacy from your MacBook Pro.
- From the General tab, check the option “Allow your Apple Watch to unlock your Mac.”
- Choose your Apple Watch and allow unlocking without the passcode.
You can also go through our detailed guide article to unlock MacBook using Apple Watch here.
If you are just getting started with your new MacBook Pro, try all the abovementioned tips to get the best out of it.